
How to Texture a Wall With a Roller (What Went Wrong and How I Fixed It)
Let’s begin with what went wrong. It’s a little awkward to admit, but it is the most valuable part of this. If you’re going to be texturing walls for the first time, my error will save you a lot of frustration, and a wall that doesn’t resemble what you’re aiming for.
We were keen to give the living room walls texture. They’d been boringly flat white for ages, perfectly acceptable but with absolutely no personality. I’d been thinking about textured walls for a while – the ones that change in the light during the day, making a room feel full of depth and age instead of being merely four walls and a ceiling.
I did my research, purchased everything I needed, and optimistically began on a Saturday morning.
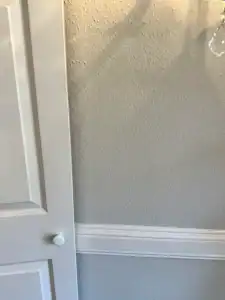
By twelve o’clock, one wall was perfect and the other looked as if someone had applied the texturing, had a crisis, and then attempted to fix it. Which, actually, is exactly what I’d done.
The issue was how long it took to dry. I’d spread the texture on too big an area at once and by the time I got back to it with the roller, it had begun to harden. This caused a mottled, bumpy effect, with some bits still pliable, and others already set in a way that more rolling won’t fix.
I halted, stared at it, and rang my father-in-law – he’s done far more wall work than I ever will. He confirmed my fear: I had been too slow on an overly large portion. He told me to begin with smaller sections, to work quickly inside those sections, and then to move on.
The second wall was lovely. Walls three and four were fine, too. The first wall needed another coat to smooth everything out – and this did work, but meant an extra day of work I hadn’t factored in.
Here’s all I discovered, and something that people don’t usually tell you.
What You Actually Need
First, let’s get the materials sorted.
You’ll need all of them, not just the ones you might think are a good idea.
Texture compound, which people also refer to as joint compound, drywall mud, or textured paint (the name changes with the product and store) is next. If you are rolling on the texture, the pre-mixed kind is simpler to use than powder you have to mix up yourself. It should be as thick as yogurt, so you can easily spread it but it won’t be too liquid.
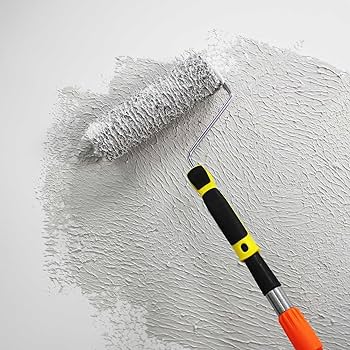
For a roller, you won’t get a texture with a normal smooth one. You have to get one with a design or lots of little bumps in the roller cover, and it’s made for texture. Lambswool or foam rollers with a bumpy surface are what most people use. What the texture will look like when it’s done is different for each roller, so have a look at the sample before you buy.
An extension pole is really important. It allows you to reach the higher parts of the wall without a ladder getting in the way of your flow. With texture, you want to be able to move your arm smoothly all the time, and any break in that movement will be obvious in the finished wall.
You’ll need a wide tray, much wider than for normal paint. This is so you can get the roller coated with the texture compound evenly.
Painter’s tape is for the line where the ceiling meets the wall, around the baseboards, and on any trim. Textured compound is a lot harder to scrape off the ceiling than paint!
And, you should use drop cloths. Texture compound splashes around a lot more than paint, so cover absolutely everything.
Finally, have medium-grit sandpaper on hand to smooth over any spots that don’t dry evenly, before you go on with another layer of texture or paint.
Preparing the Wall
This step is not optional and I say that as someone who has been tempted to skip it.
Clean the surface. Dust, grease, anything on the wall will affect how the compound adheres. Wipe down with a damp cloth and let it dry completely.
Fill any holes or cracks. Texture amplifies imperfections rather than hiding them — a crack in the wall will still be visible after texturing, just with texture around it. Fill, sand smooth, let dry.
Prime if needed. New drywall or walls that have never been painted need primer first. Previously painted walls in good condition can usually skip this step, but if the existing paint is glossy, sand lightly first to give the compound something to grip.
Apply painter’s tape. Take your time with this. The ceiling line especially — texture compound is thick and doesn’t behave as precisely as paint at edges.
How to Actually Do It
Mix the compound
If using pre-mixed compound, stir it thoroughly before use. It settles in the container and the consistency at the top is different from the consistency at the bottom. You want it uniform throughout.
If it seems too thick, add a small amount of water and stir again. Too thin and it won’t hold the texture. Too thick and it won’t spread evenly. The yogurt consistency is the target.
Work in small sections
This is the lesson I learned the hard way.
Work in sections no larger than roughly one metre square at a time. Apply the compound to that section, work it with the roller, then move to the next section. Do not apply compound to a large area and then go back to work it — by the time you return to the first section it will have started to dry and the texture will be uneven.
One section at a time. Completely. Then the next.
Apply the compound
Use a wide brush or trowel to apply the compound to the wall section in a rough, even layer. It doesn’t need to be perfect at this stage — the roller will work it. Aim for about 3-4mm thickness. Thicker than you think, thinner than instinct suggests.
Roll the texture
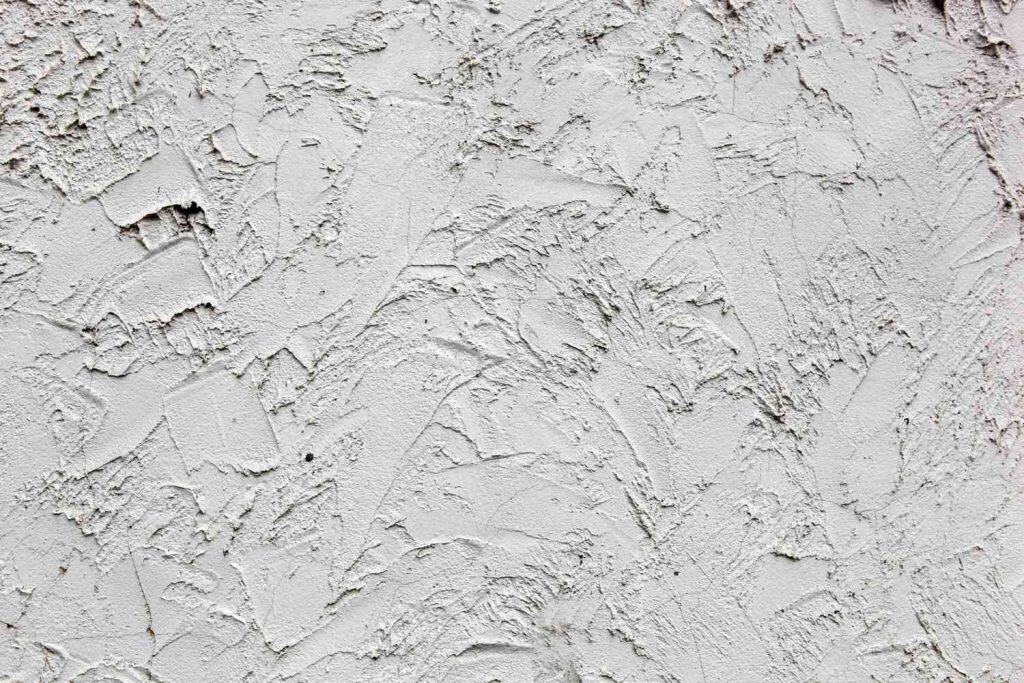
Don’t put much of the texturing material onto your roller, unlike how you’d fill a paint roller, and roll it across the filling in the way you want the raised design to go. You can go up and down, side to side, or in a completely mixed way, depending on the style you’re aiming for.
The roller makes the pattern by gently stretching the filling as it rolls. And this is where how thick or thin the filling is becomes important: if it’s too powdery, it won’t stretch at all, but if it’s too runny, it’ll stretch too far and fall back on itself.
First roll in one direction. Then, if you’d like a more uneven, lifelike effect, lightly roll over what you’ve done in the opposite direction. For a smoother, more even effect, just continue in the original direction.
Within each area, you need to be fairly speedy. The time between putting the filling on and it getting too dry is surprisingly short – about ten to fifteen minutes, give or take, depending on how warm and humid it is. In a hot room during summer, it will be even less than that.
Leave it alone
Once a section is textured, do not go back to it. The temptation to fix small imperfections while it’s still wet usually makes them worse. Let it dry completely — at least 24 hours — before assessing.
What looks uneven when wet often looks fine when dry. What looks fine when wet occasionally looks wrong when dry. You won’t know until it’s fully set, which is why you leave it.
The Drying Problem and How to Avoid It
Because this is what went wrong for me and what is most likely to go wrong for you.
Texture compound dries faster than you expect. Faster in warm weather. Faster in dry conditions. Faster when you’ve applied it in a thin layer rather than the recommended thickness.
Signs it’s drying too fast:
- The surface starts to look matte rather than slightly shiny
- The roller starts to drag and pull rather than move smoothly
- The compound starts to lift rather than compress when you roll over it
If any of these happen, stop rolling that section immediately. Continuing will make it worse. Let it dry completely, sand lightly, and apply a second thin coat over the problem area once everything is fully dry.
How to slow the drying: Work in a cooler part of the day if possible — early morning rather than midday in summer. Keep windows closed while working to reduce airflow. Work in smaller sections than you think necessary.
The rule I now follow: if I think a section is the right size, I make it smaller.
After It Dries
If you find any spots that are bumpy or not smooth, rub them with medium-grit sandpaper. Don’t push too hard; you’re just softening the high points, not taking all the texture away.
After you’ve sanded, get rid of the dust with a damp cloth and be sure to allow the wall to dry through and through before painting.
When you paint the textured surface, use a roller with a slightly fluffier cover than you normally would for a simple flat wall. The texture requires the paint to get into all the dips, plus on top of the raised parts. Apply two layers of paint so it’s fully and evenly coloured.
A wall with texture will look different depending on the light, appearing one way in the morning, and another in the evening. That’s precisely what we were aiming for in the living room, a wall that does more than just be a colour. It needed two tries on the wall to get it right, and one error to realise what had gone wrong.
However, it was a good use of time.
Alternative Way to Do It (Which I Don’t Quite Get Exactly But You May Do It Better Than Me)
A Final Thought
You’ll likely make mistakes on your very first attempt, and with doing texture to walls, which is pretty straightforward in how you do it, getting the when of it right isn’t so easy.
Don’t rush getting everything ready, but actually applying the texture should be done fast. Work on bits of wall at a time, and then after you’ve applied it, just leave it!
The living room is totally changed. The furniture is the same, the rug hasn’t changed, the lights are as they were, yet the walls now have a dimension they didn’t before, and because of this the room feels much more intentional.
That’s my experience. If you’ve textured walls and have a trick I haven’t shared, or if you had the same problem with drying as I did, then tell us about it in the comments. What didn’t work is almost always the most helpful thing in any article about doing it yourself.
Until next time,
Stay safe,
Tasos
I’m Anastasios Moulios, co-founder of DIY Cozy Living. I enjoy finding creative, practical ways to make small spaces feel warm, stylish, and lived-in. I started this blog with Katerina to share real ideas that make a home feel a little more personal and a lot more comfortable.
