
The Smartest IKEA Hacks for Small Spaces (Storage-first, Designer Results)
Living small doesn’t mean living cramped. With the right IKEA hacks you can turn tiny rooms into calm, organized, beautiful spaces that function like a dream. IKEA furniture is affordable, modular, and—best of all—easy to customize.
Below are 10 high-impact IKEA hacks that solve common small-space problems (lack of storage, awkward nooks, no closet, limited floor area) while looking polished and Pinterest-ready.
I researched the best community-tested hacks, design blogs, and practical how-tos so every idea below is battle-tested and realistic. Where it helps, I add exact measurements, budget ranges, and pitfalls so your reader can actually do the hack.
(Top sources used: IKEA Hackers and specialist home sites for technique inspiration and examples).
How to use this article
Each hack follows this mini-template so you can jump straight to what you need:
- What it is (quick summary)
- Why it’s perfect for small spaces (problem it solves)
- How to do it (clear steps)
- Materials + Budget (realistic ranges)
- Measurements & tips (what to measure and avoid)
- Style/variation (ways to personalize)
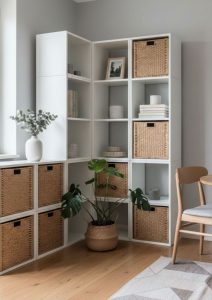
Hack 1 — KALLAX Bench with Hidden Storage & Seating
What it is: Turn a KALLAX cube shelving unit into a built-in-looking bench with cubby storage, cushion seating, and optional drawer baskets in the cubes.
Why it’s perfect: KALLAX gives enormous cubic storage for its footprint—ideal in tiny bedrooms, entryways, or under windows. It provides both seating and hidden storage (dual use = smallspace win). Community examples show dozens of creative KALLAX conversions.
How to do it:
- Select KALLAX size (2×2, 2×4, 4×4 depending on wall length).
- Build a simple plywood top (¾” pine or birch) sized to overhang the front ½”–1″. Sand and finish or paint to match room color.
- Add foam cushion (1.5–3″ thick) and wrap with upholstery fabric; staple underneath the plywood.
- Insert baskets, doors, or drawers in lower cubes for hidden storage. Optionally add hairpin legs for an airy look.
Materials + Budget: KALLAX unit $40–$200 (size dependent), plywood $15–$60, foam + fabric $30–$80, baskets $10–$40 each → Total est. $100–$400.
Measurements & tips: Measure the wall height + toe-kick clearance so the bench doesn’t block heating vents. If used as a window seat, ensure the top doesn’t press against the window sill when opening.
Pitfalls: Don’t overload cubes vertically—attach unit to the wall studs for safety. If you want a seamless built-in look, paint the KALLAX and wall the same color.
Style/variation: Add flap doors for a mini-closet, add a cushion with storage zipper, or hack in charging ports inside a cube for a phone-station bench.
Hack 2 — MALM Dressers Reworked as Built-In Storage (Trim + Top)
What it is: Group 2–3 MALM dressers, add trim and a continuous wood top to create a “built-in” dresser that looks custom and saves floor space. Popular DIY blogs show this transforms a standard dresser into a designer feature.
Why it’s perfect: In very small bedrooms where closets are tiny or non-existent, stacked/paired dressers can replace wardrobes while offering deep drawer storage. The built-in aesthetic also visually integrates storage so it reads as architecture, not furniture.
How to do it:
- Push MALM units together and anchor to studs.
- Cut and attach MDF or plywood filler boards to close gaps and create a continuous façade.
- Apply trim/molding around drawer fronts and frame to simulate custom millwork.
- Install a thicker wood top (maple or walnut veneer) and secure with screws through the dresser tops.
Materials + Budget: MALM dresser $80–$199 each, trim/MDF $40–$150, wood top $50–$200 → Total est. $200–$800 depending on number of units and finishes.
Measurements & tips: Measure drawer clearances and hallway width for delivery. If your bedroom is narrow, use shallow dressers; MALM comes in several depths—choose the shallowest for very tight rooms.
Pitfalls: If your floor is uneven, dressers can rock—use shims or levelers before final anchoring. Avoid DIYing if you’re renting and can’t anchor walls—use anti-tip straps instead.
Style/variation: Replace knobs with leather pulls for a custom look; paint the whole unit a tone-on-tone color that matches the wall for a built-in effect.
Hack 3 — PLATSA Modular Closet System for Nooks & Odd Layouts
What it is: Use PLATSA frames to build modular, wall-to-wall or floor-to-ceiling closets that fit odd angles and small alcoves. PLATSA’s flexibility makes it perfect for custom-looking wardrobes on a budget. Community shows PLATSA as a go-to for tight bedroom makeovers.
Why it’s perfect: PLATSA’s modularity solves one of the biggest small-space problems: awkward and unusable nooks. It lets you configure wardrobes to the exact width and height you have.
How to do it:
- Measure the wall/alcove precisely.
- Choose PLATSA frame heights (all the way up to ceiling if needed) and select combinations of drawers, doors, and shelves.
- Assemble per IKEA instructions and secure to studs.
- Optionally face with trim or build a simple frame to make it look built-in.
Materials + Budget: PLATSA modules vary but expect $200–$800 for a modest closet; adding doors and drawers increases cost.
Measurements & tips: PLATSA is ideal for sloped ceilings—use shorter frames or cut panels to fit. For a polished look, use matching trim or a flush toe kick.
Pitfalls: PLATSA doors need clearance—measure swing and adjacent furniture. If renter, use removable cover panels or freestanding configurations that don’t require permanent wall modifications.
Hack 4 — BILLY Bookcase to Multi-Function Wall (Desk + Storage)
What it is: The BILLY bookcase is a classic because it’s cheap and infinitely hackable.
Convert BILLY into a compact home office by adding a fold-down table (or built-in foldout desk), upper cabinets, and adjustable shelves. New IKEA BILLY variants even include foldable desk features in recent product launches.
Why it’s perfect: It solves the “no office” problem in studio apartments—your desk + bookshelf in one vertical footprint.
How to do it:
- Mount two BILLY bookcases on either side and leave a central gap sized for a desk surface.
- Use a fold-down tabletop (or a single shelf with brackets) as the desk surface.
- Add LED strip lighting under shelves for task light.
- Use baskets and boxes on lower shelves to hide clutter.
Materials + Budget: BILLY units $35–$80 each, tabletop $20–$100, brackets/lighting $20–$100 → Total est. $100–$300.
Measurements & tips: Desk height ~28–30″ comfortable for most desks. Ensure the bookcases are anchored to prevent tipping while using the desk.
Pitfalls: Don’t overload the fold-down surface; use sturdy brackets. Consider cable routing—drill discreet holes at the back for power.
Style/variation: Install a pegboard inside bookshelf side panels to hang supplies, or add doors to hide the office when guests arrive.
Hack 5 — RÅSKOG Utility Cart: Mobile Storage for Every Room
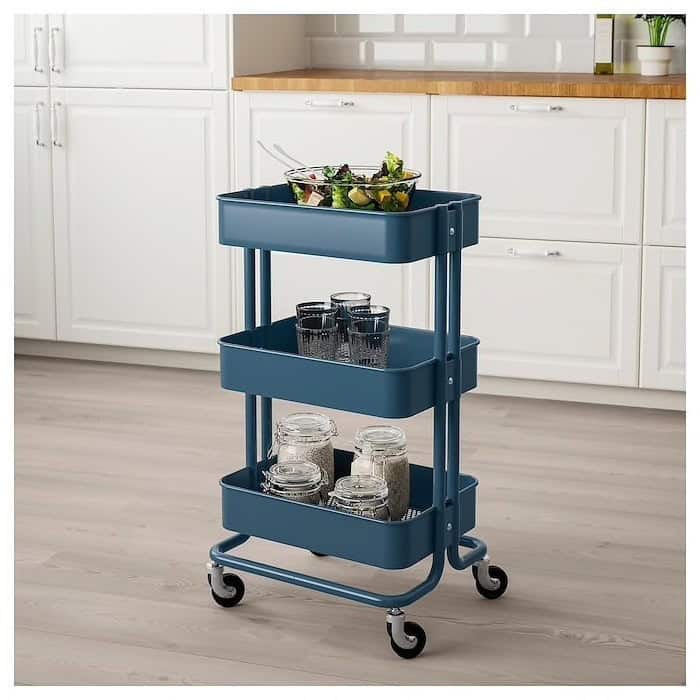
What it is: The RÅSKOG utility cart is a three-tier rolling cart that can be adapted into a bathroom cart, craft station, mini bar, kitchen island, or bedside organizer. It’s one of IKEA’s most hackable small-space heroes.
Why it’s perfect: Mobility + vertical storage = an instant solution for tight spaces. You can tuck it away, roll it under counters, or park it in a closet.
How to do it:
- Paint or powder-coat the cart for a custom color.
- Add baskets, dividers, or removable organizers.
- Attach hanging hooks or magnetic strips to the sides.
- Add a faux marble contact paper to shelf surfaces for a luxe look.
Materials + Budget: RÅSKOG cart $25–$60, paint/supplies $10–$50 → Total est. $35–$110.
Measurements & tips: RÅSKOG dimensions are narrow—great for between appliances or beside toilets. Ensure wheel locks engage to prevent rolling on sloped floors.
Pitfalls: Don’t overload top tiers with heavy items if cart height becomes top-heavy. Use for lightweight, frequently used items.
Style/variation: Convert to a portable nightstand with books, lamp, and charger; or a makeup trolley with acrylic organizers.
Hack 6 — KALLAX as Dresser or TV Unit (Cubes with Drawers & Doors)
What it is: Use KALLAX horizontally as a low dresser, TV stand, or room divider with fabric drawers or inserted doors for concealed storage. KALLAX enjoys endless variations and remains a top hack for small rooms.
Why it’s perfect: It opens the possibility of visible + hidden storage with a small footprint. When placed behind a sofa it doubles as a console for lamps, baskets, and charging stations.
How to do it:
- Place KALLAX horizontally at desired height.
- Insert KONMARI-style boxes or fabric drawers in cube holes.
- Add sliding doors or custom plywood doors if you want a cleaner façade.
- Anchor to the wall if used as a baby barrier or room divider.
Materials + Budget: KALLAX $40–$200, fabric drawers $10–$30 each → Total est. $80–$400.
Measurements & tips: Measure TV width and KALLAX depth to ensure stability and correct cable routing. Use anti-tip hardware if kids are in the home.
Pitfalls: Thick TVs can sit unstable on thin KALLAX units—use a proper TV mount or thicker top.
Style/variation: Add rounded corners with routered plywood top for a Scandinavian bench/console.
Hack 7 — Under-Bed Storage Using BRIMNES or NORDLI
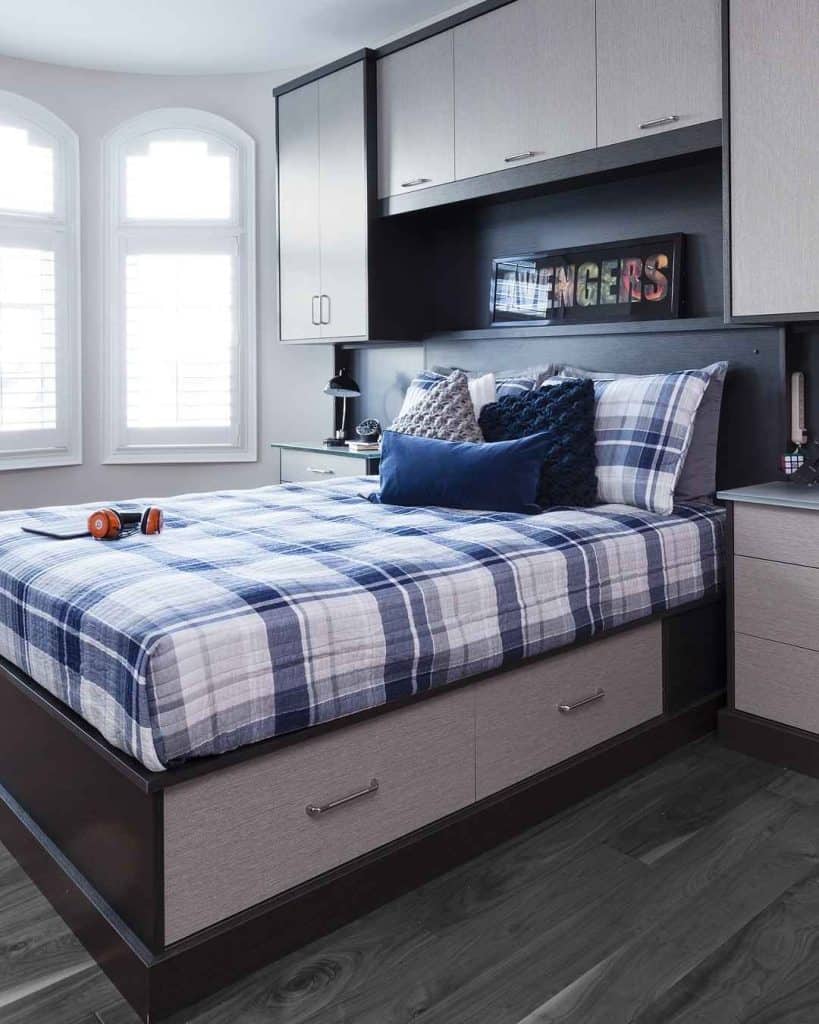
What it is: Convert BRIMNES bed frames (with built-in drawers) or NORDLI drawer units under a platform bed for massive bedroom storage without adding closet bulk.
Why it’s perfect: Bedrooms often lack storage; using the under-bed vertical space solves seasonal storage, linens, and out-of-season clothing problems.
How to do it:
- Choose a bed frame with drawers (BRIMNES) or create a platform atop NORDLI units.
- Use clear bins inside drawers for organization.
- Label bins and use dividers to separate items.
Materials + Budget: BRIMNES bed frames $199–$399, NORDLI units $200–$600 → Total est. $200–$800.
Measurements & tips: Measure mattress thickness + drawer clearance. Ensure drawer access on both sides if needed.
Pitfalls: Don’t block built-in heating vents. If using storage under a sofa bed, ensure drawers don’t catch when bed is extended.
Hack 8 — LACK Shelf Space Maximizer: Floating Nightstand + Mini Desk
What it is: The LACK wall shelf is cheap and can be used as a floating nightstand, tiny desk, or media shelf—freeing the floor from bulky furniture.
Why it’s perfect: Floating surfaces create the illusion of more floor space and keep cleaning easy in tiny rooms.
How to do it:
- Mount a LACK shelf at desired height and secure with anchors into studs.
- Use as a bedside shelf for lamp, phone, and a book (instead of a nightstand).
- For a mini-desk, add a folding chair and a shallow shelf width of 60–80 cm.
Materials + Budget: LACK shelf $10–$30, mounts $5–$20 → Total est. $15–$60.
Measurements & tips: Nightstand height ~24–28″ from floor; desk height ~28–30″. If using as a desk, ensure enough knee clearance.
Pitfalls: LACK isn’t built for heavy loads—don’t mount heavy monitors or stacks of books without additional supports.
Style/variation: Paint underside and edge in a contrast color for a designer look; pair with a floating drawer box for concealed storage.
Hack 9 — HEMNES Hallway Storage Bench (Shoe + Bag Station)
What it is: Use a HEMNES bench or shoe cabinet as an entryway hub—top with cushion and add hooks above for a compact mudroom that works in tiny entryways.
Why it’s perfect: Entryways in small apartments lack a clear drop zone—this hack creates a purposeful landing zone that keeps clutter off floors.
How to do it:
- Place HEMNES shoe storage against the wall.
- Add a slim cushion top and a wall rail with hooks above.
- Use baskets below for gloves, hats, and kid-stuff.
Materials + Budget: HEMNES bench $150–$250, hooks/rail $20–$60 → Total est. $170–$350.
Measurements & tips: Measure door swing and width—leave a 36″ path for comfortable entry. Cushion depth should not obscure door.
Pitfalls: Don’t block light switches or outlets; ensure the bench sits flush for a tidy look.
Style/variation: Paint bench base to match trim; add a small mirror above to punch up light and make the entrance feel larger.
Hack 10 — Use TROFAST & STUVA for Kids’ Small Rooms (Vertical Toy Storage)
What it is: TROFAST bins or STUVA systems are perfect for vertical toy storage—labelled, removable bins make tidying fast and keep play zones compact.
Why it’s perfect: Small kids’ rooms need quick, visible storage—bins that slide out and drop back in are a game changer for tiny play areas.
How to do it:
- Mount TROFAST frames at a child-friendly height.
- Use multiple bins stacked vertically and label each for types of toys.
- Add a corkboard or small shelf above for books and displays.
Materials + Budget: TROFAST frames $10–$60, bins $3–$15 each → Total est. $40–$200.
Measurements & tips: Place lower rows at toddler height and upper rows higher for older kids. Secure frames to wall studs.
Pitfalls: Don’t overload bins with heavy items; choose durable plastic bins for longevity.
Final section — Small Design Rules & Quick Win Checklist
Before you hack anything, keep these small-space rules in mind:
- Measure twice, buy once. Know width, depth, and door swing.
- Prioritize dual-use furniture. Seating that hides storage or desks that hide into bookshelves.
- Go vertical. Use wall space and ceiling height—shelves, tall cabinets, and hooks.
- Stick to a limited color palette. One or two accent colors keep small rooms from feeling noisy.
- Anchor furniture. For safety and a built-in look; especially important in rentals and kid homes.
- Work in zones. Give each function a clear place—sleeping, working, dressing, storage.
Quick Win Checklist (for readers):
- Add one mobile storage cart (RÅSKOG) this week.
- Upgrade one KALLAX cube into hidden storage or seating.
- Swap a standard dresser for MALM + trim built-in look.
- Create a fold-away desk from BILLY for instant work-from-home setup.
- Install LACK shelf by the bed to free up floor space.
I’m Anastasios Moulios, co-founder of DIY Cozy Living. I enjoy finding creative, practical ways to make small spaces feel warm, stylish, and lived-in. I started this blog with Katerina to share real ideas that make a home feel a little more personal and a lot more comfortable.
