
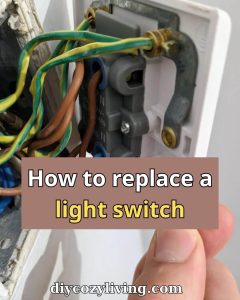
How to Replace a Light Switch (What My Father Taught Me and What I’ve Learned Since)
I can put in a new light switch because my dad showed me how when I was twelve or so!
We don’t do things by the book in Greek families; he was at it, I was on, and before I knew it he had put a screwdriver in my hand and was talking me through it. Once we were finished, I had the hang of it. I’ve been on my own with it ever since.
Take last winter: a switch in our place in Thessaloniki gave out. No warning, just one day it’s fine and the next it’s not. I pried it open and saw the wire had worked itself loose over the years. Took me twenty minutes to make it right.
But with the thing off the wall and in front of me, I couldn’t help but see how it had gone to seed — all yellowed up against the new paint. Put in a new one. Then I cast an eye over the pair in the hallway and figured, why not? Before the day was out I was done with four of them.
One for being on the fritz, three for no other reason than they were eyesores and I was in the zone!
That’s the way these projects go. If you want to have a go at it without any trouble, here is what you should know.
Before Anything Else — Safety
Replacing a light switch is one of the more approachable electrical tasks a homeowner can do themselves. The voltage involved is low enough that the work is manageable, the tools required are basic, and the process is logical once you understand what you’re looking at.
But electricity is electricity. Approached carelessly it causes serious harm. The safety steps below are not suggestions — they are the non-negotiable foundation of the whole job.
Turn off the circuit breaker.
Find the breaker box — in most apartments it’s in a hallway cupboard or near the entrance. Identify the breaker that controls the circuit for the switch you’re replacing and switch it off. If the breakers aren’t labelled clearly, switch the light on first and then turn off breakers one at a time until the light goes off. That’s your breaker.
Test the switch with a voltage tester before touching anything.
A non-contact voltage tester — an inexpensive tool that beeps or lights up when it detects electrical current — is the only way to be certain the power is actually off. Turning off a breaker you believe is the right one is not the same as confirming there is no current at the switch. Test it. Every time. Without exception.
This is the step my father was most serious about and the one I have never skipped. The cost of a voltage tester is negligible. The cost of skipping this step is not.
Official electrical safety guidelines: For Greece, the Hellenic Electricity Distribution Network Operator (DEDDIE/HEDNO) provides guidance on safe electrical work in the home — deddie.gr. For readers in the US, the National Electrical Code (NEC) guidelines are maintained by the National Fire Protection Association at nfpa.org. For UK readers, the relevant standard is BS 7671 — guidance available at iet.org.
What You Need

Nothing on this list is unusual or expensive.
A flat-head screwdriver and a Phillips head screwdriver. A non-contact voltage tester is standard and costs very little. Electrical tape. A new switch — make sure it matches the type you’re replacing (single pole, double pole, or two-way — more on this below). A small flashlight if the work area is dim without the light on.
That’s everything. No specialist tools, no electrician’s kit.
One note on choosing the new switch: before you buy, photograph the wiring of your existing switch before you disconnect anything. This photograph will be your reference throughout the job and it costs nothing.
Understanding What You’re Looking At
Open a switch plate and you will find wires connected to terminals on the back of the switch body. The number of wires and how they’re connected tells you what type of switch you have.
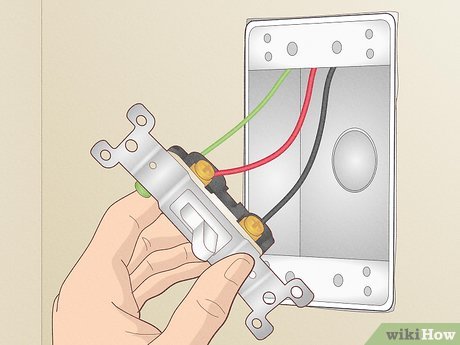
Single pole switch: The most common type. Two terminals, sometimes a ground. Controls a light from one location only. Two wires connect to the switch — one in, one out. The ground wire (usually green or bare copper) connects to the ground terminal if present.
Two-way switch (also called a three-way switch in the US): Three terminals. Used when a light is controlled from two locations — top and bottom of a staircase, two entrances to a room. Three wires connect to the switch. The wiring is slightly more involved but the same principle applies.
Double pole switch: Four terminals. Less common in residential settings. Used for higher-load circuits.
If you’re not sure which type you have, the photograph you took before disconnecting anything will tell you. If you’re still uncertain, take the photograph to a hardware store and ask — they will identify it immediately.
Step One: Remove the Old Switch
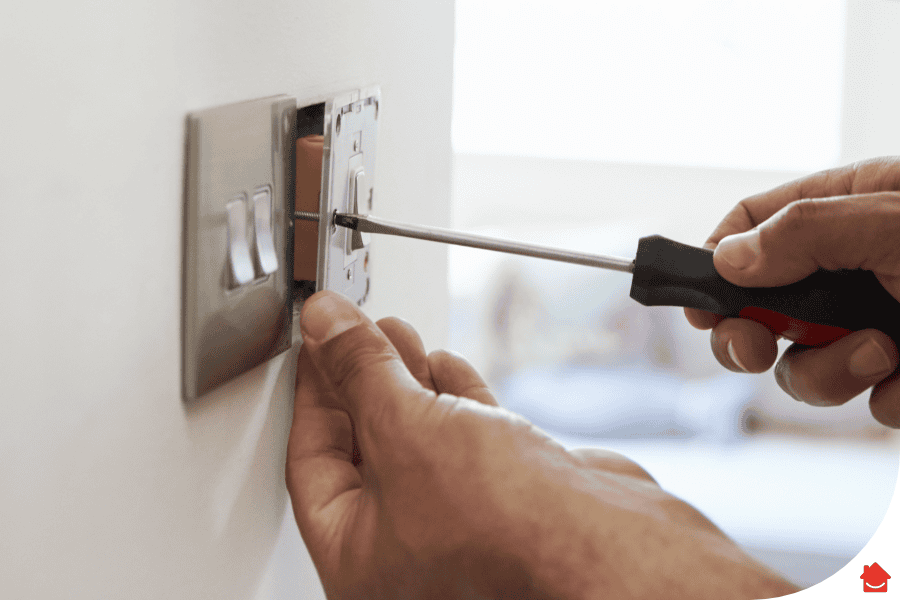
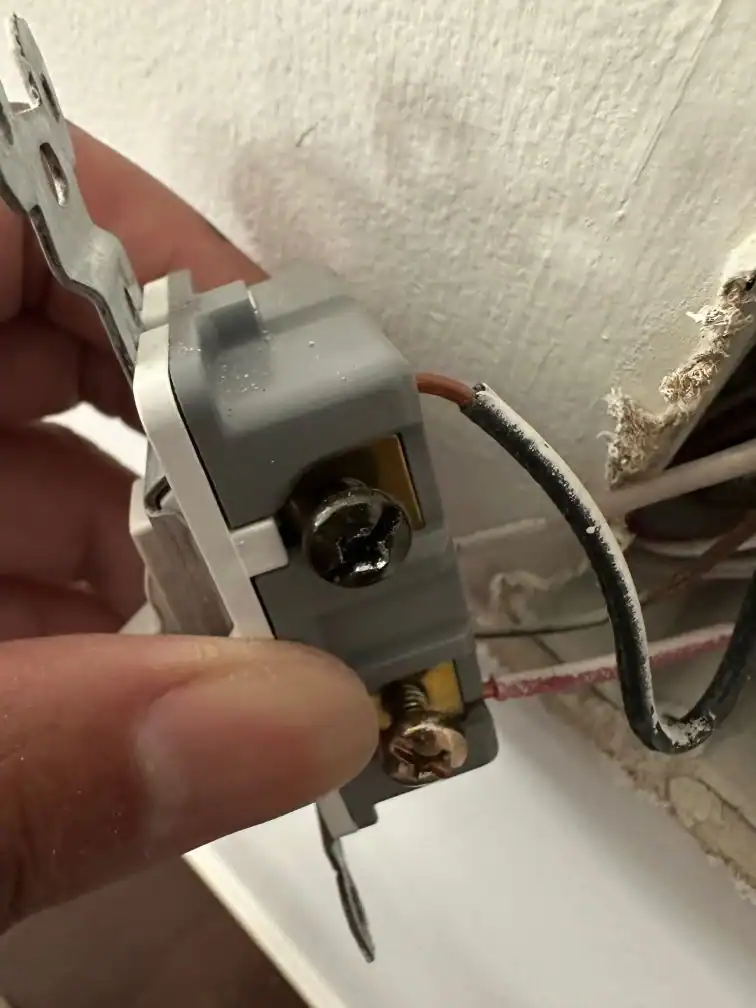
With the power confirmed off and the voltage tester confirming no current, remove the cover plate. Usually one or two screws. Set the plate aside.
The switch body is attached to the electrical box in the wall by two screws — one at the top, one at the bottom. Remove these and pull the switch body gently out from the box. It won’t come all the way out because the wires are still attached — pull it out far enough to work comfortably, usually ten to fifteen centimetres.
Take the photograph now if you haven’t already. Every wire, every terminal, how each one connects.
Loosen the terminal screws and remove each wire. Some switches have push-in connectors rather than screw terminals — use a small flat-head screwdriver in the release slot to free the wire. Once all wires are disconnected the old switch body comes away completely.
Look at the wires. If the insulation is damaged or cracked anywhere near the ends, trim back to clean insulation and strip approximately 15mm of fresh insulation before reconnecting. Old damaged insulation at a connection point is a problem worth fixing while you’re already there.
Step Two: Prepare the Wires
You want your wire ends to be straight and clean for a proper connection. Say you’ve got some that are kinked or have some oxidation from an old job: just put them in the cutters, trim them off and re-strip about 15mm of insulation. That’s all you need for a firm hold at the terminal.
The copper you’re left with should be bright. If it’s dark or has any corrosion on it, you’ll get poor conduction and it could be a headache down the road. A quick rub with some fine sandpaper will liven up any dull spots.
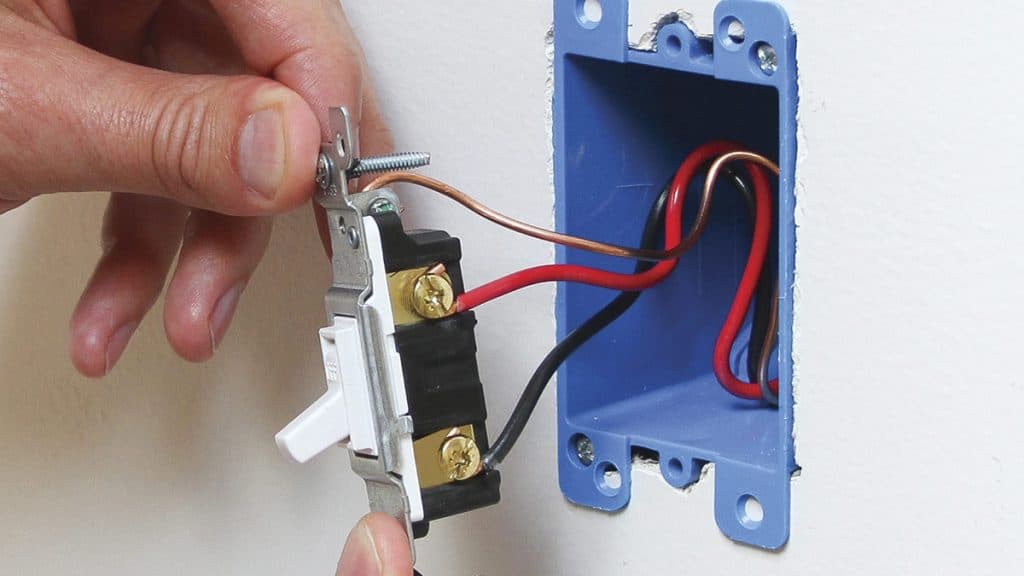
And when you’re going to a screw terminal, form a little hook in the end of the wire. Make sure it goes around the way the screw turns so that as you put pressure on it, it only pulls the wire in tighter instead of working it free.
Step Three: Connect the New Switch
You’ll want to run each of the wires over to its proper terminal on the new switch.
If you’re dealing with a single pole, put one wire on either of the two main lugs and, if there is one, the ground on the ground terminal. Make sure to give the screws a good tightening; a little pull on the wire and it shouldn’t budge.
In the case of a two-way, the common (it’s often a different colour or has a C/COM on it) is where the wire from the old common goes. The rest of the terminals are for the other two. It’s all in the picture.
And when you’re done, cover up any copper that’s not sitting in a terminal with some tape. You don’t want to see any bare metal once you’ve made your connections, save for right at the terminal.
Step Four: Fit the New Switch
Tuck the wires back in the box with a little care. You’ll want to make an Z of them instead of shoving them in, so the switch can lay flat on the wall and not be cocked to one side.
Put the screws back in to hold the body in place. Just don’t put too much torque on them; you want it to be flush and solid, but no need to strip out the threads in the box.
Then put on the new cover plate. I like to step away for a second and have a look. There’s something to be said for a new plate on a clean wall. It’s then that I see why I went ahead and did the other three.
Step Five: Test It
Turn the circuit breaker back on.
Go to the switch. Turn it on. Turn it off.
If it works: done.
If it doesn’t work: turn the breaker off again, remove the switch, recheck every connection against your photograph. The most common cause of a switch that doesn’t work after replacement is a loose connection or a wire on the wrong terminal. Both are easy to fix once identified.
If the breaker trips when you turn the power back on: there is a short circuit somewhere in the wiring. Turn the breaker off, remove the switch, and check carefully that no bare copper is touching anything it shouldn’t — the metal box, another wire, the back of the switch body. Correct it, reassemble, try again. If the breaker continues to trip, the problem is not the switch itself and the circuit needs professional attention.
The Aesthetic Upgrade
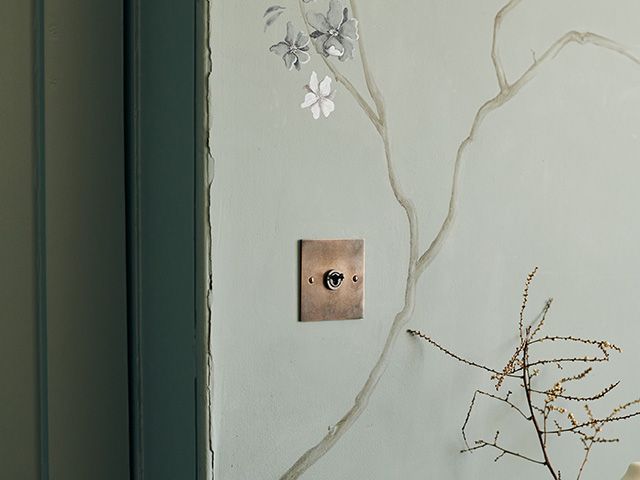
My father never got around to this, or maybe he just didn’t see the point. But it’s what drives me to put in a new switch for more than just function.
You don’t realize how much a switch plate has taken on over the years — the smudges, the discoloration, the wear and tear — until you set a fresh one beside it and the contrast is there for all to see. Up in our place in Thessaloniki, the old ones were your run-of-the-mill white plastic, if a bit of a cream color by now. I put in some with a brushed finish and a better line to them.
On its own, you might not think much of it. But in a hallway with three of them side by side, it adds up.
So when I’m after one, I’ll have a look at the rest in the room and do them while I’m at it. It doesn’t cost you any more to be done with it, and having plates that match from end to end is the kind of thing that gives a home some character instead of looking like it was cobbled together.
I had to explain as much to Katerina when she found me on a ladder at six o’clock, well past the twenty minutes I’d put on it. She let it go. For the most part.
When Not to Do It Yourself
You can put in a new single pole or two-way switch to take the place of one that is in good shape, provided you are at ease with the safety rules and don’t mind following instructions to the letter. But there is a time when you should leave it to a pro.
For instance, if you open up the switch and see wiring that is damaged, burnt or just not what you were expecting, make a call to an electrician. Same goes if the circuit breaker keeps tripping while you are at it or once you have finished. And if your home has very old wiring with materials or colours you can’t make head or tail of from a standard diagram, get an electrician in.
I don’t think there is any shame in knowing where your limits are as far as working safely on your own is concerned. The one I put right last winter was nothing to it, just a loose connection. Had I come across burnt insulation or evidence of arcing, I would have been right to phone someone and let them handle it. It is all about telling the difference between something you can do and something you can’t.
A Final Thought

When it came to the electrical work in our home, my father would put his own hands on it. He wasn’t being reckless about it; he simply knew what he was up to and had a proper respect for electricity, which is what keeps you from getting hurt.
You could say that’s his legacy. He didn’t just hand down the screwdriver or the wiring diagram, but an attitude: if you treat it with the seriousness it deserves, it is perfectly manageable. And that seriousness comes first, before your fingers are on anything, with the breaker and the tester and a good photograph.
Do a light switch right one time and you won’t be shelling out for someone else to do it ever again. It takes twenty minutes and the cost of a new switch. Then, like me, you’ll be standing there looking at the rest of the switches in the hall and figure you might as well get to them while you are at it.
I’ve given you all I have to give. Should you run into some particular problem with a switch that I haven’t mentioned, put it in the comments. There is no substitute for the specifics of what people actually come across, especially when you consider how the wiring can differ from an older house to a new one, let alone from country to country.
Until next time,
Stay safe,
Tasos
I’m Anastasios Moulios, co-founder of DIY Cozy Living. I enjoy finding creative, practical ways to make small spaces feel warm, stylish, and lived-in. I started this blog with Katerina to share real ideas that make a home feel a little more personal and a lot more comfortable.
