
How to Make Hair Bows for Girls That Are So Cute You Will Want to Make Them in Every Color

🔥 Would you like to save this?
I started making hair bows for Maria and Marina out of necessity.
Not because I couldn’t find bows to buy — you can find them everywhere. But anyone who has a daughter knows that the bow you find in the shop is never quite the right colour for the dress you already have, or the right size for the occasion, or the right fabric to match the particular outfit Marina had decided was non-negotiable that Tuesday morning.
So I started making them myself. And then I made more. And then I realised I had made about forty bows over the course of a few months and both girls had opinions about which ones were their favourites and which ones needed to be made again in a different colour.
Marina’s current favourite is the velvet bow in deep burgundy. Maria prefers the linen sailor bow because she says it looks grown-up. I have made both of these in at least four colours each.
Once you make your first bow and realise how easy it actually is, you will understand how this happens.
These ten styles are the ones we keep coming back to. Some need a sewing machine. Some need nothing more than scissors and a hot glue gun. All of them are genuinely beautiful and all of them can be made in an afternoon once you have your materials ready.
What You Need
Most of these materials you may already have. If not, they are inexpensive, and the same supplies work across all ten bow styles.
- Fabric scraps in various colours and textures
- Ribbon — lace ribbon, velvet ribbon, satin ribbon
- Nylon stretchy baby hair bands — for smaller bows on younger girls
- Metal alligator hair clips — for larger bows on older girls
- Hot glue gun and glue sticks
- Sharp fabric scissors — these are the ones I use
- Sewing machine and coordinating thread (I have this)
- Iron and ironing board
- Needle and thread for hand stitching
A note on hair bands versus clips: nylon bands work beautifully for babies and toddlers with fine hair. For older girls — Maria is ten and Marina is eight — the alligator clips grip better and hold larger bows in place. I use both depending on the bow size and who it’s for.
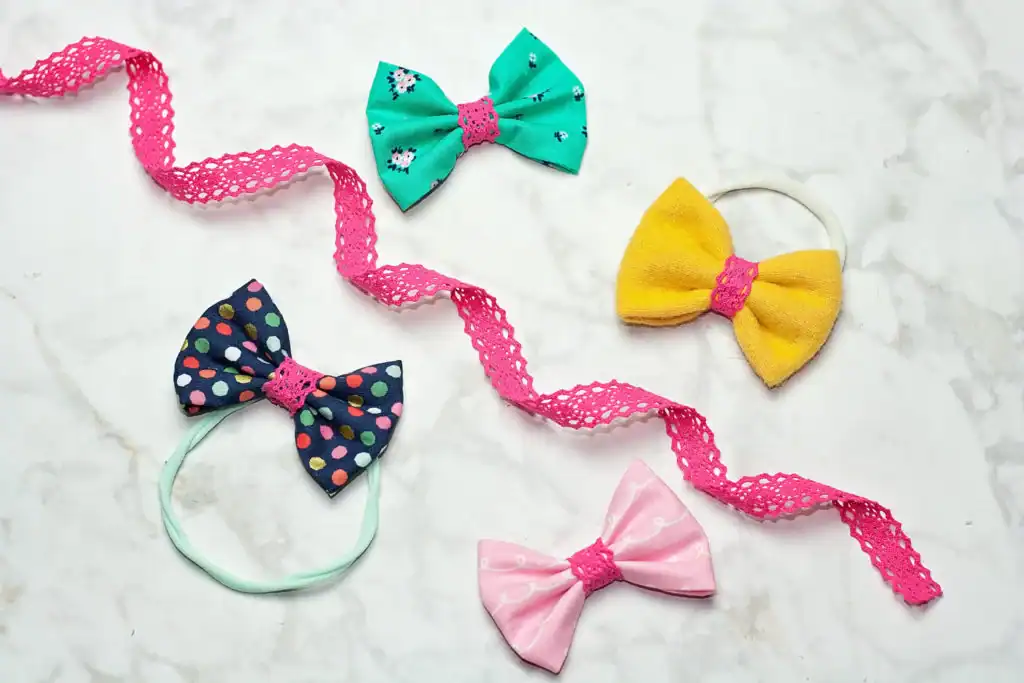
Bow One: The Simple Lace Ribbon Bow
The first bow I ever made. Five steps, no sewing, beautiful result. Start here if you’ve never made a bow before.
- Step One: Cut lace ribbon 13 inches long (33 cm)
- Step Two: Thread the nylon hair band through the centre of the ribbon
- Step Three: Make two loops with the ribbon — the bunny ear method
- Step Four: Wrap one loop around and under the other and pull tight
- Step Five: Adjust until the bow sits evenly and looks right
The lace gives this bow a delicate, feminine look that works on any age. Marina wore one of these on her first day of school and I have a photo of it that I will keep forever.
Bow Two: The Velvet Ribbon Bow
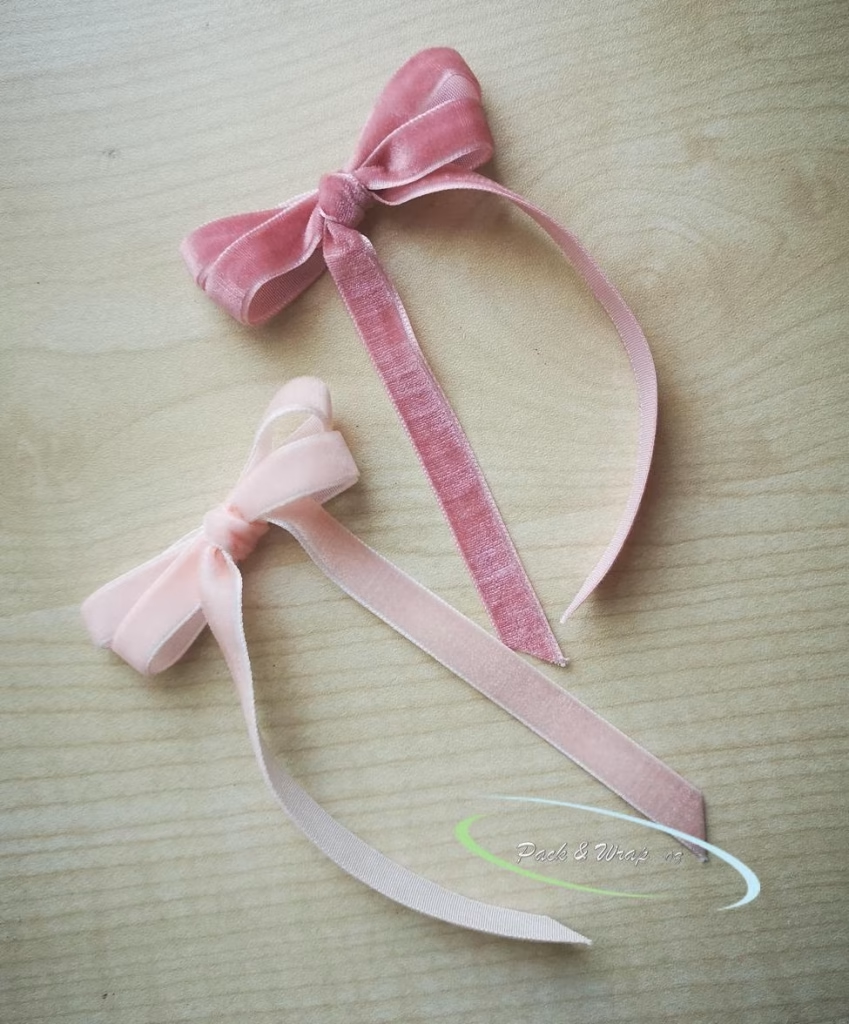
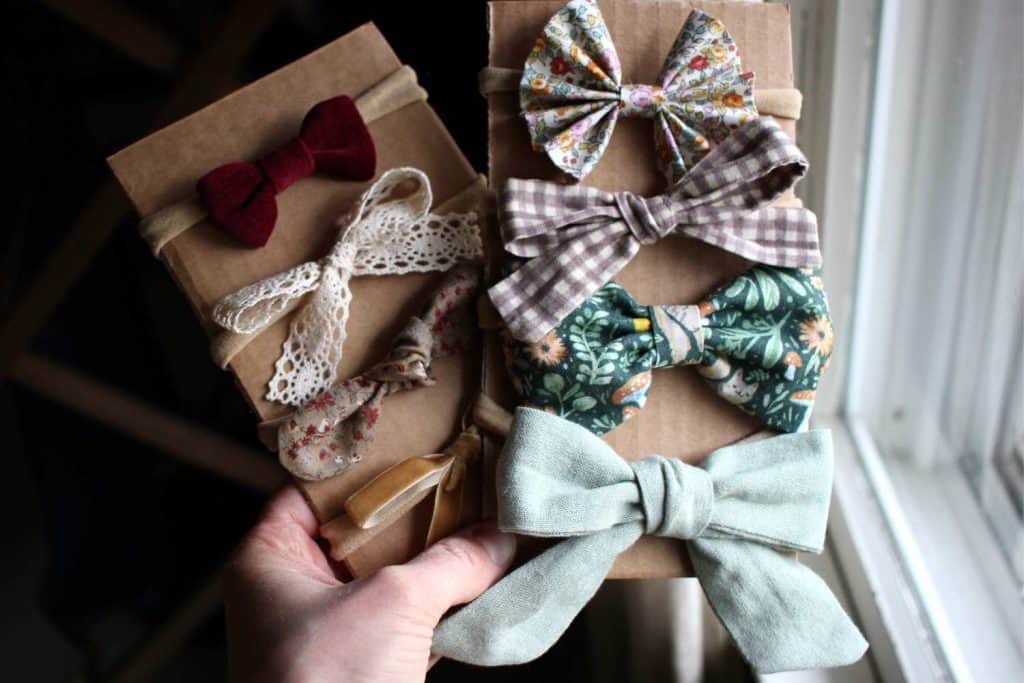
The same technique as the lace bow but velvet ribbon changes the whole character of it. Where lace is delicate, velvet is rich and soft and slightly luxurious. In deep colours — burgundy, navy, forest green — it looks extraordinary.
- Step One: Cut velvet ribbon 15 inches long (38 cm)
- Step Two: Thread the nylon band through the centre of the ribbon
- Step Three: Make two bunny ear loops keeping the velvet side facing outward
- Step Four: Wrap one loop around and under the other and pull tight
- Step Five: Adjust the bow until it lays flat and even
The extra length compared to the lace bow gives the loops more fullness. Velvet has a direction to it — always keep the soft side out and the loops will catch the light beautifully.
Bow Three: The Knot Bow
This one uses a sewing machine but even if you are not very experienced with one, the seams are straight and simple. The result is a clean, modern bow that looks completely different from a tied ribbon bow.
- Step One: Cut fabric 3 inches by 7 inches (8 cm by 18 cm)
- Step Two: Fold in half lengthwise then fold in half the short way
- Step Three: Cut a rounded edge on both short ends
- Step Four: Sew right sides together with a quarter inch seam allowance around the edge, leaving a small opening in the middle. Back stitch at start and finish
- Step Five: Turn right sides out using a pencil to push the fabric through the opening. Press flat with the iron
- Step Six: Sew the small opening closed close to the edge. Trim loose threads
- Step Seven: Thread the nylon band through the centre of the sewn piece. Tie one knot and pull gently to tighten. Adjust until it sits right
The knot bow is Maria’s everyday school bow. Simple, stays in place, looks neat all day. I make these in every colour we own.
Bow Four: The Fan Bow
No sewing at all. Just fabric, a hot glue gun, and about fifteen minutes. The fan shape is more structured than a tied bow and gives a very polished, intentional look.
- Step One: Cut fabric 5 inches by 6 inches and a separate piece 1 inch by 3 inches (13 cm by 15 cm and 3 cm by 8 cm)
- Step Two: Fold the top of the larger piece down to the centre and the bottom up to the centre. Press with the iron
- Step Three: Fold both longer raw edges under a quarter inch twice and press
- Step Four: Fold the fabric back and forth in a fan shape
- Step Five: Fold both long edges of the small fabric piece to the middle so raw edges meet in the centre. Press flat
- Step Six: Pinch the fan piece at the centre. Apply a small amount of hot glue to the pinch and wrap the small piece around it, raw edges facing inward. Hold until set
- Step Seven: Slide the nylon band over the small centre piece. Wrap the remaining fabric around both the band and the bow. Apply a small amount of glue to hold. Trim any excess
The fan bow looks more complicated than it is. Once you make one you will see how quickly it comes together.
Bow Five: The Hand Tied Plaid Bow
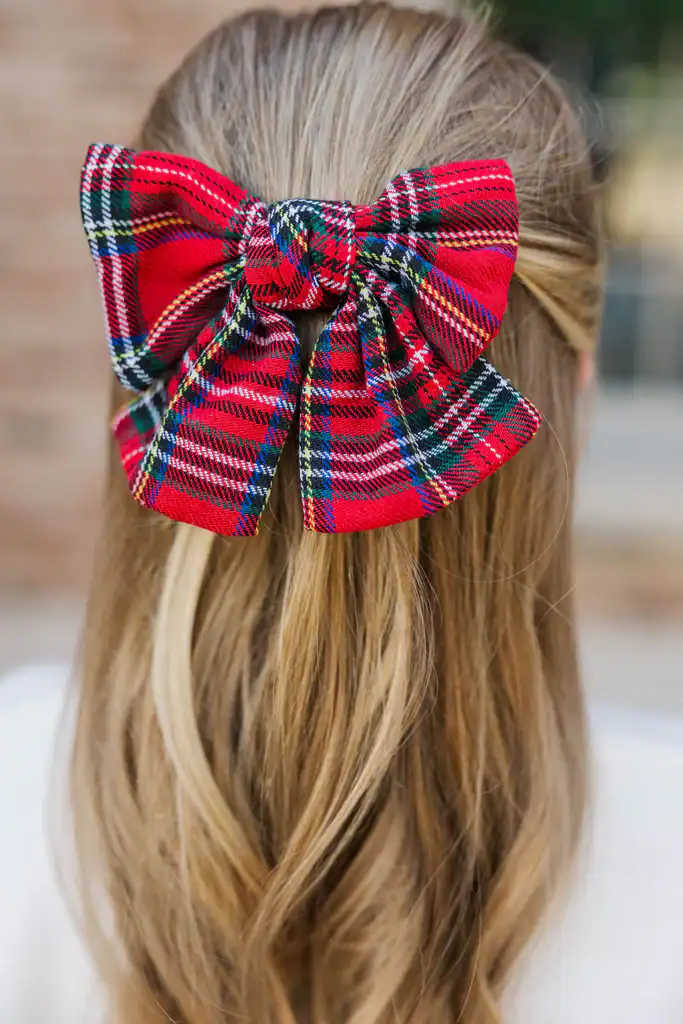
This one starts by making a fabric ribbon from scratch and then tying it into a bow. It sounds like extra work and it is — but a plaid bow made from actual fabric looks completely different from anything you can buy and the effort is entirely worth it.
- Step One: Cut fabric 2 inches by 16 inches (5 cm by 40 cm)
- Step Two: Fold lengthwise right sides together and press flat
- Step Three: Sew around the edges with a quarter inch seam allowance leaving a small opening in the middle. Trim threads
- Step Four: Turn right sides out using a pencil. Press flat and sew opening closed
- Step Five: Thread the nylon band through the fabric ribbon. Make two bunny ear loops, cross them over each other and feed one loop through the centre opening. Pull tight
- Step Six: Adjust until the bow lays nicely and both loops are even
Marina asked for this one in red and green plaid at Christmas and I made four of them in an evening. They looked like something from a very good gift shop.
Bow Six: The Petite Velvet Bow
A smaller, more structured version of the velvet ribbon bow. This one uses velvet fabric rather than velvet ribbon which gives it more body and a slightly puffier shape. Lovely on younger girls or as a secondary bow alongside a larger one.
- Step One: Cut velvet fabric 3 inches by 4 inches and a separate piece 1 inch by 3 inches (8 cm by 10 cm and 3 cm by 8 cm)
- Step Two: Fold the larger piece lengthwise in half, right sides facing each other
- Step Three: Sew only the short edges and turn right sides out
- Step Four: Tuck the raw edges of the open long side in and sew or glue closed. Press flat
- Step Five: Press the raw edges of the small piece under on both long sides
- Step Six: Pinch the larger piece at the centre into a bow shape. Apply a small amount of hot glue at the pinch and attach the small piece around it, raw edges inward
- Step Seven: Slide the nylon band over the small centre piece. Wrap the remaining fabric around both the band and the bow and glue to hold. Trim any excess
This is the bow I make most often as a gift for other people’s daughters. It always gets a reaction.
Bow Seven: The Linen Sailor Bow
My personal favourite and Maria’s. The sailor bow is larger and more dramatic than the others — it suits older girls particularly well but looks equally beautiful on a baby with a nylon band. Linen gives it a natural, slightly relaxed quality that cotton and synthetic fabrics don’t quite replicate.
- Step One: Cut fabric 3.5 inches by 21 inches (9 cm by 53 cm)
- Step Two: Fold lengthwise right sides together and press. Then fold end to end the short way and cut both ends at a slight angle
- Step Three: Sew around the edges with a quarter inch seam allowance leaving a small opening in the middle. Trim threads
- Step Four: Turn right sides out using a pencil. Press flat and sew opening closed
- Step Five: Starting at one end, wrap the fabric ribbon all the way around your palm. Tuck the long end through the opening between your pointer and middle finger and pull through. Slide the nylon band over that end. Wrap the same end over and then under the section your thumb is holding. Pull tight
- Step Six: Adjust the bow until both loops are even and it lays flat
The tying technique for this one is easier to see than to read — if the written instructions feel confusing, watch the video tutorial from the reference article. Once you do it once it becomes completely intuitive.
Bow Eight: The Large Bowtie Bow
A full, structured bowtie that looks equally good on a toddler or a ten year old. This one uses a needle and thread at one stage which sounds alarming if you don’t sew but the stitch is loose and simple — just a gather — and the result is the most satisfying bow on this list once it’s done.
- Step One: Cut fabric 6 inches by 10 inches and a separate piece 1.5 inches by 3 inches (15 cm by 25 cm and 4 cm by 8 cm)
- Step Two: Fold lengthwise right sides together and sew along the length with a quarter inch seam allowance, leaving both ends open
- Step Three: Turn right sides out and place the seam in the centre facing upward
- Step Four: Fold both ends to the centre slightly overlapping. Using needle and thread, sew a loose open stitch along the centre. Pull the thread tight and wrap it around the bow three times before tying off
- Step Five: Press the raw edges of the small piece under on both long sides
- Step Six: Apply a small amount of hot glue at the centre of the bow and attach the small piece around it, raw edges inward
- Step Seven: Slide the nylon band over the small centre piece. Wrap and glue to hold. Trim excess
- Step Eight: Using both thumbs push each side of the bow inward gently to create a rounded, puffy shape. Adjust until even
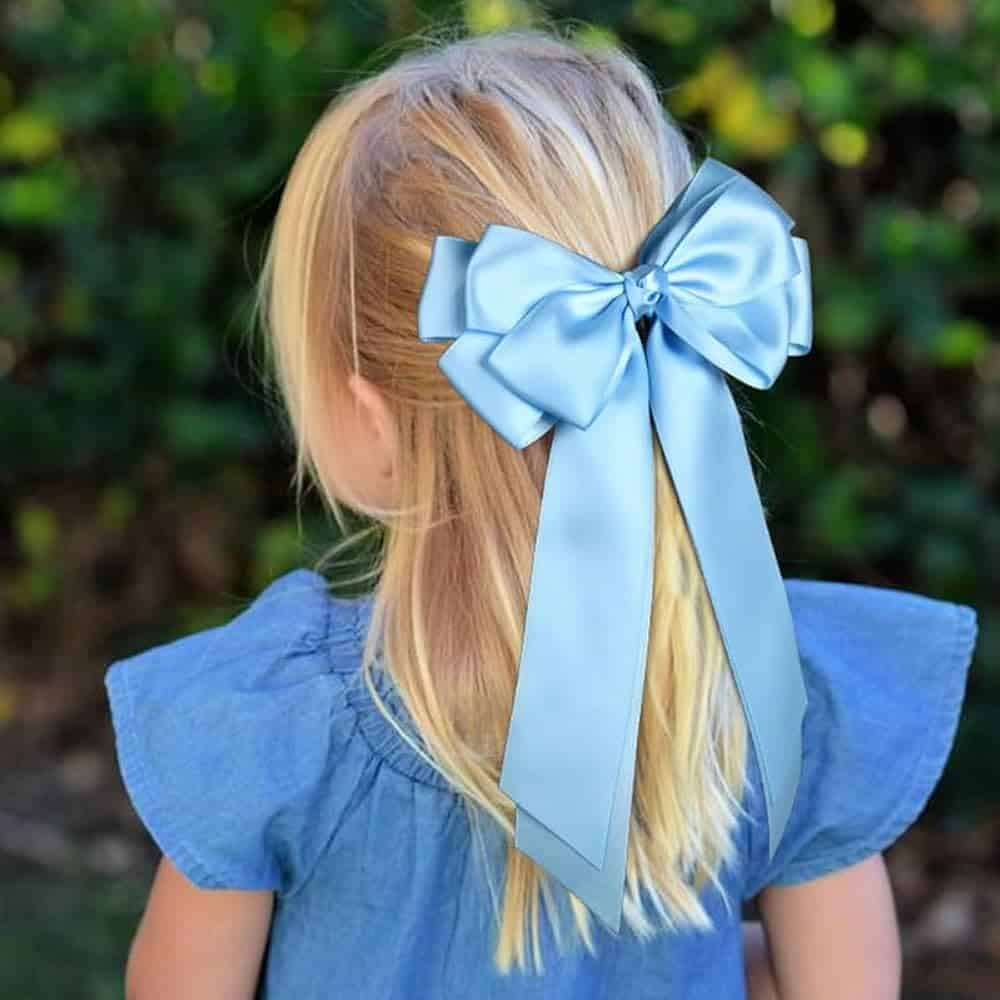
Bow Nine: The Satin Streamer Bow
A longer, more flowing bow with ribbon tails that move beautifully. This is the bow I make for special occasions — birthdays, school performances, anything where the girls want something that feels a little more than everyday.
- Step One: Cut satin ribbon 20 inches long (51 cm). Cut a second piece 6 inches long (15 cm)
- Step Two: Form the long piece into two equal loops with two equal tails hanging down. The centre crossing point is where the bow will be tied
- Step Three: Tie the short piece tightly around the centre crossing point with a double knot
- Step Four: Slide the nylon band or clip under the centre knot before pulling completely tight
- Step Five: Adjust the loops so they are equal and round. Trim the ribbon tails at an angle or into a V shape to prevent fraying
- Step Six: Apply a tiny amount of clear nail polish or fabric sealant to the cut ends to stop fraying
The tails on this bow catch the light when a child moves and it is genuinely lovely. Marina wore a version of this in white satin at her school concert and I still think it was the most beautiful hair bow she has ever worn.
Bow Ten: The Double Layer Bow
Two bows in contrasting colours or fabrics layered on top of each other. The effect is full and rich and completely original — because the combination of fabrics is yours, no two will ever look exactly the same.
- Step One: Make two knot bows or two petite velvet bows following the instructions above, in two different colours or fabrics
- Step Two: Place the smaller bow on top of the larger bow, centred
- Step Three: Apply a small amount of hot glue to the back of the smaller bow and press it firmly onto the larger bow. Hold until set
- Step Four: Attach to the nylon band or clip by gluing or stitching through both layers at the centre
- Step Five: Adjust both bows so the layers sit evenly and the colours balance
Colour combinations that work particularly well: navy and white, burgundy and blush, black and gold, red and cream. Marina made a double layer bow for her own hair last month using scraps from two previous projects. She wore it to school and three children asked her where she got it.
She told them she made it herself. Which she did, with minimal supervision and maximum pride.
A Few Tips Before You Start
Buy more ribbon and fabric than you think you need. Bows use up material quickly and there is nothing more frustrating than running out halfway through a set. For a collection of ten bows in different colours, a quarter yard of each fabric is usually enough.
A sharp pair of scissors matters more than most things on the materials list. Fabric scissors that have been used on paper will crush rather than cut ribbon cleanly and the fraying starts immediately.
Press every seam as you go. This is the step that separates a bow that looks handmade from one that looks homespun. An iron takes thirty seconds and the difference is visible.
And make them in batches. The first bow in any style takes the most time because you are learning the steps. By the third or fourth bow of the same style your hands know what they’re doing and each one takes half the time.
What if you Dont Wanna Do ANY of These but Still Want Lovely Hair?!
Check below!
A Final Thought
There is a specific pleasure in making something small and beautiful for a child you love.
Not because bows are important in the grand scheme of things — they aren’t. But because a bow you made in the right colour for the right dress on the right Tuesday morning is a small act of paying attention. Marina picks up the burgundy velvet one and puts it in her hair without saying anything and something about that quiet choice is the whole point.
Make one bow. Then make it in another colour. Then make the next style.
You’ll see.
That’s all I have for today. If you make any of these I would love to see them — leave a comment below or tag me on Instagram. And if you find a fabric combination that works particularly beautifully, share it. That’s always how the best ideas travel.
I’m Katerina Lithopoulou, co-creator of DIY Cozy Living. I’ve always loved the little things that make a space feel special. With a background in language and a passion for photography and cozy design, I enjoy turning everyday inspiration into simple ideas people can actually use.
My motto: “Cozy isn’t a trend — it’s a feeling.”
