
How To Hang Things Without Damaging Walls

Drilling holes in your pristine walls can be highly annoying, especially when it is just to hang a few lightweight frames or a small mirror.
All a renter or homeowner longs for is a beautifully decorated space without turning their drywall into Swiss cheese.
That’s why damage-free hanging solutions have become immensely popular over the last few years.
However, many people don’t want to trust their expensive art to just any sticky tape they can buy on the market.
Probably you feel that these adhesives might fail and send your favorite pictures crashing to the floor.
This is a completely logical thought, despite the fact that most damage-free hangers nowadays are incredibly strong and cheap.
There are multiple ways available through which you can hang your favorite decor without leaving a single mark.
The natural ways to decorate your walls are easy to follow, and they won’t cause any harm to your paint or drywall whatsoever.
Some of the most popular ways to hang things without damaging walls are using adhesive hooks, mounting putty, picture hanging strips, tension rods, and magnetic strips.
But, how exactly can we do it safely?
Let’s dive in!
The Benefits Of Hanging Things Without Nails
There can be various reasons why you might want to avoid using a hammer and nails.
Some of the most common reasons are renting restrictions, fear of hitting a pipe, lacking the right tools, and frequently changing your mind about your decor.
But why should you completely abandon traditional nails and screws?
No matter what you want to hang, it is always better to choose a non-destructive way so that your walls stay looking brand new.
Traditional nails are extremely sturdy, but if you make a mistake with your measurements, you are left with an ugly hole you have to patch and paint.
Having said that, here are the top reasons why you should hang things without damaging walls.
Reason No. 1: Protect Your Security Deposit
Whether you want to hang a mirror, a canvas, or a coat rack, you know landlords absolutely hate wall damage.
Since most rental agreements strictly forbid drilling large holes, using nails often hurts your chances of getting your deposit back.
But when it comes to products like adhesive hooks and picture strips, your walls will remain safe from the harmful effects of drilling.
No matter how many times you rearrange your room, your security deposit will remain completely safe.
Reason 2: No Special Tools Required
Traditional hanging methods are notorious for requiring drills, anchors, stud finders, and hammers.
Damage-free ingredients will let you mount things using just your hands and maybe a level.
This means that you don’t have to worry about buying expensive power tools just to hang a poster.
Reason 3: Ultimate Flexibility
Pick any wall in your house, and rest assured you can change its look in five minutes.
One of the most common fears among men and women before decorating is whether they will hate the placement later.
And the answer is yes; you probably will change your mind, making damage-free hanging the safest bet for beginners.
Read Also: How To Fix Small Nail Holes In Drywall
How To Hang Things Without Damaging Walls
There are many ways to hang your decor without reaching for a drill.
We are going to share each one of them, along with exactly how you should apply them.
Tip 1: The Adhesive Hook Process
If you love hanging hats, small bags, or wire-backed picture frames, adhesive hooks are a suitable ingredient to choose from.
These hooks will give you the functionality of a nail without the nasty wall damage.
Things you will need:
- Adhesive hooks (like Command Hooks)
- Rubbing alcohol
- A clean cloth
Step-by-step instructions to apply adhesive hooks:
Step 1: In order to prep the wall, take your clean cloth and wipe the area with rubbing alcohol. Let it dry completely.
Step 2: Take the adhesive strip, remove the backing from the wall side, and press it firmly onto the wall for 30 seconds.
Step 3: Remove the other backing, press the plastic hook onto the strip, and wait at least one hour before hanging anything on it.
How often to replace: Only when the hook loses its grip or you decide to move it.
Tip 2: The Picture Hanging Strips Process
Pin It
Picture hanging strips are ideal for those who like perfectly flush frames.
If you have a lot of gallery wall ideas, these Velcro-like strips should easily hold your frames for years.
Things you will need:
- Rubbing alcohol
- Picture hanging strips (interlocking style)
- A bubble level
Step-by-step instructions to apply picture strips:
Step 1: First, wipe the wall with rubbing alcohol and let it dry. Then, click two strips together until you hear them snap.
Step 2: Take the combined strips and peel one side of the backing off, applying it directly to the back of your picture frame. Repeat for all four corners.
Step 3: Remove the remaining backing, use your level to ensure the frame is straight, and press the entire frame firmly against the wall for 30 seconds.
How often to replace: They can stay on for years, but should be replaced if you move the frame to a new wall.
Tip 3: The Adhesive Putty Process
Pin It
One of the most popular natural ways for teenagers and students to hang things is mounting putty.
Putty is incredibly safe to use and won’t leave sticky residue on your posters.
Things you will need:
- Mounting putty (sticky tack)
- Your unframed posters or photos
- Clean hands
Step-by-step instructions to apply adhesive putty:
Step 1: Take a small piece of putty from the pack and roll it between your fingers to warm it up.
Step 2: Take the warm putty and stick it to the four corners of the back of your poster. Make sure you use enough for the size of the paper.
Step 3: Press the poster firmly against the clean wall. If you want to move it, gently roll the putty off the wall to prevent paint peeling.
How often to replace: Putty can dry out over a few years, so replace it when it loses its stretch.
Tip 4: The Double-Sided Mounting Tape Process
Pin It
For those who have slightly heavier items but still no frames, we have the right way to secure them.
Try the heavy-duty double-sided mounting tape process.
Things you will need:
- Heavy-duty mounting tape
- Scissors
- Rubbing alcohol
Step-by-step instructions to apply mounting tape:
Step 1: Clean the wall with rubbing alcohol. Cut strips of the mounting tape corresponding to the size of your item.
Step 2: Apply the tape to the back of your object, leaving the wall-side backing on. Press firmly so the adhesive bonds with your object.
Step 3: Remove the final backing and press the object against the wall for 60 seconds.
How often to replace: Tape is meant to be permanent, so only remove it when you are taking the object down for good.
Tip 5: The Tension Rod Process
Pin It
If you want to hang curtains without drilling into your window frames, tension rods will let you do that perfectly.
🔥 Would you like to save this?
This process will leave zero marks and is incredibly easy to adjust.
Things you will need:
- A spring-loaded tension rod
- Curtains or hanging plants
- A tape measure
Step-by-step instructions to apply a tension rod:
Step 1: Measure the inside width of your window frame to ensure you buy the correct size rod.
Step 2: Slide your curtains onto the rod before you attempt to mount it.
Step 3: Twist the rod to extend it until it is slightly wider than your window frame. Compress the spring, slide it into place, and let go so it grips the sides tightly.
How often to replace: Tension rods last indefinitely unless the internal spring breaks.
Tip 6: The Washi Tape Process
Pin It
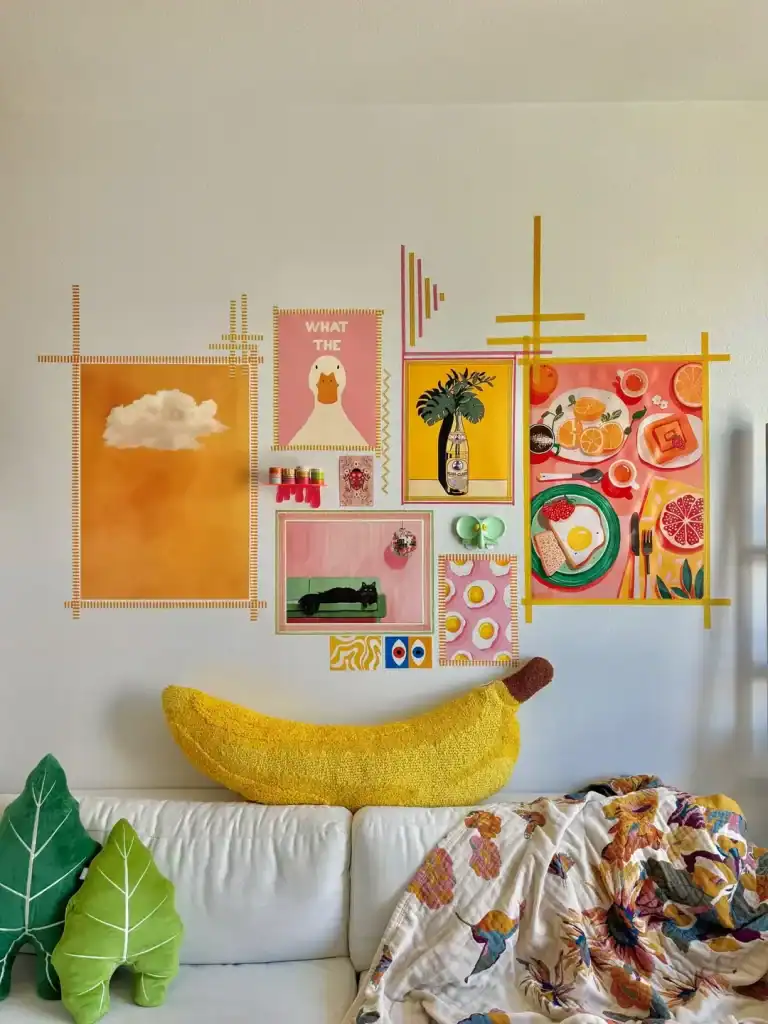
Washi tape is ideal for men and women who have a lot of unframed art prints and want a creative border.
This tape can effectively hold your paper art while giving it a colorful, faux-frame look.
Things you will need:
- Decorative washi tape
- Scissors
- Art prints
Step-by-step instructions to apply washi tape:
Step 1: Plan out your gallery wall by laying your prints on the floor first.
Step 2: Place your print against the wall and use pieces of washi tape on all four corners, or frame the entire edge of the paper with the tape.
Step 3: Smooth the tape down flat. When you want to remove it, it will peel off effortlessly without taking the paint with it.
How often to replace: Whenever you want to change the color or style of your faux frames.
Tip 7: The Over-The-Door Hook Process
Pin It
If you have heavy coats or shoe organizers, wall adhesives might not be enough.
Over-the-door hooks are the perfect solution to go for when you need to hold serious weight.
Things you will need:
- An over-the-door hook rack
- A sturdy door
- Small adhesive pads (optional, to prevent scratching)
Step-by-step instructions to apply an over-the-door hook:
Step 1: Check the top of your door to ensure there is a small gap between the door and the doorframe.
Step 2: Simply slide the hook rack over the top of the door.
Step 3: Test the door to make sure it opens and closes smoothly. After that, you can hang your heavy items immediately.
How often to replace: Never, unless the metal rusts or bends out of shape.
Tip 8: The Magnetic Paint Process
Pin It
If you want to turn a whole section of your wall into a hanging station without any tape, magnetic paint is a brilliant choice.
This will allow you to stick lightweight photos and lists directly to the wall using magnets.
Things you will need:
- Magnetic primer paint
- A paint roller
- Strong neodymium magnets
Step-by-step instructions to apply magnetic paint:
Step 1: Tape off the section of the wall you want to convert and clean it thoroughly.
Step 2: Apply three to four thin coats of the magnetic primer, letting it dry completely between each coat.
Step 3: Paint over it with your normal wall color. Once dry, you can hang your things using strong magnets.
How often to replace: The magnetic effect lasts as long as the paint is on the wall.
Read Also: How To Maximize Storage In A Small Apartment
Are These Damage-Free Methods Temporary?
All the non-drilling methods that we have mentioned here will temporarily hold your items.
None of them will permanently alter the structure of your drywall.
Some of the adhesive ingredients, such as putty and washi tape, are meant for very short-term use and light items.
The heavy-duty mounting tape and picture hanging strips are more potent and can last for years if applied correctly.
Since these are non-invasive ways to decorate your space, they won’t cause any harm and will keep your landlord happy for good.
How to Safely Remove Adhesives
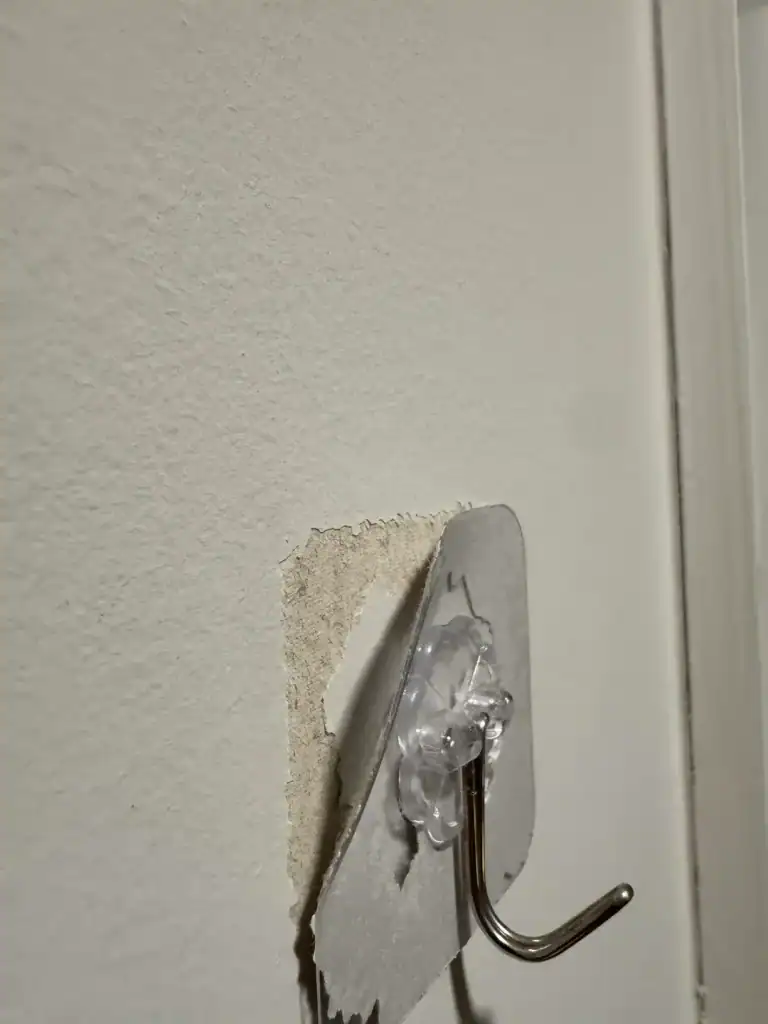
One of the biggest concerns is pulling the paint off when you decide to take these hooks down.
The good news is that most of these products are designed specifically for easy removal.
When you want to remove picture hanging strips, you must pull the tab straight down, slowly stretching it until it pops off.
If you are trying to remove double-sided mounting tape, a hairdryer is your best friend.
Apply heat to the tape for a few minutes to soften the glue, and then gently peel it away or use a piece of dental floss to cut through the adhesive backing.
What Kind Of Results to Expect?
The damage-free hanging process is the best way to decorate your room because it causes zero harm and keeps your walls intact.
Products such as adhesive hooks, strips, putty, and tension rods will make your home look beautifully curated.
Depending on the weight of your item, the product you choose will give you great results.
Picture strips, for example, will easily hold heavy wooden frames, putty will hold lightweight paper, and tension rods will hold your curtains.
Obviously, don’t expect miracles.
None of these methods is able to hang a 50-pound television, heavy floating bookshelves, or heavy kitchen cabinets.
In short, the results for decor and art will be great, but nothing spectacular for heavy furniture.
Please remember this because we don’t want you to get disappointed or break your expensive electronics.
However, you can expect excellent results for your everyday decor because these items are tried and tested.
During the old times when there were no affordable damage-free hooks, people had no choice but to drill, but today, you have plenty of reliable options.
Conclusion: To Sum Up
Damage-free hangers can organize and decorate your house good enough.
Choose the product as per the weight of your item so that the adhesive matches your specific needs.
Hang your things safely, and set your walls free from harmful drills and nails.
But, remember these techniques will not have impressive results for extremely heavy items, and you won’t be able to mount a flat-screen TV with tape.
This doesn’t mean that you should use a drill if you don’t want to.
But, I have to let you know which are the pros and which are the cons of hanging things without nails so that you form your own opinion on this topic.
My personal take is that if you just have some frames, your walls are newly painted, and you change your mind often, go ahead and use one of these damage-free ways.
On the other hand, if you want something permanent for heavy shelving and you want to mount heavy mirrors, then better use a classic stud-finder and some heavy-duty screws.
That’s really it!
I really hope you found our article helpful.
If you have any questions, feel free to write them in the comment section below and we will be more than happy to help.
Are you ready to decorate your walls today?
Until next time,
Stay safe,
Tasos

I’m Anastasios Moulios, co-founder of DIY Cozy Living. I enjoy finding creative, practical ways to make small spaces feel warm, stylish, and lived-in. I started this blog with Katerina to share real ideas that make a home feel a little more personal and a lot more comfortable.
