
How to Create a Magical Gingerbread House Tablescape This Christmas
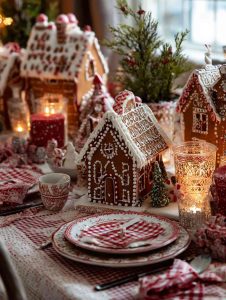
A gingerbread house tablescape is more than a dessert — it’s a living centerpiece, a tactile holiday story that invites guests in.
Done well, it balances sweetness and style: edible architecture, complementary décor, layered textures, warm lighting, and tabletop function all working together.
This guide walks you through planning, building, styling, and maintaining a stunning gingerbread house tablescape that’s Pinterest-ready and actually achievable — whether you’re hosting family, a cookie-decorating party, or a holiday dinner!
Why a Gingerbread House Tablescape Works
- Multisensory magic: sight, smell, and taste combine to create a memorable holiday moment.
- Flexible scale: go tiny with a village, make one grand centerpiece, or scatter mini houses along a runner.
- Customizable: match any aesthetic — rustic, Scandinavian, luxe metallics, or kids’ candy kaleidoscope.
- Interactive: invite guests to nibble, take pieces, or decorate mini additions at the table.
Before You Start — Planning (The 3 P’s: Palette, Practicality, Prep)

1. Choose a Theme & Color Palette
Pick a clear direction early. Examples:
- Classic Christmas: red, hunter green, plaid, pinecones, warm wood.
- Winter Wonderland: whites, silver, frosted glass, eucalyptus.
- Scandinavian cozy: neutrals, natural wood, soft textiles, minimal candy.
- Candyland / Kid-friendly: bright colors, lots of candy textures.
- Modern luxe: black, gold, marble, minimal edible accents.
Stick to 2–3 dominant colors + 1 accent to keep things cohesive.
2. Assess Table Size & Layout

Decide how the houses will sit:
- Single centerpiece: one large house on a pedestal or tray.
- Village: a cluster of 3–6 houses along a runner.
- Scattered minis: many small houses placed beside each place setting as favors.
Measure your table and plan spacing — aim to keep at least 18–24 inches per guest for comfortable dining.
3. Practical Constraints
- Food safety / allergies: if guests have nut allergy, avoid nut-based candies. Consider labeling edible elements.
- Timing: baking and fully drying a glued gingerbread house can take 24+ hours. Build your schedule (see timeline).
- Durability: if you want reusable (non-edible) houses, consider gingerbread look-alikes in wood or cardboard sealed for longevity.
Materials & Tools — What You’ll Need
Baking & Assembly
- Gingerbread dough (store-bought mix or homemade) — recipe below.
- Royal icing (acts like glue) — recipe below.
- Parchment paper, baking sheets
- House templates (printable patterns)
- Serrated knife or craft knife (for trimming)
- Piping bags + round tips (small and medium)
- Food-safe brushes
Decorating
- Assorted candies (gumdrops, peppermint, M&Ms, licorice, candy canes)
- Sprinkles, sanding sugar, edible glitter
- Shredded coconut (snow), icing sugar for dusting
- Chocolate bars or wafers (roof tiles)
- Pretzel sticks (logs, fences)
- Mini LED lights (battery-operated), fairy lights
Tablescape Styling
- Sturdy base/tray (wood platter, cake stand, mirrored tray)
- Runner (fabric, faux fur, or table runner)
- Natural elements (pine boughs, eucalyptus, pinecones)
- Candles or LED candles
- Small decorative props (mini sleds, ceramic trees, tiny signs)
- Place cards and minis if houses double as favors
Key Recipes (Reliable & Beginner-Friendly)
Gingerbread Dough (basic formula)
- 3 cups all-purpose flour
- 1 tsp baking soda
- 1 tsp ginger, 1 tsp cinnamon, 1/2 tsp cloves
- 1/2 tsp salt
- 3/4 cup unsalted butter, softened
- 3/4 cup brown sugar, packed
- 1 large egg
- 1/2 cup molasses
- 1 tsp vanilla
- Whisk dry ingredients. Cream butter + sugar, add egg, molasses, vanilla. Mix in dry till dough forms.
- Chill dough 1–2 hours (easier to roll).
- Roll 1/4″ thick, cut with templates, bake at 350°F (175°C) for 8–12 minutes depending on size. Let cool completely.
Royal Icing (for “glue”)
- 4 cups powdered sugar, sifted
- 3 tbsp meringue powder (or 2 egg whites if preferred)
- 5–6 tbsp water (add slowly)
- Beat on medium-high until glossy stiff peaks form.
Consistency tips:
- Thick (peaks hold): for assembly/glue.
- Flood (slightly runny): for filling/roof coating.
- Keep covered when not piping — it dries fast.
Step-by-Step: Building the House

Step 1 — Cut & Bake with Precision
- Use printed templates (roof, walls, front/back, chimneys).
- Chill dough before cutting to reduce spreading.
- After baking, allow pieces to cool flat on the pan 10 minutes, then move to rack. If walls warp, gently press flat while warm.
Step 2 — Plan Dry-Fit Assembly
- Lay pieces out on your base and dry-fit without icing to check fit and symmetry. Trim with a knife where necessary.
Step 3 — Assemble Walls (Use Thick Royal Icing)
- Pipe a thick bead of icing along edge, press walls together, hold for 30–60 seconds. Use cans or mugs inside to support until icing sets (~10–20 minutes).
- Reinforce inside seams with additional icing.
Step 4 — Attach Roof
- Secure one roof panel at a time. Add internal support (cardboard scrap wrapped in parchment) if needed while drying.
- Allow the full structure to set 2–4 hours (overnight for best strength).
Step 5 — Add Structural Details
- Chimney, porch, eaves — attach with thick icing. Use pretzels for railings or chocolate bark for roof tiles.
Decorating Like a Pro (Design Principles)

1. Layer Texture & Height
Combine levels: low greenery, mid-level houses, taller candle clusters. Height variance creates visual interest.
2. Light It Warmly
Battery-operated fairy lights woven through greenery add a cozy glow. Place LEDs within or around the house for an illuminated effect (use battery packs hidden behind decor).
3. Balance Edible & Inedible
Keep structural/edible parts where they won’t be in contact with candles or open flames. Use edible elements close to guest reach; non-edible props for higher or riskier positions.
4. Repetition for Rhythm
Repeat one candy motif (e.g., peppermints) across all houses to tie the village together.
5. Leave Negative Space
Don’t over-crowd. Allow areas of plain texture (wood or runner) to highlight the houses.
Styling Ideas by Aesthetic

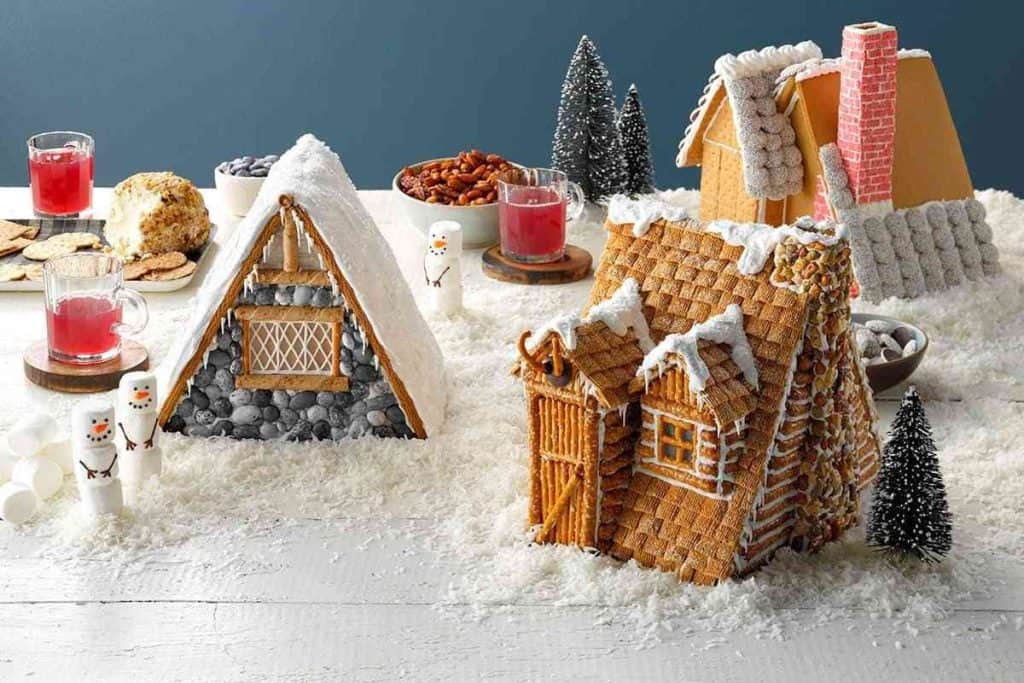
Rustic Cabin
- Natural wood tray, burlap runner, powdered-sugar “snow”, pinecones, pretzel-log fences.
- Houses decorated with brown sugar roofs, white icing icicles, and minimal candy.
Luxe Minimal
- Monochrome houses (white royal icing with gold-dusted accents), mirrored base, tapered candles, eucalyptus.
- Swap candy for sugared cranberries or macarons in neutral tones.
Candyland Playful
- Bright runner, multi-colored gumdrops lining roofs, candy cane fences, glitter accents.
- Place small bowls of extra candy for guests to nibble or add to houses.
Scandinavian Cozy
- Neutral gingerbread (less candy), wooden stars, simple white icing motifs, linen napkins, black-and-white place cards.
Timeline — When to Do What
- 3–7 days before: Decide theme, buy non-perishables (candies, decorations), print templates.
- 2 days before: Bake house pieces, let cool 24 hours. Make royal icing (can store covered).
- 1 day before / assembly day: Build houses and let set overnight. Prepare greenery and table linens.
- Event morning: Final decorate, add lights, set up table, add fresh last-minute details (dusting sugar, cranberries).
If you’re short on time, build one large house from a kit the day before and add fresh greenery the morning of.
Kid-Friendly Variations & Party Ideas

- DIY stations: set up mini houses on each place setting with small piping bags and candies for kids to decorate.
- Cookie favor: give each child a decorated mini house to take home — use boxes to keep them safe.
- Contest: best roof design or most creative color scheme; keep it light and fun.
Troubleshooting Common Problems
- Walls sagging: mix stiffer icing, support while drying, let set longer before adding roof.
- Candy sliding off roof: use thicker icing for roof tiles, press candy gently into place, or chill briefly.
- Icing too runny: add powdered sugar gradually until desired stiffness.
- House collapse: remove loose elements, let house dry fully, then rebuild with reinforcement.
Storage & Longevity
- As a decorative-only piece, a well-made gingerbread house can last 1–2 weeks in a cool, dry place (keep away from humidity and direct sunlight).
- If you want to preserve the house longer: brush with a thin coat of clear food-grade shellac (non-edible or for decorative-only use). Label as inedible if you do this.
- Leftover edible pieces (candies, intact cookies) can be stored in airtight containers.
Cost & Difficulty Snapshot
- Budget build (1 small house + minimal decor): $20–40 — easy–moderate.
- Mid-range (village of minis + decent props): $60–120 — moderate.
- High-end (large house, lighting, custom props): $150+ — advanced planning & skill.
Most home bakers will find the project moderate in difficulty if they follow the timeline and use sturdy royal icing.
Final Styling Checklist (Day Of)
- Runner/cloth in place, centered.
- Base/tray set and stable.
- Houses fully dry and secured to base.
- Fairy lights tested & tucked away safely.
- Fresh greenery and candles positioned, away from edible components.
- Place settings arranged with clear space for guests.
- A small sign with “Please enjoy — edible!” or allergy note if relevant.
Inspiration & Creative Prompts
- Try a moonlit winter palette: indigo runner, silver dusted roofs, star-shaped sprinkles.
- Use local flora (sprigs of rosemary or bay leaves) for scent and authenticity.
- Make a themed village (toy shop, bakery, post office) for storytelling charm.
Closing Thoughts
A gingerbread house tablescape is an invitation — to gather, to admire, and to taste.
The beauty is in the planning: a clear theme, realistic timeline, and balanced styling choices will turn a pile of cookies into a showstopper centerpiece.
Keep safety and durability in mind, lean into texture and light, and don’t be afraid to let some imperfections show — the charm of a homemade display is often in its human details.
I’m Anastasios Moulios, co-founder of DIY Cozy Living. I enjoy finding creative, practical ways to make small spaces feel warm, stylish, and lived-in. I started this blog with Katerina to share real ideas that make a home feel a little more personal and a lot more comfortable.
