
RV Water System Problems Solved: Everything You Need to Upgrade, Sanitize, and Improve

Your RV’s water system is one of the most vital parts of your mobile lifestyle. It handles everything from hydration and hygiene to cleaning and cooking.
If you’ve ever dealt with low pressure, poor water quality, or confusing tank sensors, you know how quickly small problems can become big headaches.
This article is a deep dive into everything you need to know about your RV’s water system—from key accessories and upgrade strategies to fixing common issues like leaks, low pressure, and how to properly sanitize or flush the system.
Without further ado, let’s get into it.
🔧 How the RV Water System Works (At a Glance)
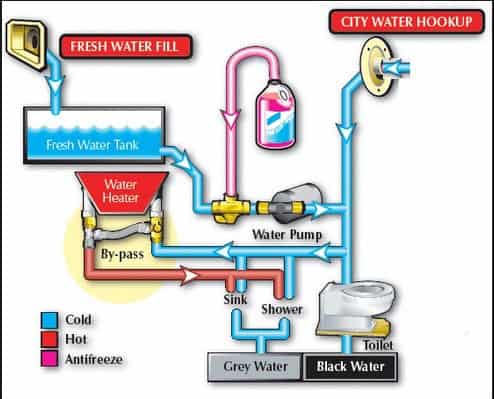
Your RV water system is made up of a few main components:
| Component | Function |
|---|---|
| Fresh Water Tank | Stores clean water for boondocking |
| City Water Hookup | Connects to campground water supply |
| Water Pump | Pressurizes water when not on city water |
| Water Heater | Provides hot water to sinks & showers |
| Plumbing Lines | Delivers water throughout the RV |
| Gray Tank | Collects used water from sinks/showers |
| Black Tank | Collects waste from toilet |
Each part needs maintenance and occasional upgrading. Let’s walk through the critical areas you can improve to ensure comfort, cleanliness, and safety.
✅ Step 1: Protect Your Plumbing — Regulate Pressure
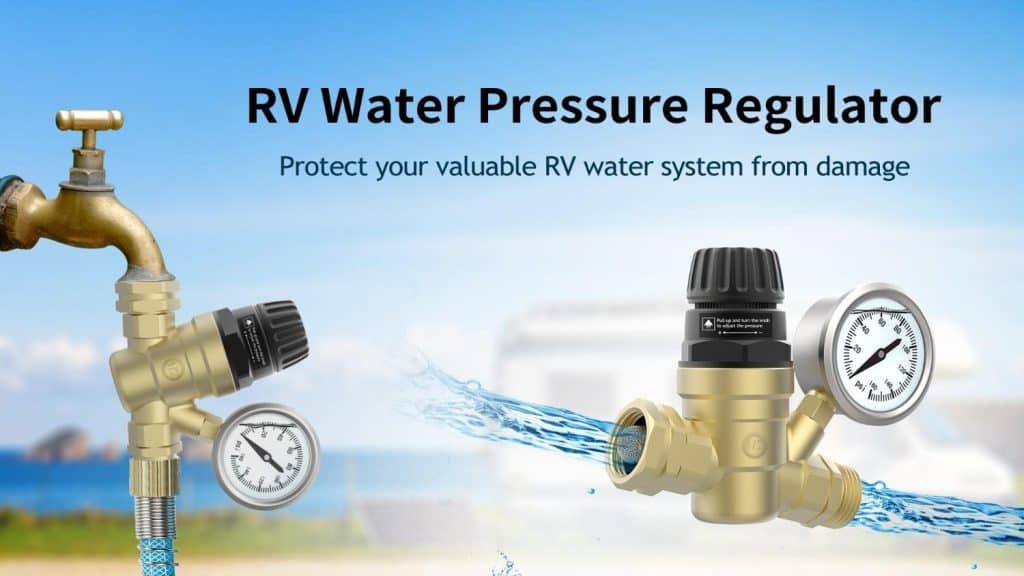
Campgrounds can have wildly inconsistent water pressure. Some are low; others are dangerously high. That’s why a water pressure regulator is the first must-have.
- Connect it between your hose and the campground spigot.
- Choose a brass adjustable model with a built-in pressure gauge.
- Set the PSI to around 45–50 for most RVs (check your manual).
Bonus Tip: Always test the campground water pressure with a gauge when possible. High pressure can damage fixtures, O-rings, and even your hot water heater.
💧 Step 2: Filter for Health and Taste

Campground water often has chlorine, sediment, and bacteria—not ideal for drinking or washing. Installing an inline water filter improves:
- Taste and smell
- Appliance lifespan
- Plumbing cleanliness
Advanced RVers often use a two-stage filtration system (sediment + carbon). Some go further with a reverse osmosis system, which is excellent but requires a larger setup.
People also ask: What is the best water purification system for RVs?
For maximum purification, consider a Berkey countertop filter or an under-sink reverse osmosis system. These systems remove up to 99.9% of harmful contaminants.
🧊 Step 3: Prepare for Cold Weather
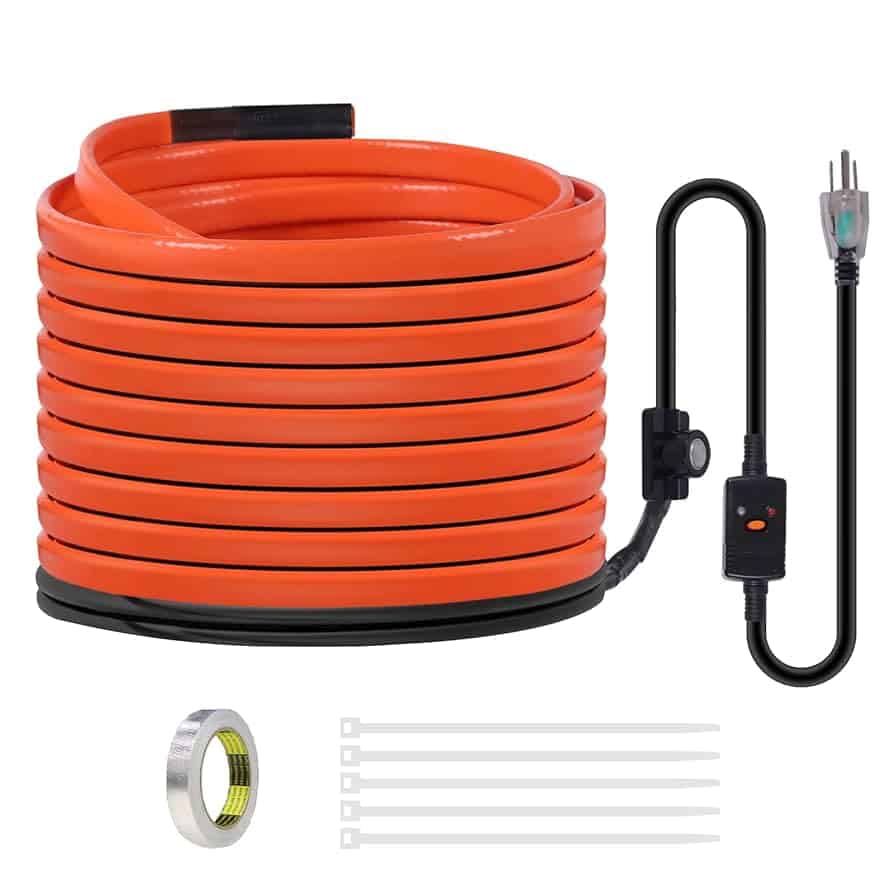
Frozen water lines can destroy an entire trip. If you travel in colder months, equip your RV with:
- A heated water hose (with thermostat control and GFCI plug)
- Pipe insulation and heat tape for underbelly plumbing
- An interior heat source if temperatures dip below freezing
Warning: Even in spring/fall, night temps can freeze water lines unexpectedly. A heated hose is cheap insurance against thousands in plumbing repairs.
🪠 Step 4: Add a Water Softener
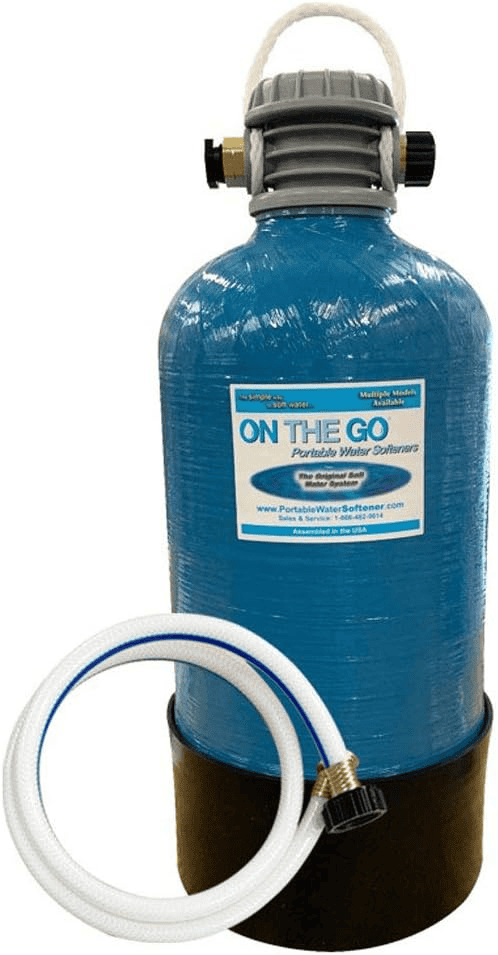
Hard water causes mineral buildup, which reduces water heater efficiency and shortens appliance life. A portable RV water softener helps if you:
- Spend time in areas with hard water
- Notice scale buildup on sinks or fixtures
- Struggle with dry skin or dull hair
These softeners are:
- Easy to attach
- Rechargeable with regular table salt
- Safe for use with drinking water
🧼 Step 5: Sanitize Your Fresh Water Tank
Over time, bacteria, algae, and slime can build up in your fresh water tank. Sanitizing it regularly is key.
How to Sanitize Your Tank
- Turn off your water heater.
- Drain the fresh water tank.
- Mix 1/4 cup of bleach per 15 gallons of water and fill the tank.
- Run faucets until you smell bleach, then let it sit 4–6 hours.
- Drain everything again, flush with fresh water, and repeat until bleach smell is gone.
🧪 Or use RV-safe tank sanitizer tablets instead of bleach (less harsh on rubber seals).
People also ask: What should I add to my RV water tank?
Use sanitizing tablets, occasional bleach, or enzymatic cleaners to kill bacteria. Also, consider a mineral additive if you’re using softeners.
🧰 Step 6: Check for Leaks and Low Pressure
Leaks can be silent and costly. Common signs:
- Water pump cycles when not in use
- Damp cabinets or floors
- Dripping from undercarriage or fittings
How to Find a Leak:
- Visual check: Look under the RV, around connections, and under sinks.
- Dry test: Dry suspected areas with paper towels, then check for wetness after use.
- Pressure test: Turn on the pump and close all faucets. If the pump cycles, you may have a leak.
People also ask: How to make RV water pressure stronger?
First, use a high-flow regulator or upgrade to a stronger RV water pump (up to 65 PSI). Also, check for blockages or clogged filters.
🔄 Step 7: Upgrade Your RV Water Pump
Most stock RV water pumps are loud and weak. Upgrading gives you:
- Better flow and pressure
- Quieter operation
- Smart cycling (no pulsing)
Top Picks:
- Shurflo 4008 (quiet + reliable)
- Seaflo 55-series (stronger PSI)
📌 Look for self-priming and variable-speed pumps.
People also ask: Can I upgrade my RV water pump?
Yes! Most RVs support a variety of aftermarket pumps. Make sure to match the voltage (usually 12V), check the PSI rating, and ensure hose compatibility.
🚿 Bonus: Comfort Upgrades for Everyday Use
Beyond safety and filtration, upgrade for daily comfort too:
- Install a high-pressure RV shower head with pause button
- Use quick-connect hose fittings for faster setup
- Keep a dedicated hose reel and storage bags (label them clearly)
- Add a separate under-sink drinking water faucet
Final Checklist: Must-Have RV Water Accessories
| Need | Best Solution |
| Regulate water pressure | Brass regulator with gauge |
| Improve taste & quality | Dual-stage inline filter or RO system |
| Fight hard water | Portable water softener |
| Prevent frozen hoses | Heated water hose (thermostat-controlled) |
| Sanitize fresh water tank | Bleach or sanitizing tablets |
| Increase water pressure | Upgrade water pump (Seaflo, Shurflo) |
| Prevent cross-contamination | Separate hose storage for black/gray/fresh |
Wrapping Up: Build a Smarter RV Water System

A well-maintained RV water system saves time, money, and frustration on the road. With smart upgrades and proper accessories, you can eliminate common problems like weak pressure, bad-tasting water, and potential freeze damage.
Whether you’re chasing national parks, camping in the woods, or parked at a lakeside retreat, your water system should work quietly in the background—clean, safe, and efficient.
If you’d like a printable checklist of everything we covered or a maintenance tracker, just let us know—we’ll send one your way!
I’m Anastasios Moulios, co-founder of DIY Cozy Living. I enjoy finding creative, practical ways to make small spaces feel warm, stylish, and lived-in. I started this blog with Katerina to share real ideas that make a home feel a little more personal and a lot more comfortable.
