
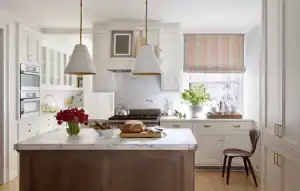
How to Upgrade Your Kitchen on a Budget (Without It Looking Cheap)
I remember standing in our kitchen one evening, staring at those orange-toned cabinets that screamed early 2000s builder-grade. The countertops were laminate. The lighting was harsh. The hardware was… tragic.
And I thought:
“Great. So we need $25,000.”
We didn’t.
What we actually needed was strategy.
There’s this myth that kitchens require full demolition to feel new. But the truth? Most kitchens don’t need a renovation. They need intentional upgrades.
And when done right, a $2,000 kitchen can look like a $20,000 one.
Let’s break this down properly.
Before You Spend a Single Dollar
If you skip this section, you risk wasting money.
Most budget kitchen upgrades fail because homeowners start buying before they plan.
Step 1: Decide Your Budget Tier
Here’s what different budgets can realistically achieve:
| Budget | What You Can Actually Upgrade | Realistic Outcome |
|---|---|---|
| $500 | Paint, hardware, styling | Noticeably fresher |
| $1,500 | Cabinets + lighting + faucet | Feels remodeled |
| $3,000 | Add backsplash + counters refresh | Major transformation |
| $5,000 | Multi-zone upgrades + semi-custom touches | Almost full renovation look |
The key is aligning expectations with budget.
If you expect marble countertops and custom cabinetry for $800 — you’ll be disappointed.
But if you aim for visual transformation, not structural overhaul? Very doable.
Why Kitchens Are Worth the Effort (Data Matters)
According to national remodeling reports, minor kitchen remodels consistently recoup around 70–80% of their cost in home value on resale.
That means:
- Strategic updates aren’t just aesthetic.
- They’re financial.
But here’s the catch — overspending doesn’t guarantee higher return. Controlled, smart upgrades often outperform luxury renovations in ROI percentage.
Translation: Smart beats expensive.
The Highest Impact, Lowest Cost Changes
This is where the magic happens.
1. Cabinet Transformation (The 60% Rule)
Cabinets visually dominate most kitchens. Roughly 60% of what you see at eye level is cabinetry.
Which means if you change them — even cosmetically — everything changes.
Option A: Paint (The Game Changer)
Average DIY Cost:
- Primer: $40–$60
- Cabinet paint: $100–$200
- Supplies: $100
Total: $250–$400
Key tip: Use cabinet-specific enamel paint, not wall paint.
Prep determines 80% of the result:
- Degrease thoroughly
- Light sand
- Prime properly
- Use a foam roller or sprayer
Trending safe colors:
- Warm white
- Soft greige
- Muted sage
- Deep navy (for lowers only)
Option B: Two-Tone Cabinets
Upper cabinets light
Lower cabinets darker
This:
- Adds dimension
- Feels designer
- Costs the same as one color
Cabinet Upgrade Comparison
| Upgrade | Cost | Difficulty | Visual Impact |
|---|---|---|---|
| Paint only | Low | Medium | Very High |
| Replace hardware | Very Low | Easy | High |
| Soft-close hinges | Low | Easy | Medium |
| Full cabinet replacement | High | Professional | Extremely High |
If cabinets are structurally sound, replacing them is rarely necessary.
2. Hardware Swap (The Easiest Upgrade Ever)
Cost:
- $3–$12 per pull
- Total for average kitchen: $80–$250
Switch:
- Dated curved nickel → modern matte black
- Shiny brass → brushed brass
- Builder chrome → champagne bronze
This alone can make cabinets look new.
And please:
Don’t mix three metals randomly.
Stick to 1 primary finish.
3. Countertop Illusions (Without Replacing Them)
New stone countertops:
$2,000–$5,000+
Budget alternatives:
Option A: Butcher Block Overlay
- $30–$60 per sq ft
- Warm and timeless
Option B: Epoxy Coating Kits
- $200–$500 DIY
- Mimics marble
Option C: High-End Laminate
Modern laminate isn’t what it used to be.
Cost: $20–$40 per sq ft
If your current counters are structurally intact, resurfacing is significantly cheaper than replacement.
Lighting changes everything.
And I mean everything.
Research in environmental psychology shows that lighting temperature influences mood, perception of cleanliness, and even how spacious a room feels.
Harsh cool light (5000K) makes kitchens feel sterile.
Warm white (2700–3000K) feels welcoming.
Three Lighting Layers You Need
- Ambient (ceiling)
- Task (under-cabinet)
- Accent (pendants or sconces)
Under-cabinet LED strips:
- $40–$120
- Instant luxury feel
Pendant light swap:
- $100–$300
- Major focal point shift
This is one of the fastest ways to modernize.
The “Looks Expensive But Isn’t” Upgrades
These are subtle, but powerful.
Faucet Upgrade
Cost:
$120–$350
Switch to:
- Pull-down sprayer
- Matte black
- Brushed brass
- Stainless industrial
It becomes jewelry for your sink.
Add Trim & Molding
Adding crown molding to cabinets:
- $200–$500 DIY
It makes builder-grade cabinets look custom.
Remove One Upper Cabinet
This sounds scary.
But removing a single upper cabinet and replacing it with open shelving can:
- Make the space feel bigger
- Create styling opportunity
- Modernize instantly
Cost:
$150–$300
Upgrade Switch Plates & Outlets
$5–$30 each.
Replace:
- Yellowed plastic
With: - Matte white
- Black
- Screwless plates
Small detail. Big polish.
Where We Are So Far
If you combine:
- Cabinet paint ($350)
- Hardware ($200)
- Faucet ($250)
- Lighting ($300)
- Minor trim ($200)
You’re at roughly:
$1,300–$1,600
And your kitchen will look dramatically different.
And we haven’t touched layout or materials yet.
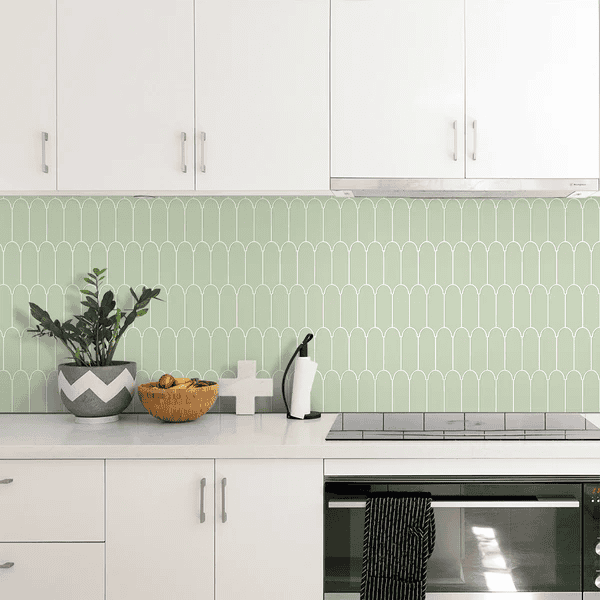
Budget-Friendly Backsplash Options (That Don’t Look Temporary)
A backsplash sits at eye level. It frames your counters. It reflects light.
When it’s outdated, the whole kitchen feels outdated.
Here’s what you should realistically consider.
Option 1: Peel-and-Stick Tile (The Right Way)
Cost:
- $8–$15 per sq ft
- Average kitchen: $120–$300
It has improved significantly over the years. The key is:
- Choose matte finishes (not glossy plastic-looking ones)
- Stick to classic shapes (subway, zellige-inspired, simple square)
- Avoid loud patterns
Best for: renters or ultra-tight budgets.
Option 2: Classic Subway Tile (DIY-Friendly)
Cost
- Tile: $2–$6 per sq ft
- Adhesive + grout: $150–$250
- Total DIY average: $300–$600
Subway tile is timeless because it’s simple.
Upgrade it by:
- Using slightly larger format (3×12 instead of 3×6)
- Going vertical stack instead of brick pattern
- Using warm white grout, not stark white
Option 3: Microcement or Plaster Finish
Cost:
- DIY kits: $300–$700
This creates a seamless, European-style backsplash.
No grout lines. Soft texture. Modern but warm.
It looks expensive — but costs less than mid-range tile installation.
Backsplash Comparison Table
| Type | Cost Range | Skill Level | Longevity | Overall Look |
|---|---|---|---|---|
| Peel-and-Stick | Low | Easy | Medium | Good if chosen carefully |
| Subway Tile DIY | Medium | Moderate | High | Timeless |
| Microcement | Medium | Moderate | High | High-end modern |
| Full Designer Tile | High | Professional | Very High | Custom |
If your budget is under $1,000 total, tile is usually worth it over peel-and-stick — if you’re willing to DIY.
Smart Budget Materials Guide (Where to Save, Where to Invest)
This is where people either win or waste money.
Countertop Materials (Average Installed Cost Per Sq Ft)
| Material | Cost Per Sq Ft | Budget-Friendly? | Notes |
|---|---|---|---|
| Laminate | $20–$40 | Yes | Modern versions look better than expected |
| Butcher Block | $35–$60 | Yes | Needs sealing but very warm |
| Quartz | $70–$120 | No (higher tier) | Durable, clean look |
| Granite | $50–$100 | Sometimes | Depends on slab |
| Epoxy Resurfacing | $10–$20 DIY | Yes | Good for cosmetic refresh |
If the cabinets are painted and lighting upgraded, laminate often looks completely acceptable.
Cabinet Paint Recommendations (Budget + Durable)
Look for:
- Alkyd enamel
- Urethane-reinforced enamel
- Self-leveling cabinet formulas
Avoid:
- Basic wall latex paint
Average total paint investment: $250–$500
That’s cheaper than replacing even one cabinet run.
Layout Tweaks Without Moving Plumbing
Moving plumbing is where budgets explode.
Instead, work around what you have.
1. Rolling Island or Cart
Cost:
$150–$500
Adds:
- Storage
- Prep space
- Visual interest
Choose wood tones to add warmth against painted cabinets.
2. Remove Cabinet Doors (Selective Open Shelving)
Cost:
Free
Just remove doors, patch hinges, paint interior.
But here’s the rule:
Only do this if you’re willing to keep shelves minimal.
Clutter kills this look instantly.
3. Add an Island Overhang (If Possible)
If you’re upgrading counters anyway, extending 10–12 inches allows for:
- Bar seating
- Casual dining
- Visual luxury
Small structural tweak. Big perceived value.
Styling: The Step That Makes It Look Renovated
This is where I got it wrong the first time.
I upgraded our kitchen — and it still felt “meh.”
Because styling matters.
The Countertop Formula
Never scatter random decor.
Instead:
Group in threes:
- Wood cutting board (vertical)
- Small plant
- Ceramic container
Keep at least 60% of counter clear.
Clutter = visual chaos.
Texture Layering
Modern kitchens feel cold if everything is hard.
Add:
- Wood (cutting boards, stools)
- Linen (tea towels)
- Ceramic (vases)
- Woven elements (basket storage)
Warmth makes budget upgrades feel intentional.
Declutter Aggressively
Remove:
- Paper piles
- Unused appliances
- Random bottles
- Mismatched containers
A decluttered kitchen instantly feels more expensive.
Research in environmental psychology consistently shows that reduced visual clutter improves perceived order and comfort in a space.
Translation: Clean feels luxurious.
Realistic Budget Scenarios
Let’s make this extremely practical.
Scenario A: $800 Budget
| Item | Estimated Cost |
|---|---|
| Cabinet paint | $350 |
| New hardware | $150 |
| Faucet upgrade | $200 |
| Under-cabinet lighting | $100 |
| Styling | $50 |
Outcome:
Feels fresh, modern, brighter.
Scenario B: $2,500 Budget
| Item | Estimated Cost |
|---|---|
| Cabinet paint | $400 |
| Hardware | $250 |
| Subway tile backsplash | $500 |
| Butcher block counters | $900 |
| Lighting | $300 |
| Faucet | $250 |
Outcome:
Feels fully renovated to guests.
Scenario C: $5,000 Budget
| Item | Estimated Cost |
|---|---|
| Professional cabinet paint | $2,000 |
| Quartz counters (small kitchen) | $2,200 |
| Backsplash tile | $800 |
Outcome:
Near full remodel appearance without layout change.
Mistakes That Make Budget Kitchens Look Cheap
Let’s prevent regret.
- Skipping prep before painting.
- Mixing matte black, gold, chrome, and bronze together.
- Choosing trendy colors you’ll hate in 2 years.
- Installing harsh cool lighting.
- Overcrowding open shelves.
- Buying the cheapest peel-and-stick available.
- Forgetting scale (tiny pendants over large islands).
Budget is not the problem.
Lack of restraint is.
When You Should Actually Save for a Full Renovation
Be honest if:
- Cabinets are structurally damaged.
- Layout blocks functionality.
- Plumbing or electrical is unsafe.
- Floors are severely damaged.
Cosmetic upgrades can’t fix structural issues.
What I Would Do Again (And What I Wouldn’t)
If I had to redo ours:
I would:
- Paint cabinets immediately.
- Upgrade lighting sooner.
- Remove half the decor.
- Choose warmer tones.
I wouldn’t:
- Rush countertop decisions.
- Follow Pinterest trends blindly.
- Mix too many finishes.
The biggest transformation wasn’t expensive materials.
It was clarity.
Final Thoughts
Upgrading your kitchen on a budget isn’t about pretending it’s luxury.
It’s about:
- Choosing upgrades with the highest visual return.
- Avoiding waste.
- Improving lighting.
- Editing instead of adding.
You don’t need $30,000.
You need:
- A plan.
- Restraint.
- Smart materials.
- Good lighting.
- And less clutter than you think.
And I promise — when you walk into your kitchen and it finally feels like yours?
That’s worth every intentional dollar.
Until next time,
Stay safe,


I’m Katerina Lithopoulou, co-creator of DIY Cozy Living. I’ve always loved the little things that make a space feel special. With a background in language and a passion for photography and cozy design, I enjoy turning everyday inspiration into simple ideas people can actually use.
My motto: “Cozy isn’t a trend — it’s a feeling.”
