
How to Put Ribbon on a Christmas Tree (The Right Way, Finally Explained)


Ribbon is the single thing that separates a Christmas tree that looks designed from one that looks assembled.
It is also the thing that most people attempt, abandon halfway through in frustration, and quietly remove before anyone sees it.
The reason is not that ribbon is difficult. It is that nobody explains it properly. Most tutorials show you a beautiful finished tree and a vague instruction to tuck the ribbon into the branches. What they do not explain is which technique to use for which tree, why your ribbon keeps looking flat and wrong, and how to fix it when it is not working.
This is the guide that actually explains those things.
By the end you will know which ribbon to buy, which technique suits your tree and your aesthetic, how to start and finish cleanly, and how to rescue a ribbon job that has gone wrong.
Let’s dive right in!!!
Choosing the Right Ribbon

The ribbon choice determines everything. The wrong ribbon for your tree makes the whole job harder and the result worse regardless of technique.
Width
Wider ribbons (2.5 to 4 inches) are great for making bold statements and creating large, eye-catching loops. Narrower ribbons (1 to 2 inches) work well for subtle accents, layering, or delicate touches.
As a rule: match the ribbon width to the tree size. A 6-foot tree needs at least 2.5-inch ribbon to read properly. A ribbon that is too narrow on a large tree disappears into the branches and has no visual impact. A ribbon that is too wide on a small tree overwhelms it.
Wired vs Non-Wired
This is the most important decision you will make before you start.
Wired ribbon has a thin wire running along each edge that allows it to hold any shape you give it. You can push a loop upward and it stays there. You can create a full bow and it holds its shape. Wired ribbon is easiest to work with and it is what professional decorators use almost exclusively for Christmas trees.
Non-wired ribbon is softer and more fluid but it will not hold a loop or a bow shape without support. It works well for a draped, cascading effect but it is significantly harder to use for the tucked-loop method described below.
If you have never put ribbon on a tree before, buy wired ribbon. The difference in the result is dramatic.
How Much Ribbon Do You Need?

For general guidance, use about 10 to 15 yards of ribbon for every foot of tree height. A 6-foot tree needs approximately 60 to 90 yards of ribbon for a properly filled look. This sounds like a lot and it is. Most people buy one roll of 9 yards, run out halfway down the tree, and wonder why it looks thin.
Buy more than you think you need. Leftover ribbon is useful for gift wrapping, wreaths, and next year. Running out halfway is not a good outcome.
Ribbon Combinations
Using two ribbons simultaneously, one wide and one narrow, or one plain and one patterned, produces a significantly more layered and interesting result than a single ribbon.
The classic professional combination is a wide velvet ribbon for the primary ribbon and a thinner metallic or satin ribbon woven alongside it.
The wide ribbon provides the structure and visual impact; the thin ribbon adds shimmer and detail.
The Three Core Techniques
Technique 1: The Loop and Tuck Method (Most Popular, Best for Beginners)
This is the technique used in most professional tree designs and the one that produces the full, designer result you see in photographs.
The principle is simple: you create soft loops of ribbon and tuck the ends deep into the tree rather than leaving the ribbon on the surface of the branches.
The most common mistake is attaching the ribbons to the surface of the tree rather than deep inside the branches. It is crucial to secure the ribbon to the innermost part of the branch so that it looks like the ribbon is coming from within the tree rather than just sitting on top of it.
Step 1: Start at the top
Begin at the very top of the tree. Fold the first 2 inches of the free end of the ribbon back on itself. This folded end tucks around the base of the tree topper or around the topmost branch and anchors the ribbon so it cannot pull free as you work down.
Step 2: Create your first loop
Pull out approximately 10 to 14 inches of ribbon and create a soft loop, pinching the ribbon at the base of the loop. Do not cut the ribbon yet. The loop should be generous, not tight. Think of it as a billow rather than a flat fold.
Step 3: Tuck deep into the branch
Push the pinched base of the loop several inches into the tree, not just behind the nearest branch but into the interior of the tree where the thicker inner branches can hold it securely. Think of your ribbon like a waterfall. It should not be tight or flat. You want soft loops and movement.
The loop puffs outward from the tree. The tucked section disappears inside. This is the effect you are going for.
Step 4: Move diagonally down the tree
Take the ribbon from where it exits the tree and move diagonally downward to the next position, roughly 12 to 18 inches lower and one section around the tree. Create another loop and tuck it in. Then move diagonally again.
As you work around, you will want to tuck the ribbon into the tree, let it puff or billow out diagonally, but not too loosely, then tuck it back in deep into the tree.
Continue this diagonal path from top to bottom, moving around the tree as you go rather than working straight down one side.
Step 5: Avoid perfect spacing
The key is to avoid perfectly even spacing. Variation makes the tree look more natural and layered. Let some sections cascade or loop closer together while others trail more loosely. This creates that effortless, designer look that makes the ribbons appear part of the tree rather than sitting on top of it.
Step 6: Secure the end
When you reach the bottom of the tree, tuck the ribbon end deep into a lower branch. If the ribbon has a tendency to pull free, fold the end back on itself before tucking to create a thicker anchor point.
Technique 2: The Vertical Cascade (Modern, Dramatic)
The vertical cascade is a more contemporary technique that produces a different look from the traditional loop-and-tuck. Instead of the ribbon winding around the tree, it falls in long vertical sweeps from top to bottom.
Step 1: Cut multiple lengths
Start by cutting your ribbon into several long pieces, each about 4 to 6 feet long, depending on your tree’s height and the desired effect. You will need eight to twelve lengths for a 6-foot tree.
Step 2: Secure at the top
Take each length and secure one end near the top of the tree. You can tie them to the top branch, secure them with a small ornament hook, or use a decorative tree topper to hide the ribbon ends.
Step 3: Let them fall naturally
Allow each ribbon length to fall down the tree, tucking it lightly behind branches at intervals to keep it loosely in place rather than hanging freely in front of the tree. The ribbon should move in and out of the tree’s depth as it falls, not hang flat against the front surface.
Vary the starting positions around the tree so the cascades are evenly distributed. Some can fall relatively straight; others can weave slightly as they descend.
Step 4: Fluff and adjust
Once all the cascades are in place, step back and assess the distribution. Add more lengths to any sections that look sparse. The finished result should look like ribbons are flowing naturally down through the tree from the crown.
🔥 Would you like to save this?
This technique works particularly well with very wide ribbon, 4 inches or more, or with luxurious materials like velvet that fall beautifully under their own weight.
Technique 3: The Cut and Place Method (Fastest, Flexible)
Cut ribbon into 20-inch strips and a few 10-inch strips for the top. Twirl each strip of ribbon just once and then tuck each end into a bare spot in the tree.
This method uses individual short pieces rather than continuous ribbon. Each piece is twisted once to create a small loop and both ends are tucked into nearby branches independently.
The advantage is flexibility: you can place ribbon exactly where you need it to fill gaps, you are not committed to a path down the tree, and you can add or remove individual pieces easily. The disadvantage is that it looks less fluid and cohesive than the loop-and-tuck method since there is no visual connection between the pieces.
This method works well as a secondary technique, adding extra loops of a contrasting ribbon to fill gaps after the main ribbon is in place, rather than as the primary approach.
Using Two Ribbons Together
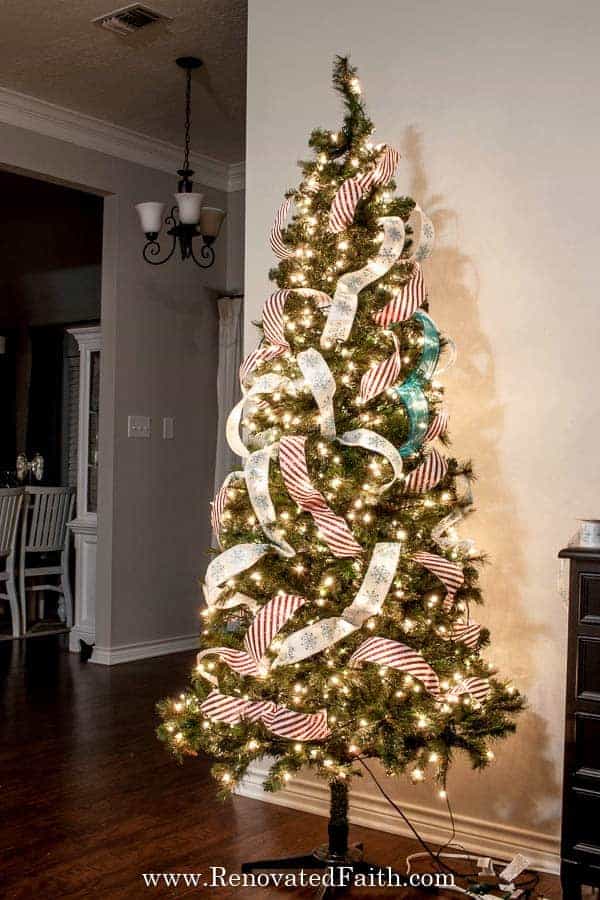
The most common question after the basic technique is how to use two ribbons simultaneously, and it is easier than people assume.
Apply the first (primary) ribbon from top to bottom using the loop-and-tuck method, working diagonally around the tree. Once the primary ribbon is fully in place, apply the secondary ribbon using the same method but offset from the first ribbon’s path. The secondary ribbon fills the gaps between the primary ribbon’s loops.
The two ribbons should overlap occasionally and diverge in other places.
Perfectly alternating the two ribbons produces a result that looks too regular and pattern-like. A more natural distribution where the ribbons sometimes run close together and sometimes separate produces a better result.
If your ribbons have different stiffness, that is totally fine. The contrast actually adds depth.
How to Make a Ribbon Bow for the Tree
A well-made bow placed at the tree topper or at key positions on the tree adds a finishing element that no loop can replicate.
The loop bow method:
Pull a length of ribbon from the spool without cutting it. Create a loop of your desired bow size and pinch the ribbon at the centre. Create a second loop of the same size on the opposite side and pinch alongside the first. Continue creating loops in alternating directions, four or five loops on each side, pinching and gathering in the centre after each one.
Once all loops are made, secure the centre tightly with a thin piece of wire or a cable tie pulled as tight as possible. Fan the loops outward in all directions and adjust until the bow looks full and even. Trim the tails to the desired length and cut a V-notch in each tail end for a more finished appearance.
The secret to a full, generous bow is using more ribbon than feels necessary and making more loops than seems right. A bow that looks slightly too large before it is attached to the tree will look correct once it is in place. A bow that looks the right size beforehand will look small once on the tree.
Common Mistakes and How to Fix Them
The ribbon looks flat and has no volume The loops are not being pushed outward and upward from the tree. Push loops upward for volume so they do not look flat. Once the ribbon is tucked in, physically push each loop upward with your hand so it sits proud of the branch rather than drooping down against it.
The ribbon keeps falling out The ribbon is being tucked behind surface branches rather than deep into the tree’s interior. Push the ribbon further in, past the first branch it meets, until it catches on thicker inner branches. For artificial trees with wire branch tips, you can simply twist a wired branch around the end of the ribbon to anchor it permanently.
The ribbon looks too tight and formal The loops are too small and spaced too evenly. Make each loop more generous (pull out more ribbon before tucking) and vary the spacing deliberately. Introduce some sections where two loops sit close together and others where there is a longer gap.
The ribbon path is visible and looks like a spiral You are working too regularly around the tree in the same direction. Change direction occasionally, move to a different quadrant of the tree unexpectedly, let the ribbon path be less predictable. Make two to three loops, then cut the ribbon and start again in a new spot moving in a different direction. Do not be afraid to cut the ribbon as it gives you the flexibility to place it where you need and results in a better overall design.
The ribbon does not match the tree’s scale Too-narrow ribbon on a large tree is one of the most common reasons a ribbon job looks wrong. If the ribbon is disappearing into the branches rather than being visible from across the room, it is too narrow. Go wider.
The bow will not hold its shape You are using non-wired ribbon. Wire ribbon holds any shape you give it. Non-wired ribbon requires wire or a twist tie at the centre to hold the loops in place. If you cannot switch ribbons, use a piece of florist wire at the centre of the bow to secure the loops.
Ribbon Styles for Different Tree Aesthetics

Traditional and classic: Deep red velvet ribbon, wide, with a gold metallic accent ribbon alongside it. Velvet absorbs light and creates a warmth that no other material replicates.
Scandinavian and natural: Tartan or buffalo check ribbon in muted greens and reds, or a natural burlap ribbon with a cream satin alongside. The texture of burlap against smooth ornaments creates a pleasing contrast.
Glamorous and metallic: Wide gold or silver wired ribbon in a cascade technique, allowing the metallic surface to catch the light as it falls down the tree.
Whimsical and children’s: Satin ribbon in multiple bright colours, each applied with the cut-and-place method at different positions. More playful and less structured than the adult versions above.
Minimalist and Scandinavian: A single narrow velvet ribbon in a deep forest green or midnight blue, used sparingly with longer gaps between loops. Less is genuinely more here.
The Step-by-Step Checklist
Before you start:
- Fluff and shape every branch of the tree first. Ribbon on an unfluffed tree always looks worse.
- Have your ribbon, scissors, and any additional wire ready before you climb the ladder.
- Decide on your technique and your ribbon combination before you start rather than mid-way through.
As you work:
- Always start at the top.
- Tuck deep into the interior branches not the surface.
- Push every loop upward and outward before moving to the next one.
- Step back every few loops to assess from a distance.
- Vary the spacing. Never perfectly even.
When you are done:
- Add any secondary accent ribbon to fill gaps.
- Place bows at key positions: the top, at a few mid-tree positions, and at the base if the tree skirt or collar needs a focal point.
- Step back from across the room and assess the overall distribution. Add more ribbon to any section that looks noticeably thin.
Frequently Asked Questions
Do I start ribbon at the top or the bottom of the tree? Always start at the top. Starting at the bottom means you run out of ribbon before you reach the top, which leaves the most visible part of the tree (the area nearest eye level) looking sparse. Starting at the top means any ribbon shortfall happens at the lower sections where it is less noticeable and easier to supplement.
Should I use one ribbon or two? Two ribbons in coordinating but contrasting textures almost always produce a better result than one. A wide ribbon and a narrow ribbon used together add layering and depth that a single ribbon cannot achieve. If budget is a consideration, use one excellent ribbon rather than two mediocre ones.
How do I keep ribbon from sliding down the tree? Push the tucked section deeper into the tree so it catches on multiple interior branches rather than resting on just one surface branch. For artificial trees, wrap the ribbon end around a wire branch tip and twist to anchor it. For real trees, the rougher branch surfaces grip wired ribbon better than smooth artificial branches.
Can I put ribbon on a pre-lit tree? Yes. Work around the light strands as you tuck the ribbon, treating them as additional branches to weave through. Wired ribbon holds its position better around light strands than non-wired ribbon.
How do I remove ribbon without damaging it for next year? Reverse the tucking process carefully, un-tucking each loop from the inside outward rather than pulling the ribbon from the outside. Once removed, wind it back loosely onto the original spool or around a piece of cardboard. Storing ribbon wound tightly prevents the creasing that makes it difficult to use the following year.
What is the difference between how ribbon looks on a real tree versus a fake tree? Real tree branches are irregular and textured which holds ribbon naturally with no extra effort. Artificial tree branches are smoother and more regular which means ribbon has less to grip and needs to be anchored more deliberately with wire or by wrapping around branch tips. The result looks equally good on both but the method requires slightly more care on artificial trees.
The first year I did this properly it took me about forty minutes to ribbon a five-foot tree and I stood back and looked at it for slightly too long afterward. Tasos asked if something was wrong. Nothing was wrong. It just looked genuinely beautiful for the first time and I was not entirely prepared for how much difference the ribbon made.
Start with wired velvet ribbon and the loop-and-tuck method. Tuck deep, push the loops upward, vary the spacing, do not panic when it looks wrong in the middle because it always looks wrong in the middle before it comes together at the end.
It will come together.

I’m Katerina Lithopoulou, co-creator of DIY Cozy Living. I’ve always loved the little things that make a space feel special. With a background in language and a passion for photography and cozy design, I enjoy turning everyday inspiration into simple ideas people can actually use.
My motto: “Cozy isn’t a trend — it’s a feeling.”
