
This post is all about how to paint a kitchen island.
But honestly?
It’s really about how one small, affordable change can make you feel like you have a completely new kitchen.
Here’s the thing.
I lived with my kitchen island for three years. Three years of the same color, the same feeling, the same “it’s fine, I guess.” And then one day I walked in and just… didn’t love it anymore.
Sound familiar?
I didn’t want to rip everything out. I didn’t want to spend a fortune. I just wanted a refresh.
So I picked up a brush and went for it.
Here’s exactly what I did — and how you can do it too.
A Quick Walk Around the Island First
Before we get into the how, let me give you a sense of what we were working with.
One side had three sets of drawers. The other had four cabinets with shelves. One end had a counter with two stools, and the other had decorative molding.
In other words — not a tiny project. But not an impossible one either.
The Questions You’re Probably Already Asking
If you’re thinking about painting your kitchen island (or your cabinets), these are the questions worth thinking through before you open a single can.
Q: Should you spray or brush and roll?
We seriously considered spraying. And then we looked at our wood floors and marble countertops and thought better of it. The overspray risk alone was enough to talk us out of it. The prep work involved in protecting everything would have taken longer than the actual painting.
Brush and roller combo it was. No regrets.
Here’s what we used:
- Small roller with a low nap
- Angled Purdy paint brushes (the XL Glide is my favorite)
- Painter’s tape
- Drop cloths
- Primer
Q: What’s the best paint for a kitchen island?
This one matters more than people realize — especially if your island was originally painted with oil-based paint like mine was. That glossy surface had me nervous.
I shouldn’t have been.
We used Sherwin-Williams Emerald Urethane Trim Enamel in a Satin finish. It goes on over glossy surfaces, cleans up with water, and the durability is genuinely impressive.
Why satin and not semi-gloss? My marble countertops are already very shiny. I didn’t want the island competing with them. The lower sheen keeps everything balanced.
This paint is the real deal. I won’t use anything else on cabinets now.
Q: How much prep work is actually involved?
More than you want. Less than you’d think. Here’s the exact order we followed:
- Removed all the hardware
- Taped off around the countertops
- Wiped the whole island down to remove dust and grease
- Laid drop cloths over the floors
- Applied one coat of primer before touching the color
Don’t skip the wipe-down step. Don’t skip the primer. Both matter more than most tutorials admit.
Q: How do you actually get a smooth finish?
Start by cutting in around all the edges and molding with your angled brush. Then go back and fill in the flat cabinet surfaces with the roller.
The low nap roller is the key to a smooth result. I know it’s tempting to grab whatever is on sale, but cheap rollers and cheap brushes will leave bristles stuck in your finish and texture you didn’t ask for. Quality tools make a genuinely visible difference. I’ve learned this the hard way more than once.
Q: How many coats do you need?
It depends on which direction you’re going color-wise. Light to dark needs more coats than dark to light — or same to same.
When the island was painted a medium gray, one coat did the job. This time we were going darker, so we did two full coats. Both were worth it.
The Part Nobody Talks About is Picking the Right Color
Most people run into trouble with this – and, if I’m being honest, so did I.
There’s just something about trying to picture a paint colour on a bit of furniture in your house, while you’re looking at a paint sample in a shop, under those bright shop lights, that simply doesn’t work; it never works, and yet we all still do it.
What really helped me, though, was this.
I got peel-and-stick paint samples and put them right onto the island itself. Not on a piece of paper stuck to the wall, but on the surface. Then I checked them out in the morning, in the afternoon and at night, with the kitchen lights on.
A colour can appear totally different, depending on the time of day and the kind of light, and your island is going to go through all of those times.
I also had to think about everything the island has to coexist with — the countertops, the floor, the cabinet color, the hardware. A color that looks stunning on its own can feel completely wrong once it’s surrounded by everything else in the room.
A few other things I learned along the way:
- Darker colors hide wear better. If your island gets heavy daily use, a deeper color is more forgiving of dings and scuffs than a light one.
- Undertones matter more than the color itself. A gray with a purple undertone is going to read very differently next to warm wood floors than a gray with a green undertone. Look at the undertone, not just the swatch.
- When in doubt, go a shade darker than you think. Paint always dries lighter than it looks wet, and colors almost always look lighter on a large surface than on a small chip.
Take your time with this step. The actual painting goes faster than you’d expect. The color decision is where you want to slow down.
What I Would Do Differently Next Time
Because something always comes up, doesn’t it?
First, I’d be much more careful when I put tape around the worktops. I’d thought I was being quite careful, but I wasn’t. A couple of times, with the brush, I got a little too near the marble and held my breath. Luckily, nothing went wrong, but I was lucky. Next time I’m going to use wider tape and much more of it!
Second, I would buy the new handles and knobs before I started painting, not afterwards. I took all the knobs and drawer pulls off to start with (as you have to) and then painted the whole island before I’d decided what new hardware I wanted.
So it was without hardware for roughly two weeks while I made my choice. It wasn’t a disaster, but a bit irritating. So, choose your hardware first because it will help you be sure you’ve found the right paint colour before you decide.
Third, I would give myself more drying time between coats. The instructions say a certain number of hours and I stretched the definition of “dry enough.” The second coat went on fine, but I was impatient and I knew it. With cabinet paint especially, more drying time equals a harder, more durable finish. Now I know.
And finally — and I mean this sincerely — I would do this project sooner. Three years I looked at that island and felt meh about it. Three years. The whole thing took a weekend. If your kitchen is making you feel “fine, I guess” right now, don’t wait three years like I did.
Your kitchen deserves better. So do you.
The Exact Color, Since You’re Going to Ask
The before was Mindful Gray SW 7016 — a beautiful, reliable gray that had served that island well for years. No complaints.
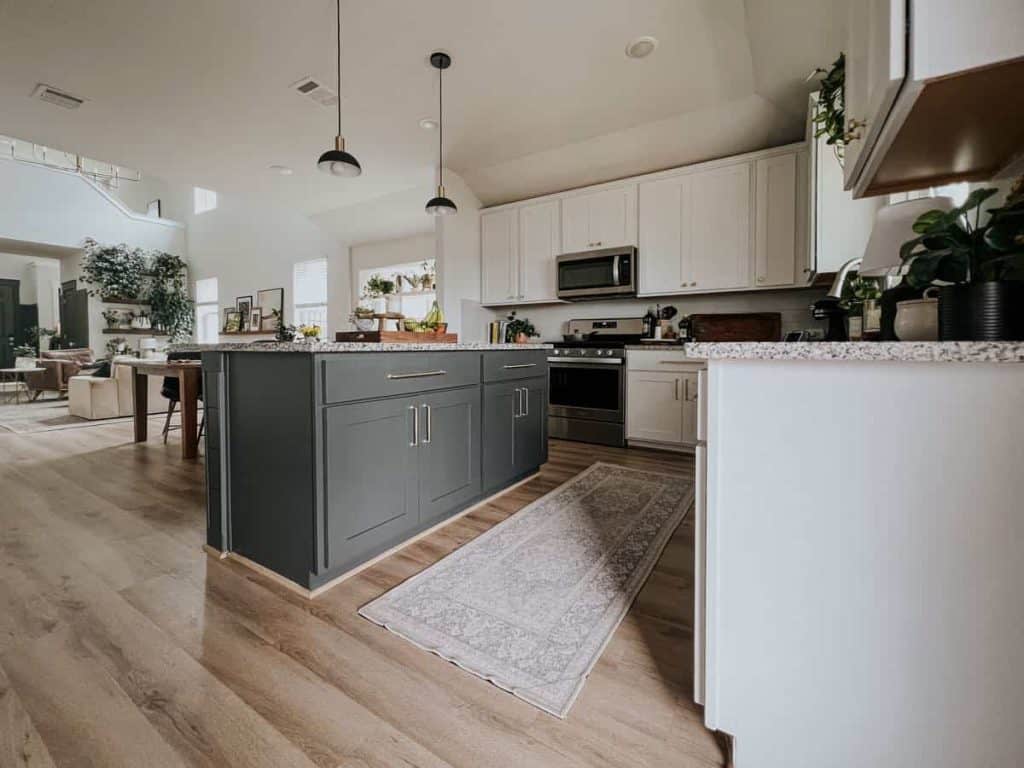
The after?
Peppercorn SW 7674.
And oh my goodness.
The difference it makes in the space is hard to put into words until you see it. It anchors the whole room. It balances the wood floors, plays beautifully off the marble, and gives the kitchen a whole new personality without changing a single thing structurally.
One More Thing Worth Saying
You don’t have to gut your kitchen to fall back in love with it.
You don’t have to spend thousands or live through weeks of renovation chaos. Sometimes the space just needs a new perspective — or in this case, a new coat of paint.
The smallest changes really do make the biggest differences.
And your kitchen island? It’s just waiting for its moment!
And that’s all I have for today’s article! I really hope you found it helpful and interesting. If you have any questions or comments feel free to leave em down below and I will be more than happy to get back to you as soon as I can!
Thanks for reading.
Until next time,
Stay safe,
Tasos
I’m Anastasios Moulios, co-founder of DIY Cozy Living. I enjoy finding creative, practical ways to make small spaces feel warm, stylish, and lived-in. I started this blog with Katerina to share real ideas that make a home feel a little more personal and a lot more comfortable.
