How to Create a Handmade Grinch Scarf (And Why My Daughters Fought Over It)

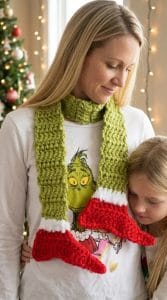
Every December, our house turns into what I can only describe as a cheerful craft explosion.
Yarn on the sofa, scissors on the kitchen table, and at least one cup of tea gone cold because I got distracted mid-project.
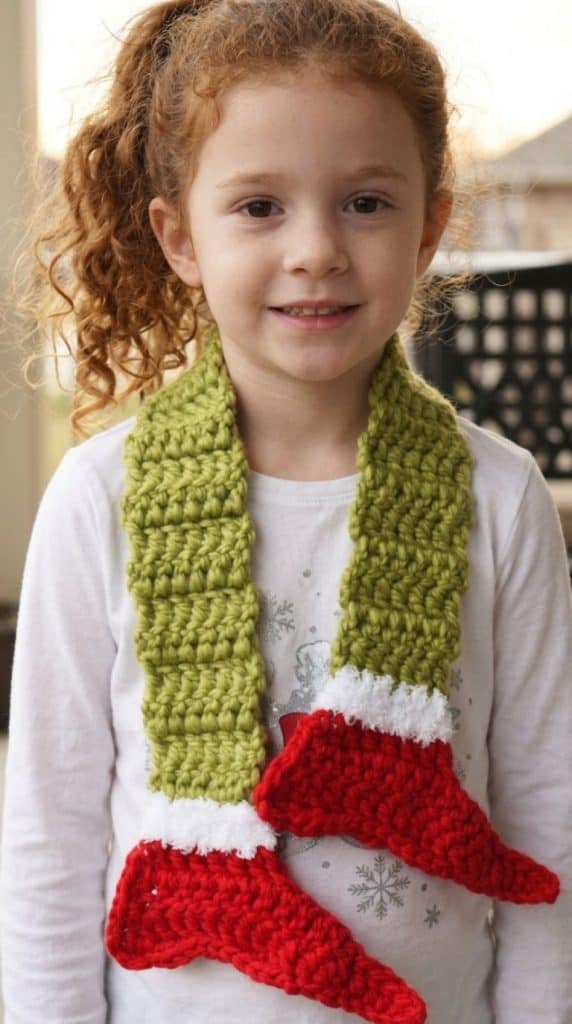
This year, my youngest Marina spotted a Grinch scarf online and said, “Mama, can you make that?”… and honestly, that’s all the motivation I ever need.
So I did.
And now my daughter Maria wants one too.
This handmade Grinch scarf is one of the most satisfying Christmas crafts I’ve made in years, it’s beginner-friendly, it uses supplies you can pick up at any craft store, and the end result looks like something you’d find in a boutique holiday shop.
Let me walk you through exactly how I made ours.
What You’ll Need Before You Start
I always say the secret to a smooth craft session is having everything ready before you sit down. Nothing kills the creative flow like getting up every five minutes to hunt for scissors.
Here’s what you’ll need for this project:
| Supply | Details |
|---|---|
| Green yarn | Medium weight (worsted), acrylic or wool blend |
| Red yarn | Medium weight, same brand as green if possible |
| Gold or yellow yarn | Optional, for accent touches |
| Crochet hook | Size H/8 (5 mm) |
| Scissors | Sharp, dedicated craft scissors |
| Yarn needle | For weaving in ends at the finish |
On yarn: I used an acrylic worsted weight in a bright, slightly lime-leaning green — the kind of green that just screams Grinch. For the red, go bold. Not burgundy, not brick — proper Christmas red. That contrast is what makes this scarf pop.
People always ask: Does the yarn brand matter?
Honestly, for a beginner-friendly project like this, not really. What matters most is that both your green and red yarns are the same weight — this keeps your tension consistent and your finished scarf looking tidy. I tend to reach for Lion Brand or Red Heart for projects like this because they’re easy to find and very forgiving to work with.
Getting Started: The Foundation
Once everything is laid out in front of you (I do this at the kitchen table while my mother Zina watches her shows in the background — she always peeks over to see what I’m making), you’re ready to begin.
Start by creating a slip knot with your green yarn, then chain 20 stitches. This is your foundation chain — the base everything else builds from. If you’ve never made a slip knot before, there are dozens of quick video tutorials online and it takes about thirty seconds to learn.
Once you have your 20-stitch chain, work single crochet stitches back across it. This is your first base row, and it sets the width of your scarf.
People always ask: How long should the scarf be?
A standard adult scarf runs around 60 inches (150 cm). For a child’s scarf — like the one I made for Marina — 45 inches is plenty. You’re simply continuing your rows until you reach the length you want, so there’s no complicated counting involved. Just keep going and hold it up every so often to check.
Building the Stripe Pattern
This is where the Grinch magic happens.
After every 10 rows, switch colors. So: 10 rows of green, 10 rows of red, 10 rows of green, and so on, all the way down the length of your scarf. The result is that classic bold stripe pattern that instantly reads as “Grinch” — without any complicated color work or charts.
To switch colors cleanly, finish your last stitch in the current color, then use a slip stitch to join in the new yarn. Cut the old color, leaving about a 6-inch tail to weave in later. It sounds fussier than it is — after the first switch, it becomes second nature.
People always ask: Do I have to alternate every 10 rows exactly?
Not at all! This is where you can really make the scarf your own. Tasos actually suggested I try wider stripes — 15 rows of green, 5 rows of red — and it gave a different but equally lovely effect. You could also do thinner stripes for a more graphic look, or even add a few rows of gold/yellow for extra personality.
Adding Texture and Personality
The simplest version of this scarf uses single crochet throughout — and it looks beautiful. But if you want to add a little more visual interest, consider mixing in different stitches as you go.
🔥 Would you like to save this?
Here are a few easy ways to elevate the look:
- Half-double crochet creates a slightly taller, airier stitch that gives the fabric more drape
- Double crochet makes the scarf work up faster and creates a looser, more open texture
- Alternating rows of single and half-double crochet gives a subtle ribbed effect that’s really pretty in person
I added a few rows of half-double crochet in the red sections on Marina’s scarf and she absolutely loved the texture. She kept running her fingers over it while I was still finishing the ends.
People always ask: What if my tension is uneven?
This is the most common worry for beginner crocheters, and I promise it matters much less than you think for a scarf. Scarves are wonderfully forgiving. If your tension loosens up as you relax into the project (which is totally normal), it just adds character. Block your finished scarf by dampening it lightly and laying it flat to dry — this evens out the stitches beautifully.
Finishing Touches That Make All the Difference
Once your scarf reaches the length you want, secure your final stitch so it won’t unravel, then take your yarn needle and weave in all those loose ends from your color changes. This is the most meditative part of the whole process — I usually do it in front of the Christmas tree with a cup of tea.
A few finishing ideas to consider:
- Fringe: Cut 6-inch lengths of both green and red yarn, fold them in half, and attach them along each short end for a playful fringe. Kids especially love this.
- Pompoms: Attach small green pompoms to each end instead of fringe for a rounder, cuter look
- Felt embellishments: Cut tiny heart shapes from red felt (the Grinch’s growing heart!) and hand-stitch them onto the scarf as a sweet detail
- Buttons: Sew on a few small round buttons in red or gold for extra texture
Maria asked for pompoms. Marina asked for fringe. I made both and now I need to make a second scarf.
Caring for Your Grinch Scarf
This is something I always include because handmade gifts deserve to last.
If you used acrylic yarn (which I recommend for beginners), your scarf is actually quite easy to care for. Most acrylic yarns are machine washable on a gentle cycle — check the yarn label to be sure.
If you used a wool blend:
- Hand wash in cool water with a small amount of mild detergent
- Gently squeeze out excess water — never wring or twist
- Lay flat to dry on a clean towel
- Reshape while damp if needed
Avoid hanging the scarf to dry while it’s wet — the weight of the water can stretch it out of shape.
People always ask: Can kids wash it themselves?
With acrylic yarn, yes — toss it in a laundry bag and run the gentle cycle. It comes out just fine. This is actually one of the reasons I lean toward acrylic for children’s projects; the durability and easy care is a genuine practical bonus.
Variations Worth Trying
Once you’ve made one Grinch scarf, you’ll want to make more — trust me on this. Here are some ways to change it up:
- Mini scarf for a stuffed animal: Use a smaller hook and lightweight yarn to make a tiny version for a child’s favourite toy
- Grinch infinity scarf: Instead of a traditional long scarf, work in the round to create a loop scarf — very cozy and no ends to lose
- Matching set: Use the same stripe pattern to make a hat and scarf set — the hat works up in a couple of hours and it’s the most adorable holiday gift
- Scarf for gifting: Make several during quiet evenings in November and package them in a gift box with a small handwritten note — they sell beautifully at holiday craft fairs too
My mother Zina has already requested one. She asked specifically for “a little less green” — which, Mama, sort of defeats the purpose, but I love you anyway.
One Last Thing Before You Start
If you’re brand new to crochet and this feels a little overwhelming — please don’t let it be. The Grinch scarf is genuinely one of the best beginner projects I know of. The stitches are simple, the stripe pattern gives you natural stopping points, and there’s enough going on visually that small imperfections just disappear into the design.
Pick up your yarn, find a cozy spot, and put on your favourite Christmas film. By the time the credits roll, you’ll have something beautiful to show for it.
And if your daughters end up fighting over who gets to wear it first — well, that’s just proof you made something worth having.
Thanks for reading,

I’m Katerina Lithopoulou, co-creator of DIY Cozy Living. I’ve always loved the little things that make a space feel special. With a background in language and a passion for photography and cozy design, I enjoy turning everyday inspiration into simple ideas people can actually use.
My motto: “Cozy isn’t a trend — it’s a feeling.”
