
How to Insulate Your Home Yourself and See Results Fast
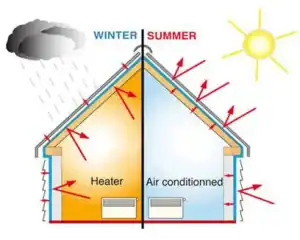
If you’ve been wincing at your energy bills or noticing cold drafts in winter and sweltering rooms in summer, your home might be telling you something: it needs better insulation.
But here’s the good news — you don’t have to hire a contractor or rip apart your walls to make a noticeable difference.
With a few DIY-friendly insulation hacks, you can boost comfort, cut energy costs, and make your home more eco-friendly — all in a single weekend.
Why Weekend Insulation Projects Work
You might think insulation is a huge renovation project. While that’s true for some upgrades, there are plenty of quick fixes and affordable upgrades that work wonders without heavy construction.
Pro Tip: Small, targeted insulation improvements can reduce heating and cooling costs by up to 15% according to the U.S. Department of Energy.
These hacks focus on areas where energy escapes most easily: windows, doors, floors, attics, and outlets.
1. Seal Air Leaks Around Windows and Doors
Drafty windows and doors are among the biggest culprits for heat loss. You can seal them in just a few hours.
What You’ll Need
- Weatherstripping tape (for doors)
- Rope caulk or silicone sealant (for windows)
- A utility knife and measuring tape
How to Do It
- Inspect the edges of windows and doors for visible gaps or feel for drafts.
- Apply weatherstripping to door frames and movable window sashes.
- Use rope caulk or silicone sealant for any stationary window gaps.
| Cost | Time | Difficulty |
|---|---|---|
| $10–$30 | 1–2 hours | Easy |
2. Add Window Insulation Film

This clear plastic film acts as an extra barrier against cold air in winter and can reduce heat gain in summer.
- Cut the film to size and attach it to the window frame using double-sided tape.
- Use a hair dryer to shrink it tight — no wrinkles, no drafts.
Bonus: It’s barely noticeable and easy to remove when warmer weather returns.
3. Install a Door Sweep

That small gap under your front or back door? It’s basically a highway for air to escape. A door sweep blocks it instantly.
- Choose a rubber or brush-style sweep.
- Attach it to the bottom of the door with screws or adhesive.
Example: I installed one on my back door last winter and noticed the kitchen stayed 3–4 degrees warmer without touching the thermostat.
4. Insulate Electrical Outlets and Switch Plates

Exterior wall outlets and switches often have small gaps that let cold air in.
DIY Fix:
- Turn off the power.
- Remove the cover plate.
- Add a foam gasket (costs less than $1 each).
- Replace the plate.
It’s a small job that adds up across an entire house.
5. Use Draft Stoppers (Homemade or Store-Bought)

For interior doors you don’t use often, a simple draft stopper works wonders.
You can make one by filling a long fabric tube with rice, sand, or old fabric scraps. Slide it against the base of the door to block airflow.
6. Add Reflective Insulation Behind Radiators

If you have radiators against exterior walls, heat can escape outside instead of into the room.
Weekend Fix:
- Cut a piece of reflective foil insulation.
- Place it behind the radiator to reflect heat back into the room.
| Cost | Time | Benefit |
|---|---|---|
| $15–$25 | 30 min | Up to 10% more heat efficiency |
7. Lay Down Rugs or Carpet Runners
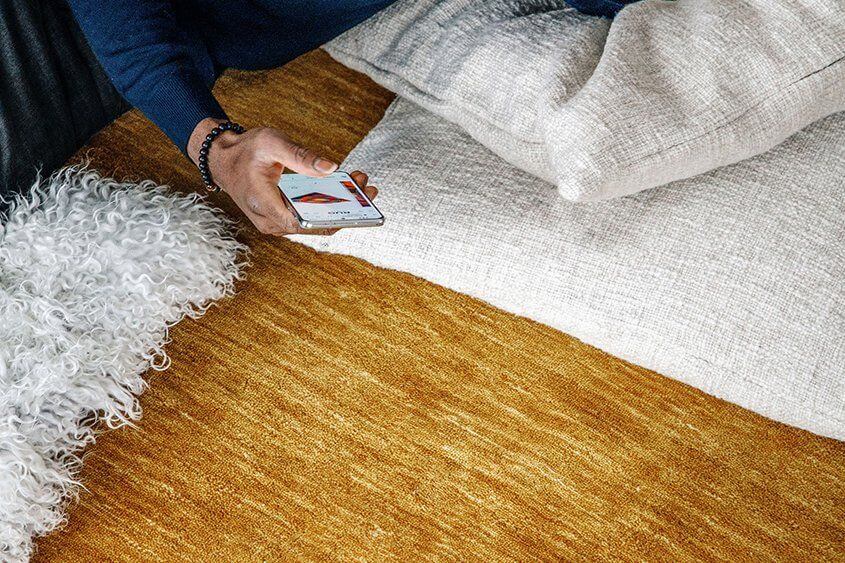
If you have bare floors over an unheated space (like a basement or crawl space), rugs provide a quick insulation boost.
Design Tip: Layering rugs not only adds warmth but also brings texture and style to a room.
8. Insulate the Attic Hatch
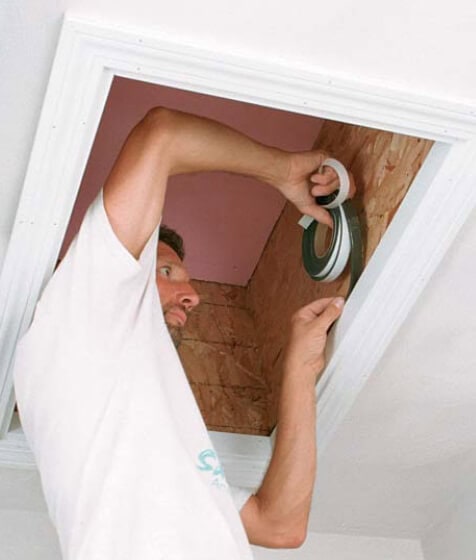
An uninsulated attic access panel can leak a surprising amount of air.
- Cut rigid foam board to size.
- Attach it to the hatch using adhesive.
- Add weatherstripping around the edges for a tight seal.
9. Use Thermal Curtains
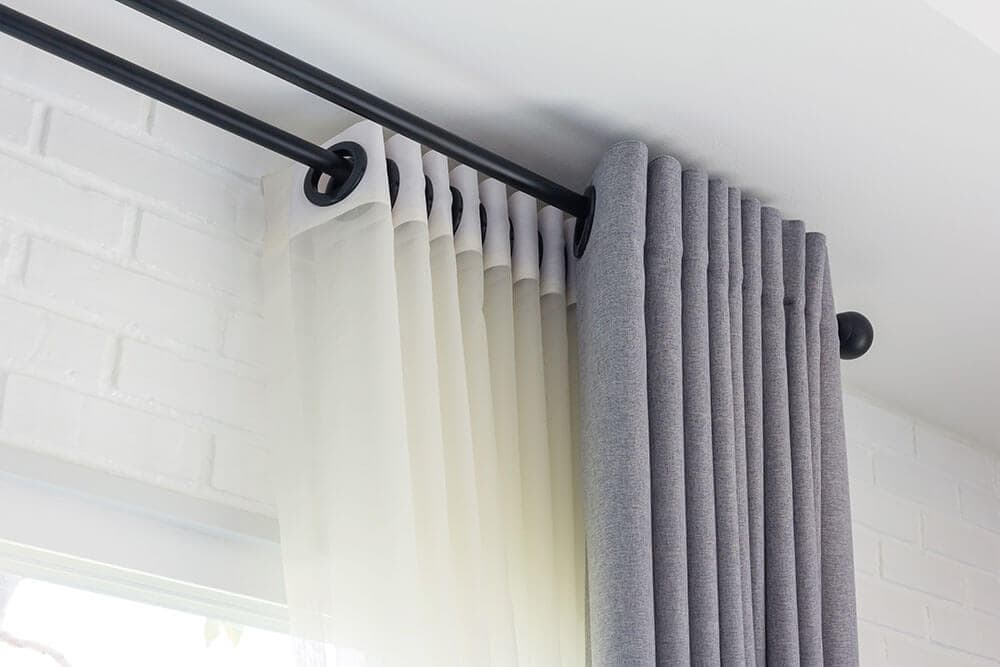
Thermal or insulated curtains help block drafts in winter and heat in summer.
- Close them at night in winter to trap heat.
- In summer, keep them shut during the hottest hours of the day.
10. Wrap Your Water Heater and Pipes
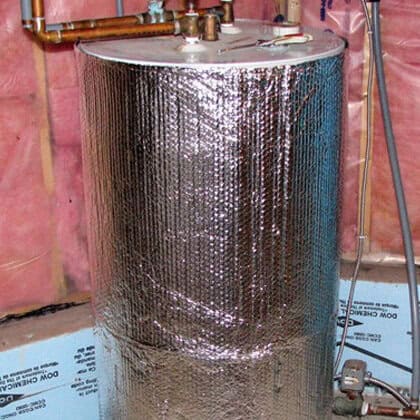
Heat loss from your water heater can drive up energy bills.
- Use a water heater blanket for older models (check manufacturer guidelines first).
- Wrap hot water pipes in foam insulation to keep water warmer longer.
Quick Reference Table
| Hack | Cost | Time | Difficulty | Main Benefit |
|---|---|---|---|---|
| Seal Windows & Doors | $10–$30 | 1–2 hrs | Easy | Stops drafts |
| Window Film | $10–$20 | 1 hr | Easy | Extra barrier |
| Door Sweep | $5–$20 | 30 min | Easy | Blocks gap |
| Outlet Gaskets | <$10 | 1 hr | Easy | Stops leaks |
| Draft Stoppers | Free–$20 | 15 min | Easy | Warmer rooms |
| Radiator Foil | $15–$25 | 30 min | Easy | More heat |
| Rugs | Varies | 10 min | Easy | Floor warmth |
| Attic Hatch Insulation | $15–$30 | 1 hr | Medium | Prevents heat loss |
| Thermal Curtains | $20–$60 | 15 min | Easy | Year-round control |
| Water Heater Wrap | $20–$40 | 1–2 hrs | Medium | Saves energy |
Safety and Maintenance Tips
- Always turn off power when working on electrical outlets.
- Check manufacturer instructions before adding insulation to appliances.
- Inspect seasonally — materials like weatherstripping can wear out over time.
Why These Hacks Work
The key to effective DIY insulation is targeting air leaks and surfaces where heat transfers easily. You’re not replacing your home’s insulation system — you’re giving it a boost where it’s weakest.
And since most of these projects are low-cost and low-skill, you can tackle several in one weekend for a noticeable difference in comfort and energy savings.
Final Word:
You don’t need a big budget or construction crew to make your home warmer in winter and cooler in summer. By sealing leaks, adding simple barriers, and making a few strategic changes, you can keep your home cozy year-round — and your energy bills under control.
I’m Anastasios Moulios, co-founder of DIY Cozy Living. I enjoy finding creative, practical ways to make small spaces feel warm, stylish, and lived-in. I started this blog with Katerina to share real ideas that make a home feel a little more personal and a lot more comfortable.
