
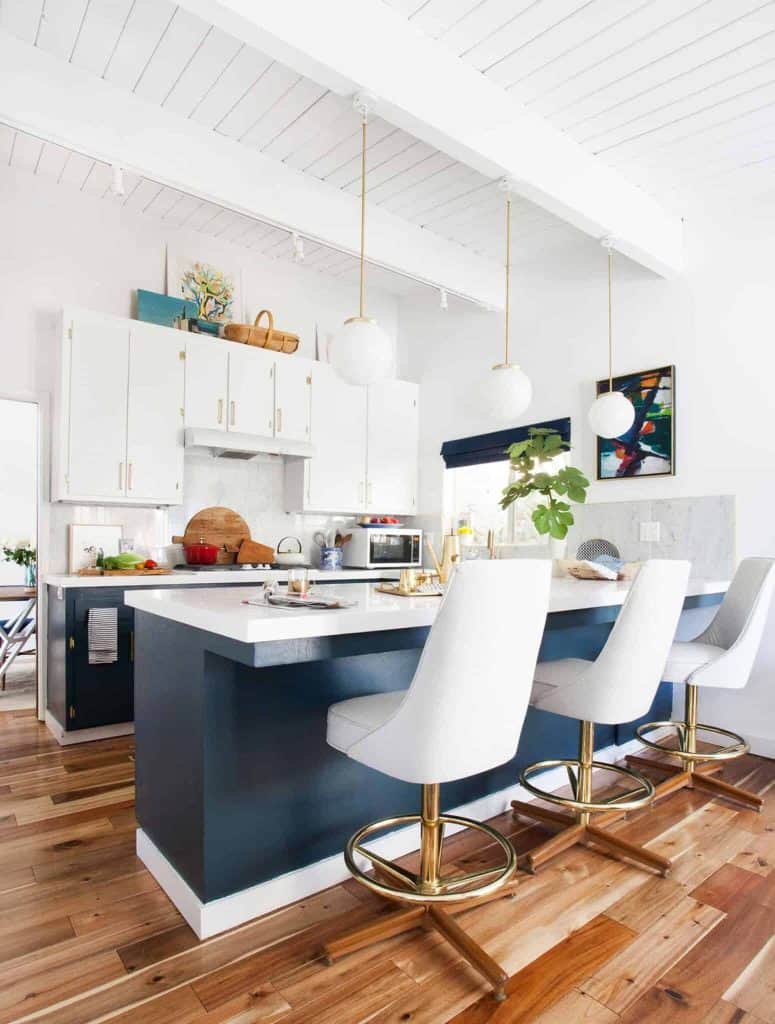
Is Decorating Above Your Kitchen Cabinets a Good Idea or Just a Dust Trap

Hello, all – it is really lovely to see you again.
As those of you who’ve kept up with what I’m doing will know, I’ve just moved to a new house; and honestly, the kitchen was something of a task.
One of the most annoying things I had to deal with – apart from working out where the last person who lived here put the light switches – was the strange, grimy space between the tops of the cupboards and the ceiling.
It’s just a strange, unused area. Should I put a false vine plant up there, as people did in ‘94? Or should I simply leave it and allow the dust to accumulate? Or should I simply get someone in to build it all in?
If you are looking at that gap now and are thoroughly confused, don’t be anxious.
For the last month I’ve been looking into, making, and trialling every option I could find. Whether you’re after a neat, up-to-date style, or a pleasant, rural aesthetic, this guide will give you the information to work out precisely what to do with the area.
Let’s get started!!
The Big Debate – To Decorate or To Close?
Before we dive into the “how,” we have to talk about the “why.”
Every kitchen is different. What works for my tiny apartment might not work for your massive open-concept home.
Here is a quick breakdown of why you might choose one over the other.
At a Glance: Decorating vs. Closing
| Feature | Leaving it Open (Decorating) | Closing it Off (Built-in Look) |
| Vibe | Airy, eclectic, and personalized. | Clean, high-end, and architectural. |
| Cleaning | Requires regular dusting (it gets greasy!). | Zero maintenance. No dust allowed! |
| Storage | Great for “overflow” items. | Can add “hidden” storage if you use doors. |
| Cost | Super budget-friendly (mostly DIY). | Can be pricey if you need custom trim. |
| Height | Makes ceilings feel higher if styled right. | Makes the room feel more structured. |
Pros and Cons of Leaving the Space Open
I’ll be honest with you guys—I’m a fan of the open look, but it isn’t for everyone.
When I first moved into my dorm, I used the top of the cabinets to store literally everything (including my textbooks… don’t ask). But now that I’m in a real adult apartment, I see the pros and cons a bit more clearly.
The Good Stuff (Pros)
- The Illusion of Space: If you have a small kitchen, closing off the top can sometimes make it feel like the ceiling is crashing down on you. Leaving it open keeps things “breathing.”
- Personal Expression: This is your chance to show off who you are! Whether it’s your collection of vintage teapots or just some cute baskets, it adds character.
- Easy Access: If you put things up there that you actually use (like that giant turkey platter you only touch in November), it’s easy to grab without digging through a deep pantry.
The Not-So-Good Stuff (Cons)
- The Dust/Grease Monster: This is the biggest one. Kitchens are oily. That oil floats up, mixes with dust, and creates this sticky film that is a nightmare to scrub off.
- Visual Clutter: If you put too much up there, it starts to look like a thrift store exploded. You have to be careful with their placement. (Oops, I mean the placement—see, I’m still caffeinating!)
- Outdated Vibes: If you use old-fashioned fake vines or cheap plastic decor, it can make a modern kitchen look like a time capsule from thirty years ago.
Creative Ways to Decorate (Style Like a Pro)
If you’ve decided to keep it open, please, for the love of design, don’t just throw a single silk plant up there and call it a day. We can do better than that!
Here are my favorite ways to style the space so it looks like a professional designer walked into your house.
1. The “Indoor Jungle” Vibe
Plants are the easiest way to add life to a room. However, since the top of the cabinets is usually pretty far from the light, you have to choose wisely.
- Pothos: These are great because they trail down the side of the cabinet, which looks stunning.
- Snake Plants: They grow vertically and are practically impossible to kill.
- Artificial (but High Quality): If you go the fake route, make sure they have “real-touch” leaves. Nothing ruins a kitchen faster than dusty, shiny plastic leaves.
2. Use Artwork and Photos
Who says art is only for the walls? I love leaning framed prints or even small canvases against the wall above the cabinets.
It draws the eye upward and makes the kitchen feel like a part of the rest of your home’s decor.
Just make sure the frames are sturdy so they don’t fall over when you slam a cabinet door!
3. The Rule of Three
When you’re grouping items, always stick to the Rule of Three. Group items in odd numbers with varying heights.
- Example: A tall vase, a medium-sized wooden bowl, and a small decorative candle.This creates a sense of balance that the human eye naturally loves.
Using the Top for “Secret” Storage
Let’s talk about function. If you’re like me and your kitchen cabinets are already bursting at the seams, that space up top is prime real estate.
But the key is making it look like storage, not like a mess.
The Basket Method
Buy a set of matching wicker or wire baskets.
- Uniformity is Key: If the baskets match, it looks like a deliberate design choice.
- Label Them: Use cute wooden tags or chalkboard labels.
- What to Store: Things you don’t use every day. Think: Holiday linens, cookie cutters, that fondue set you bought on a whim, or extra paper towels.
Pro Tip: If you use wire baskets, line the bottom with a pretty fabric or burlap so people can’t see the “ugly” stuff inside through the holes.
How to Close the Gap for a Streamlined Look
Maybe you’re looking at your kitchen and thinking, “Katerina, I hate dusting. I want a clean, high-end look.” I totally get it! Closing the gap is a great way to make a kitchen look more expensive and “custom-built.”
1. Add Crown Molding
This is the classic way to do it. You can install a wide piece of crown molding that goes from the top of the cabinet straight to the ceiling. It hides the gap and gives a very finished, elegant look.
2. Create a “Valance” or Riser
If the gap is too large for molding alone, you can add a “riser.” This is basically a flat piece of wood (painted to match your cabinets) that fills the space. Then, you put the molding on top of that. It makes your cabinets look like they were custom-made for the room.
3. Install “Hat” Cabinets
If you have the budget, adding a second, smaller row of cabinets on top is a total game-changer. These are often glass-fronted and have internal lights. It’s a great place to display your “good” china or crystal without them getting dusty.
Matching Your Style Archetype
When you’re deciding how to style or close your cabinets, you have to think about the “vibe” of your whole house. You don’t want a Farmhouse top in a Minimalist kitchen. It would look… well, weird.
- Farmhouse: Use a lot of white-washed wood, woven textures, and maybe some vintage milk glass.
- Industrial: Think metal bins, oversized clocks, and exposed “edison” style lighting.
- Minimalist: Less is more. Maybe one single, large ceramic vase and a lot of empty space. Definetly don’t over-decorate here.
- Boho: Bring on the plants, colorful ceramics, and eclectic textures.
Lighting the Space (Optional but Beautiful)
I cannot stress this enough: Lighting is everything.
Even if you don’t put a single piece of decor up there, adding lighting can transform your kitchen from “basic” to “boutique hotel.”
My Lighting Cheat Sheet
| Type of Light | Why I love it | Installation Difficulty |
| LED Strip Lights | Provides a continuous, even glow. Makes ceilings feel taller. | Easy (Peel and stick). |
| Puck Lights | Creates “pools” of light. Great for highlighting specific art. | Medium (Wireless ones are easy). |
| Rope Lights | Very flexible and cheap. | Easy. |
| Smart Bulbs | You can change the color to match your mood! | Easy. |
Installing these is usually a DIY job.
I bought a set of LED strips that plug into the same outlet as my microwave. Now, when I walk into the kitchen at night, it has this beautiful, warm glow that makes me feel like I’m in a fancy restuarant.
The “Maintenance Masterclass” (The Secret I Swear By)
Okay, real talk. If you leave the space open, it is going to get dirty. But I have a hack that will save your life (and your cuticles).
The Wax Paper Hack:
- Clean the top of your cabinets one last time (get all that grease off!).
- Lay down a layer of wax paper or newspaper across the entire top surface.
- Once every six months, just roll up the paper, throw it away, and put down a new layer.
- All the grease and dust stay on the paper, and your cabinets stay perfectly clean. It takes about 5 minutes. You’re welcome!
Final Idea I Recently Got From a Pinterest Post
Cabinet decor but not for the top. This ”side” kitchen cabinet decor idea looks brilliant to me!!! And it’s also perfect for those of ya that dont have a lot of space above their cabinets.
Definitely worth it for me!!! Loved it
Final Thoughts: What’s Right for You?
Ultimately, your kitchen needs to be a room you enjoy. Should you decorate it, if you’re the sort of person who wants to see things they really like first thing in the morning? Or, if you’d rather have a kitchen straight from a magazine that you don’t have to get a step stool out to tidy, is shutting it off a better option?
Before deciding, simply consider: am I doing this because I want to, or because I feel the area must be occupied? Occasionally, “blank space” – not filling everything – is actually a benefit, as it gives your eyes a place to relax.
I trust this aids you in dealing with the ‘empty’ in your kitchen, and with assurance. It’s one of those little adjustments that has a very big effect on how a house seems. Don’t worry about trying things; it isn’t forever!
And that’s all I have for today’s article. I really hope you found it useful ad helpful. If you have any comments or questions, feel free to leave em down below and I will be more than happy to get back to you as soon as possible!
Until next time,
Stay safe,


I’m Katerina Lithopoulou, co-creator of DIY Cozy Living. I’ve always loved the little things that make a space feel special. With a background in language and a passion for photography and cozy design, I enjoy turning everyday inspiration into simple ideas people can actually use.
My motto: “Cozy isn’t a trend — it’s a feeling.”
