
RV Remodel Hacks: How We Renovated an RV on a Budget!
Renovating an RV is one of those projects that sounds fun in theory … but in reality, becomes a blend of excitement, frustration, creativity, and real life.
We learned that the hard way — and we want to save you some stress by sharing not just what we did, but why we did it, how we saved money, what we’d do differently, and how it all came together room by room.
Whether you’re dreaming of a cozy mobile home, planning to live on the road, or just want to make camping way more comfortable, this story is for you.
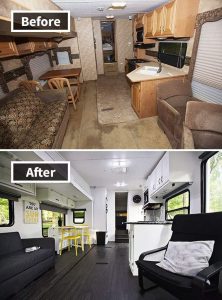
We will show you various before and after RV remodels because your RV may not be similar to ours. This way you can choose what suits you the most.
Before We Began: The Big Picture
We didn’t start with a blank slate RV. We started with a project — one that was dated, cluttered, and just waiting for someone to love it again.
Renovating an RV isn’t just about looks — it’s about function, comfort, and financial sense. And yes, doing it on a budget forces you to be wiser than you expected.
Here’s a roadmap of the process we followed — pulling together inspiration from long-form renovation posts, DIY blogs, and real RV communities:
Step 1: Assess What You Bought (Reality Check)
The first thing anyone renovating an RV on a budget should do is evaluate the condition carefully. When we got ours, we had big dreams — but reality was full of:
- out-of-date interiors
- outdated appliances
- mismatched cabinetry
- worn flooring
- dull lighting
So before tearing anything out, we sat down and asked:
“What absolutely needs to be fixed — and what can we live with?”
This helped us avoid spending on things that look old but still work fine. It also helped shape the budget categories.
Common red flags to check before purchasing or renovating:
- Water damage (big problem in older RVs)
- Non-working appliances (can be expensive later)
- Plumbing issues
- AC/heating problems
- Awning condition (expensive to replace)
- Tires/brakes condition — especially if you plan to travel long distances
Step 2: Sketch a Plan — Not Just a Wish List
We are list lovers — and there’s a reason for that: without one, renovation becomes chaos. Our rule was simple:
Plan first, buy later.
Measure twice, spend once.
Early on, we sat down and wrote:
- Room priorities
- Budget limits
- Non-negotiables vs. nice-to-have
We split items into two big categories:
- Must-fix foundation: structural, functional, safety
- Aesthetic upgrades: paint, décor, lighting, shelving
A key piece of planning was deciding what mattered most. For us:
- A beautiful kitchen countertop
- A modern backsplash as visual centerpiece
- Lighting that didn’t make the place feel like a cave
This became our big-ticket allocation list — everything else we compromised or swapped for budget alternatives.
Step 3: Budget-Friendly Shopping (Chaos and Rewards)
Renovating on a budget means learning where to buy, when to wait for deals, and how to save big without sacrificing quality.
Our biggest sources:
- Home Depot & IKEA for furniture and hardware
- Amazon for quick-ship items
- Target for décor accents
A few clever tips we picked up and used:
- Double-check return policies — because sometimes what looks good on paper doesn’t fit in reality
- Shop tools first — tools literally save money when you borrow, rent, or already own them
- Use coupons, cashback, seasonal sales
- Look for repurposed or second-hand items on marketplace groups
One lesson I keep repeating: watching how materials feel in real daylight before deciding is worth an extra trip. Small spaces read differently once light hits them.
Step 4: Fix What Needs Fixing (Structural and Functional)
Before any glamorous cosmetic work starts, you have to handle:
- interior water damage
- broken joints
- peeling laminate
- electrical and plumbing basics
If you skip this, it can come back to bite you later, both in cost and headaches.
This stage is not glamorous. It’s sanding, patching, resealing, and sometimes screaming into a drill. But it’s essential.
Step 5: Demo — With Purpose, Not Destruction
One of the most satisfying parts was demoing the interior. But unless you’re absolutely sure of what you’re replacing, resist the urge to gut everything — especially storage cabinets. We removed only what was:
- outdated
- unusable
- poorly designed
Things we kept or repurposed:
- structurally sound cabinets
- working appliances
- non-broken doors
Things we removed with intention:
- old countertop
- outdated lower cabinets
- trim and décor that made the space feel smaller
This kind of targeted demo preserves budget and energy.
Step 6 — Prep Surfaces Like a Pro (This Actually Determines the Finish Quality)
Here’s where many weekend DIY projects fail: half-done surface prep.
RV interiors are a patchwork of materials:
- particleboard
- solid wood
- plastic laminate
- veneer
- wallpaper
Each surface needs a different approach. For the best paint results:
- loosen glossy surfaces with liquid sander
- sand particleboard lightly
- prime every surface before color
If you rush this, you’ll end up repainting sooner rather than later. It’s boring, but it matters.
Quick Prep Checklist
| Surface Type | Prep Required | Why It Matters |
|---|---|---|
| Real wood | Liquid sander + light sand | Helps primer stick |
| Particleboard | Light sanding | Improves adhesion |
| Wallpaper | Remove or roughen | Prevents peeling |
| Laminate | Degrease + rough | Avoids bubbling paint |
Step 7: Painting — Your Biggest Visual Impact for the Least Money
Painting changes everything.
We went with a soft neutral palette to make the interior feel:
- brighter
- larger
- modern
Painting cabinets, walls, and ceilings uniformly created a canvas that made everything else pop with color and texture. Even small campers feel more open with lighter tones.
Whether you’re repainting cabinets or walls, always:
- prime first
- choose durable interior paint
- work in sections and let each coat dry thoroughly
What About Wallpaper?
We experimented with peel-and-stick wallpaper and shelf liner faux wallpaper as accent walls. It worked well in some areas, but materials matter — cheap liners can shrink or warp with temperature changes. The trick is choosing products rated for heat and humidity if you live in areas with temperature swings.
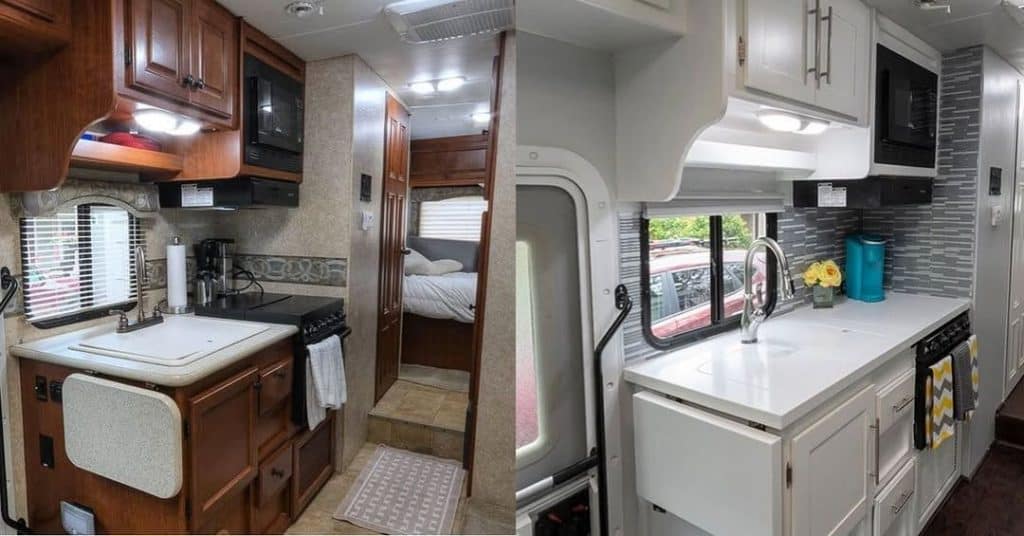
Kitchen Renovation: The Heart of the RV
The kitchen pulls everything together.
Instead of buying an expensive butcher block, we improvised:
- used an IKEA tabletop as a countertop
- cut it to size
- used leftover pieces to extend the dinette table
- covered seams strategically with decorative elements
It ended up better than we hoped — and saved a bundle.
Backsplash That Doesn’t Break the Bank
Peel-and-stick backsplash tiles are one of the biggest “wow” upgrades for a small kitchen. They’re affordable, removable, and can protect walls from splashes.
Tools helpful here:
- cutting mat
- metal ruler
- X-Acto knife
- level
Start low and work up. Dry-fit pieces first — it saves so much rework.
Lighting — Small Change, Huge Mood Shift
RV lighting makes a massive difference.
We swapped:
- outdated bulbs
- harsh yellow base lights
For:
- LED fixtures with lower voltage (12V systems)
- accent lights over seating
- industrial-style fixtures for personality
If you’re replacing lights, make sure they’re rated for RV electrical systems. Safety first.
Flooring — The Base of Comfort
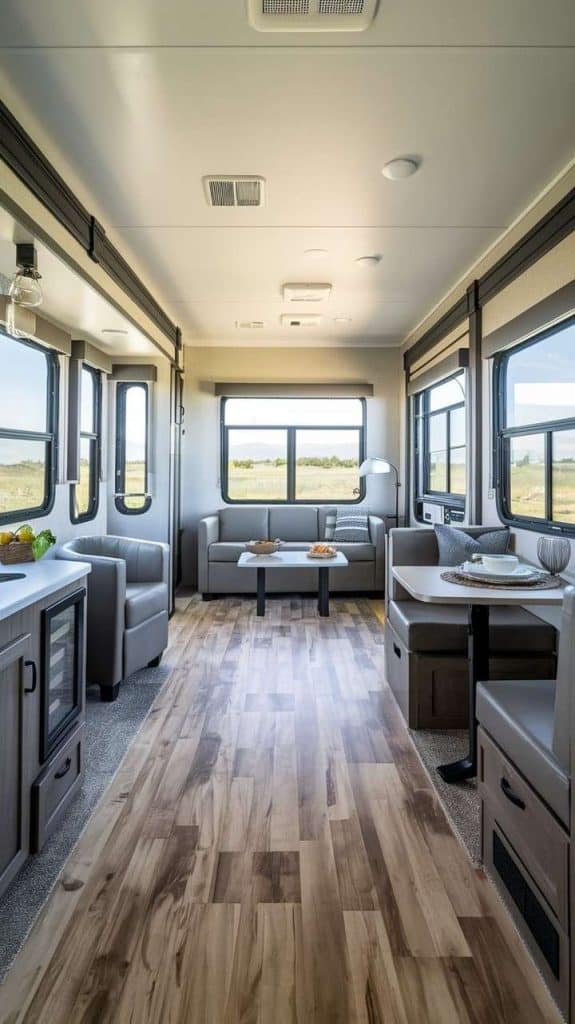
Replacing the floor is a project — but worth it.
Vinyl plank or snap floors are:
- easy to install
- budget-friendly
- durable for travel use
Just remember to account for expansion gaps — temperature and movement affect how floors settle.
Furniture — Functional First, Then Stylish
When adding or replacing furniture:
- bolt heavy pieces down
- choose multifunctional items
- keep weight in mind — RVs are weight-sensitive
We reused a corner cabinet and bolted it to the wall, which gave us extra storage without added weight.
Seating & Textiles — Comfort Meets Practicality
Replacing big furniture like sofas is tempting — but not always practical. Instead:
- reupholster with durable fabric
- use waterproof materials in high-traffic areas
- make custom covers if needed
We chose soft yet wipe-clean textiles because we travel with kids — function over fashion always.
The Bedroom: Turning a Tight Space into a Place You Actually Want to Sleep
RV bedrooms can feel claustrophobic. Low ceilings, awkward layouts, limited storage — it’s not exactly a luxury hotel situation. But with a few smart, budget-friendly upgrades, this space can become one of the coziest corners of your RV.
One of the first things we realized is that comfort matters more than aesthetics here. You can have the prettiest decor in the world, but if you’re not sleeping well, the whole experience suffers.
Instead of replacing the mattress (which can get expensive fast), we added a quality mattress topper. That alone changed everything. Better sleep, less back pain, and zero regret.
Lighting also made a huge difference. We swapped harsh overhead lights for softer options — LED strip lighting and warm lamps — which instantly made the space feel calmer and more intentional.
What We Focused On in the Bedroom
| Element | What We Did | Why It Worked |
|---|---|---|
| Mattress | Added a topper | Comfort without major cost |
| Bedding | Neutral, layered textiles | Made the space feel larger |
| Lighting | Warm LEDs and lamps | Softer, more relaxing mood |
| Storage | Under-bed solutions | Used space that was already there |
The bedroom doesn’t need to be fancy. It just needs to feel peaceful.
The Bathroom: Small, Yes — But Still Worth the Effort
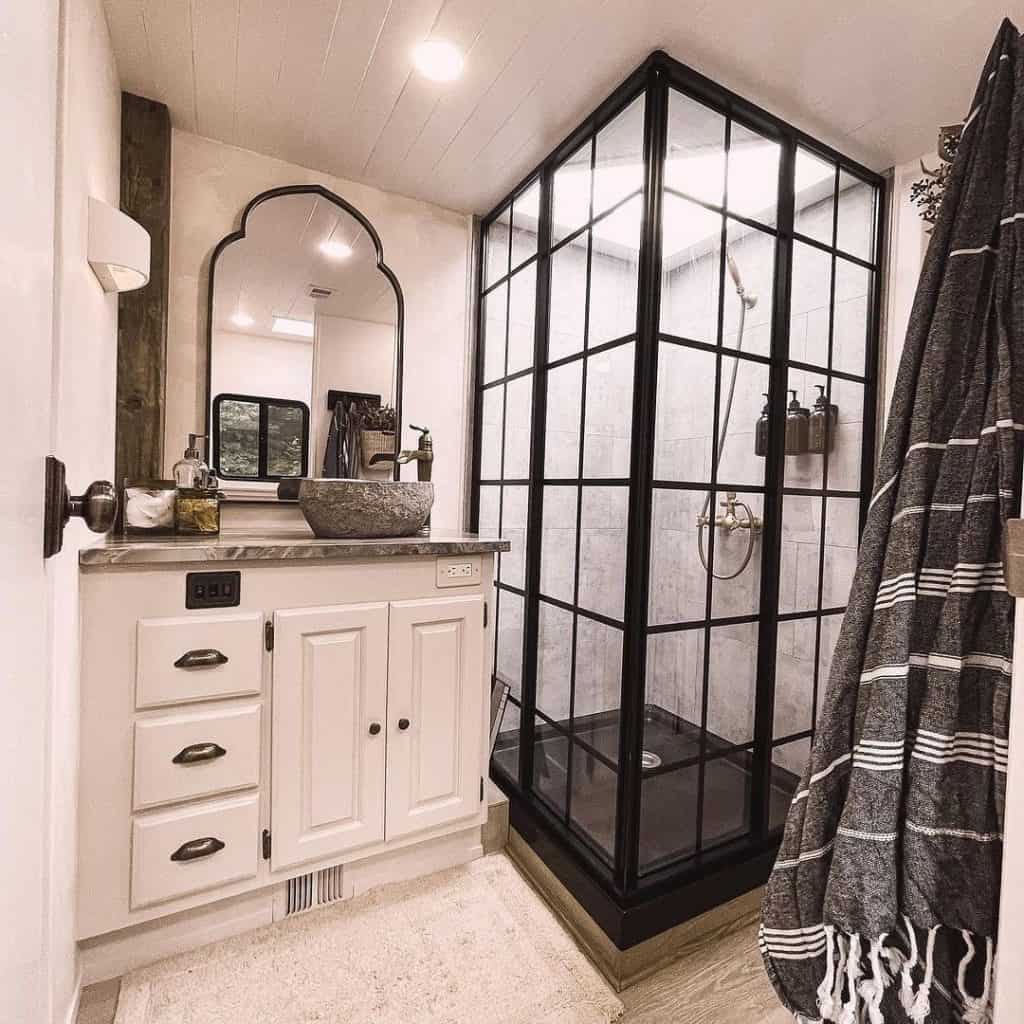
Let’s be honest: RV bathrooms are rarely anyone’s favorite place. They’re tiny, often outdated, and usually feel more functional than enjoyable. But small upgrades here can have an outsized impact.
We didn’t gut the bathroom — that would’ve blown the budget. Instead, we focused on visual freshness and usability.
A new shower curtain in a light color made the room feel instantly brighter. We upgraded the showerhead (cheap but effective), added small storage shelves, and replaced worn accessories.
Waterproof peel-and-stick materials worked beautifully for adding personality without committing to permanent changes.
Small Bathroom Changes That Actually Matter
- Brighter lighting (this alone is a game changer)
- A clean, modern shower curtain
- Lightweight shelving for daily essentials
- Simple hooks for towels and toiletries
- Decluttering anything we didn’t use weekly
You don’t need a spa bathroom. You need a bathroom that feels clean, calm, and easy to use.
Storage & Organization: The Secret to RV Sanity
If there’s one thing we learned quickly, it’s this:
A beautiful RV means nothing if you can’t stay organized.
Storage is what makes or breaks daily life in a small space. We approached this part less like decorators and more like problem-solvers.
Instead of adding bulky furniture, we focused on hidden and vertical storage. Doors, walls, and unused corners became valuable real estate.
Storage Rules We Live By Now
- Use vertical space before adding new furniture
- Hooks are your best friend
- Every item must earn its place
- If it doesn’t have a home, it becomes clutter
Under-bed storage, over-door organizers, baskets, and wall-mounted solutions helped us keep everything accessible without overwhelming the space.
Decor & Personal Touches: Where the RV Became Ours
This was the most fun part — and surprisingly, one of the cheapest.
Decor doesn’t have to be expensive to feel meaningful. Some of our favorite touches came from thrifted items, repurposed materials, and things we already owned.
We treated decor like seasoning: a little goes a long way.
Instead of filling every wall, we chose a few accent pieces:
- A soft wallpaper feature
- Warm wood textures
- Neutral fabrics layered with one or two accent colors
In small spaces, restraint actually feels more luxurious.

Hidden Costs (So You’re Not Caught Off Guard)
Even with careful planning, some costs sneak up on you. That’s just reality.
Common surprises:
- Moisture damage you didn’t notice at first
- Extra materials for repairs
- Tools you didn’t realize you needed
- Replacement parts specific to RV systems
We learned to expect the unexpected and set aside a small buffer — even a modest one makes a difference.
What Renovating Taught Us (The Real Lessons)
This project wasn’t just about the RV. It taught us patience, flexibility, and how to make decisions together under pressure.
Some honest takeaways:
- You don’t need perfection — you need progress
- Trends fade; comfort lasts
- Some “mistakes” become your favorite parts
- Living in a renovation is harder than it looks
We also learned that asking for advice and learning from others’ mistakes saves time, money, and stress.
Budget Snapshot: What Renovating on a Budget Actually Looks Like
| Area | Budget-Friendly Approach | Approximate Cost |
|---|---|---|
| Paint & Prep | DIY with primer | Low |
| Flooring | Vinyl or plank | Medium |
| Lighting | LEDs & reused fixtures | Low |
| Bathroom updates | Accessories & storage | Low |
| Decor | Thrifted & DIY | Very low |
| Storage | Baskets, hooks, organizers | Low |
The biggest savings came from doing the work ourselves and knowing when to reuse instead of replace.
What We’d Do Differently Next Time
Looking back, there are a few things we’d change:
- Spend more time checking for moisture early on
- Build storage solutions into the renovation phase
- Avoid chasing trends and focus more on timeless choices
But overall? We’re proud of what we created.
Final Thoughts: Is Renovating an RV on a Budget Worth It?
Absolutely — if you go in with realistic expectations.
Renovating an RV on a budget isn’t about copying a Pinterest-perfect makeover. It’s about creating a space that works for your life, your travel style, and your priorities.
For us, it became a home on wheels — imperfect, personal, and completely ours.
Until next time,
Stay safe,
— Katerina & Tasos

I’m Katerina Lithopoulou, co-creator of DIY Cozy Living. I’ve always loved the little things that make a space feel special. With a background in language and a passion for photography and cozy design, I enjoy turning everyday inspiration into simple ideas people can actually use.
My motto: “Cozy isn’t a trend — it’s a feeling.”

Thank you. Great ideas with true incentive for change.