
How to Make a Paper Ghost for Halloween (The Hanging Kind That Actually Looks Good)


There is a specific kind of Halloween decoration that looks like it belongs in a house where someone actually cares about October rather than just going through the motions.
The hanging ghost is one of them.
Not the plastic ones from a bag. The ones made from white tissue paper, hung from a thread, that move slightly when someone walks past and catch the light in a way that makes them look genuinely ghostly rather than craft-project-y. Marina spotted them in a photo last year and asked me to make some for her bedroom doorway. I made three in about forty minutes and she immediately asked for more.
We have eleven of them now. They live in a box with the paper pumpkins and the origami decorations and they come out every October without fail.
Here is exactly how to make them.
What You Need
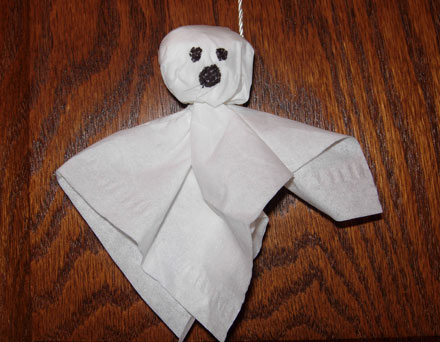
White tissue paper — two sheets per ghost. Standard tissue paper from any craft shop or gift wrap section works perfectly. Thicker tissue paper holds its shape better. Very thin paper tears easily when you’re shaping the head, so if you have options, go for the slightly thicker variety.
White thread, fishing line or thin white string — for hanging. Fishing line is the best option because it’s invisible once the ghost is hung, which makes the ghost look like it’s floating rather than suspended. White thread is the next best option. Avoid coloured thread or thick string.
A needle — for threading the hanging line through the head of the ghost.
Black marker or black paper — for the face. A fine tip black marker is the fastest option. Cut paper eyes and mouth give a more graphic, bold result that’s visible from further away.
Scissors
Something round for the head — a small ball of scrunched tissue paper, a cotton wool ball, a small polystyrene ball, or even a scrunched ball of newspaper. The size of this determines the size of the finished ghost. A ball roughly the size of a large marble gives a small delicate ghost. A ball the size of a golf ball gives a more substantial one.
Optional: white ribbon for a bow at the neck, googly eyes instead of drawn ones, a small amount of white thread for a wispy trailing effect at the hem.
How Many Ghosts to Make
One ghost is a craft. Three ghosts in a doorway is a decoration. Seven ghosts at varying heights across a window is a Halloween moment.
Make more than you think you need. They take about fifteen minutes each once you’ve done the first one and know the process. A batch of six takes an evening and looks considerably more dramatic than a single ghost hanging alone.
For a group display, varying the sizes makes the arrangement look more natural — make some with a smaller head ball and some with a larger one, and hang them at different heights.
Step One: Make the Head
Take your ball — cotton wool, polystyrene, scrunched tissue paper, whatever you’re using — and set it aside for a moment.
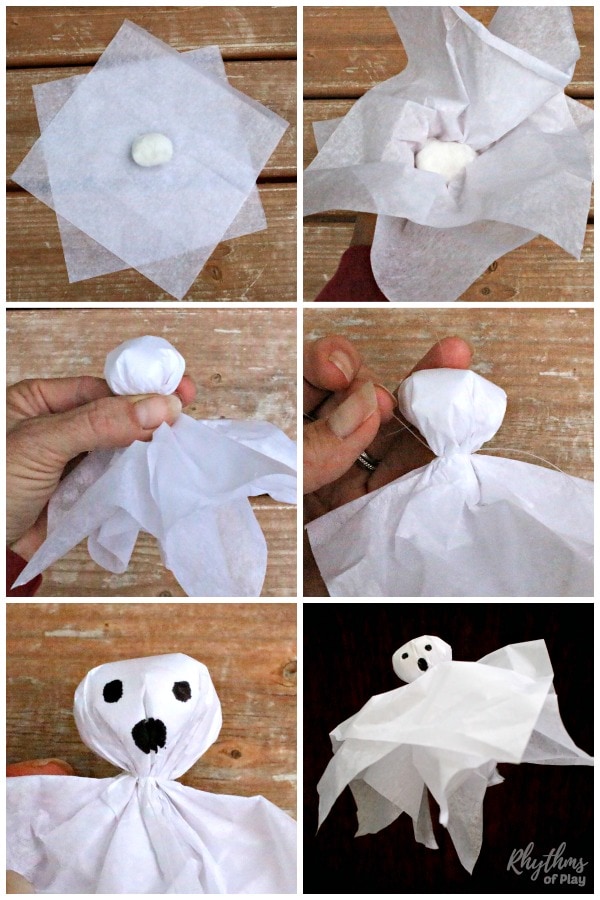
Take one sheet of white tissue paper and lay it flat on the table. Place the ball in the centre of the sheet.
Gather the tissue paper up around the ball from all sides, pulling it snugly around the ball to form the head shape. The paper should be smooth over the top and sides of the ball with no visible wrinkles on the face area — wrinkles here will be visible once the face is drawn on and make the ghost look crumpled rather than clean.
Hold the gathered paper below the ball firmly between your thumb and forefinger. This gathered section below the ball is the neck. Set it aside without letting go — you need the second sheet now.
Step Two: Add the Body
Take the second sheet of tissue paper and lay it flat.
Place the head you just made in the centre of the second sheet, with the neck section pointing downward and the smooth head at the top.
Gather the second sheet up around the head the same way you gathered the first — pulling up from all sides, smoothing it over the top of the head until the surface is clean and even.
Now both sheets are gathered below the head, the first sheet closest to the ball and the second sheet over the top of everything. The double layer gives the ghost more opacity so the ball inside doesn’t show through, and more body in the skirt section below the neck.
Step Three: Tie the Neck
Still holding the gathered section firmly below the head, take a short length of thread and tie it tightly around the neck to secure everything in place. Tie it twice and knot firmly — this is what holds the ghost together and if it’s loose the head will sag.
The neck tie should sit close to the bottom of the ball, not too far below it. Too much paper between the ball and the tie makes the neck look long and the head look small. The tie should sit at the natural base of the head shape.
Trim the knot ends short.
Step Four: Shape the Skirt
The paper below the neck tie is the ghost’s body and trailing skirt. Shake it loose gently — it should fall naturally into soft folds around the neck tie.
For a more dramatic trailing effect, carefully tear the bottom edge of the tissue paper into uneven strips or points rather than leaving it as a straight edge. The irregular hem catches the air when the ghost moves and looks more ghostly than a clean straight edge.
🔥 Would you like to save this?
If you want a more polished look, leave the bottom edge as it is — it falls in natural folds that are soft and pretty without being specifically shaped.
For a really full skirt, add a third sheet of tissue paper at this stage — cut it into a circle slightly smaller than a full sheet, cut a small hole in the centre, and slip it over the neck tie before tying. This extra layer adds volume at the hem.
Step Five: Add the Face
This is the step where the ghost becomes a ghost rather than a lump of white paper.
With a marker: Hold the head gently and draw two oval or round eyes on the smoothest part of the face. A simple open oval for a surprised ghost. A slightly downturned shape for a sad ghost. Small circles for a classic look. Add a small open mouth below the eyes — an oval, a circle, or a simple curved line.
Keep the face simple. The tissue paper surface is slightly textured and fine detail gets lost. Bold, simple shapes read better from a distance and look more charming.
With paper: Cut two small oval or circle shapes from black paper or card. Cut a small mouth shape. Glue them onto the face with a tiny dot of glue stick. Paper eyes have a graphic quality that drawn ones don’t — they’re bold, they’re visible from across the room, and they don’t smudge.
Googly eyes: Glue two googly eyes onto the face for a version that children find immediately funny. Marina prefers this version. I prefer the paper eyes. We usually make some of each.
Step Six: Thread the Hanging Line
Cut a length of fishing line or white thread — about thirty to forty centimetres for a standard hanging ghost, longer if you want it to hang very low.
Thread one end onto the needle. Push the needle straight down through the very top of the ghost’s head, through the ball inside, and out through the other side. Remove the needle and tie a knot at the short end of the thread so it can’t pull back through.
The thread now exits the top of the ghost’s head. Tie the other end to wherever you’re hanging from — a curtain rail, a length of twine strung across a window, a hook in the ceiling, a branch.
If you don’t have a needle long enough to pass through the head, push a toothpick through the top of the head horizontally and tie the thread around the middle of the toothpick. The toothpick sits inside the head and holds the thread without pulling through.
How to Display Them
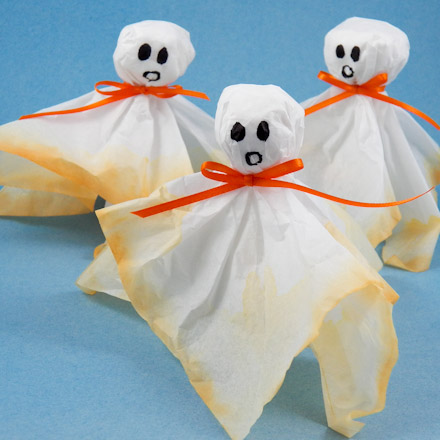
Across a doorway: String a length of thin twine or invisible thread across the doorway at varying heights. Hang ghosts at different heights from the main line so they hang at staggered levels — some at eye height, some lower, some just above head height. People walk through them as they enter the room.
In a window: The same approach but against a window. In daylight the ghosts are visible from outside. In the evening with light behind them they glow. Fishing line makes them look like they’re floating in the glass.
From a branch: A bare branch in a tall vase with ghosts hanging from each branch tip. Add some of the origami bats from the Halloween origami article [linked here] alongside the ghosts for a mixed hanging display.
Clustered at different heights from the ceiling: Three or five ghosts hung from the same point at different thread lengths. They cluster together and move independently, which looks more alive than a row of evenly spaced ghosts at the same height.
Combined with paper pumpkins: A shelf or mantel with the paper pumpkins from the paper pumpkin tutorial [linked here] sitting at the base and two or three small ghosts hung just above them at different heights. The combination of floor-standing pumpkins and hanging ghosts fills a display area vertically in a way that one element alone doesn’t.
Variations Worth Trying
Mini ghosts for a garland: Make the head ball very small — a marble-sized ball of scrunched tissue — and use a single sheet of tissue paper folded in quarters rather than a full sheet. The finished ghost is about five centimetres tall. Make twelve and string them on a length of thread through the tops of their heads. The garland connects directly to the crochet Halloween garland article [linked here] as a paper alternative for anyone who doesn’t crochet.
Coloured ghosts: Pale lavender, mint green or blush pink tissue paper for a softer, less traditional Halloween palette. White eyes and mouth cut from white paper rather than black. These suit a more pastel or minimal aesthetic and look particularly good in a child’s bedroom.
Glitter ghosts: Before shaping the head, lightly brush one sheet of tissue paper with diluted craft glue and sprinkle fine white or silver glitter over it. Let it dry completely before constructing the ghost. The finished ghost catches the light when it moves.
Ghost with arms: After tying the neck, cut two thin strips from a separate piece of tissue paper. Twist each strip gently into a loose tube shape. Tuck one end of each strip under the neck tie on either side of the ghost’s body, securing with a small dot of glue. The strips hang down from the sides like arms and can be shaped slightly outward for a reaching ghost gesture.
Tips for Making Them With Children
The head-making step is easier for children if you pre-scrunch the inner ball for them — getting the tissue paper smooth over a lumpy or irregular ball is frustrating for small hands. A smooth, round cotton wool ball gives a better result for young children than a scrunched paper one.
The face is the part children are most excited about. Give them the marker and let them do it themselves. Marina’s early ghost faces were considerably more expressive than mine — wide staring eyes, dramatic open mouths — and they were the better ghosts for it.
The neck tying step is the one that needs adult help for younger children. The knot needs to be tight and the paper needs to be held still while it’s tied, which requires two sets of hands.
From about age seven or eight most children can do the whole process themselves with minimal help once you’ve shown them the first one.
A Final Thought
Eleven ghosts sounds like a lot. It happened gradually — three for Marina’s doorway, two for the kitchen window, three for the living room display, three more because we had tissue paper left and it seemed wasteful not to.
They cost the price of a pack of tissue paper and an evening of half-attention while we watched something. They come out every October. They move when someone walks past them and that movement, that slight drift in the air, is the thing that makes them feel like actual ghosts rather than paper.
That’s the whole secret. Make enough of them that they have company. Hang them where the air moves. Let October do the rest.
That’s all I have for today. If you make these with your children and they name them — which children always do — I would love to hear the names in the comments. Marina’s are called things I can’t always explain and she has opinions about which ghost belongs in which room that I have learned not to argue with.
I’m Katerina Lithopoulou, co-creator of DIY Cozy Living. I’ve always loved the little things that make a space feel special. With a background in language and a passion for photography and cozy design, I enjoy turning everyday inspiration into simple ideas people can actually use.
My motto: “Cozy isn’t a trend — it’s a feeling.”
